crwdns2915892:0crwdne2915892:0
The hard drive can become faulty if you drop the laptop while it’s running, or if it’s placed under an excessive amount of stress. If the laptop doesn’t boot or indicates hard disk read errors, follow this guide to replace it.
The battery for this device is not easily accessible and cannot be easily removed. Before you begin your replacement, be sure to disconnect the laptop from any power source. Additionally, we recommend that you drain the battery completely before you begin this replacement.
crwdns2942213:0crwdne2942213:0
-
-
Unscrew the two 7mm Phillips #1 screws that hold the bottom back plate in its place.
-
-
-
Place your hands at the bottom of the cover and slide it towards you.
-
Lift the cover up to remove it.
-
-
-
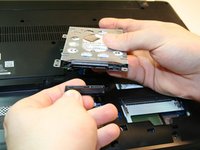
The hard drive is located at the bottom of the laptop.
-
-
-
-
Unscrew the four 6mm Phillips #1 screws that hold the hard drive frame in place.
-
-
-
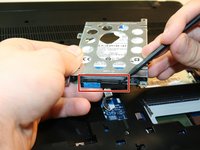
Gently pick up the hard drive without pulling it completely out.
-
-
-
Use the spudger to disconnect the hard drive from it motherboard connector.
-
-
-
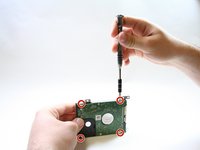
Remove the four 3mm Phillips #1 screws, two on each side, that secure the hard drive in its protective frame.
-
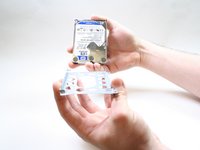
Lift the frame to separate it from the hard drive.
-


To reassemble your device, follow these instructions in reverse order.
crwdns2935221:0crwdne2935221:0
crwdns2935229:010crwdne2935229:0
crwdns2935287:0crwdne2935287:0

UC Davis, Team 1-3, Rodger Winter 2017 crwdns2935289:0UC Davis, Team 1-3, Rodger Winter 2017crwdne2935289:0
UCD-RODGER-W17S1G3
crwdns2931471:04crwdne2931471:0
crwdns2935297:06crwdne2935297:0
crwdns2947412:03crwdne2947412:0
Clear and easy - thanks!
Easy breezy.
Very good and to the point