crwdns2933423:0crwdne2933423:0

Lenovo IdeaPad 130-15AST Speaker Replacement

crwdns2942213:0crwdne2942213:0

  1. Lenovo IdeaPad 130-15AST Speaker Replacement, DVD/CD Optical Drive: crwdns2935265:01crwdnd2935265:01crwdnd2935265:01crwdne2935265:0
    • Verify that the DVD/CD Tray is free of DVD's and CD's.

    • Using a Phillips #00 screwdriver, remove one of the 6.0mm screws.

  2. Lenovo IdeaPad 130-15AST Speaker Replacement: crwdns2935265:02crwdnd2935265:01crwdnd2935265:02crwdne2935265:0 Lenovo IdeaPad 130-15AST Speaker Replacement: crwdns2935265:02crwdnd2935265:02crwdnd2935265:02crwdne2935265:0
    • Using the Jimmy Tool, gently pry the DVD/CD Drive away from the case of the laptop.

  3. Lenovo IdeaPad 130-15AST Speaker Replacement: crwdns2935265:03crwdnd2935265:01crwdnd2935265:01crwdne2935265:0
    • Gently slide the DVD/CD Drive out of the laptop.

  4. Lenovo IdeaPad 130-15AST Speaker Replacement, Battery: crwdns2935265:04crwdnd2935265:01crwdnd2935265:01crwdne2935265:0
    • Before proceeding, make sure the computer is turned off and it is not connected to any power source.

    • Using a Phillips #00 screwdriver, remove twelve of the 6.0mm screws.

  5. Lenovo IdeaPad 130-15AST Speaker Replacement: crwdns2935265:05crwdnd2935265:01crwdnd2935265:03crwdne2935265:0 Lenovo IdeaPad 130-15AST Speaker Replacement: crwdns2935265:05crwdnd2935265:02crwdnd2935265:03crwdne2935265:0 Lenovo IdeaPad 130-15AST Speaker Replacement: crwdns2935265:05crwdnd2935265:03crwdnd2935265:03crwdne2935265:0
    • Do not try to completely remove this case without ensuring the entire case is free of connection points as this could crack or damage the case.

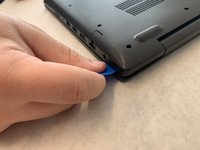
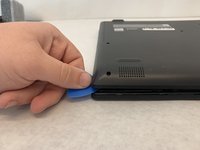
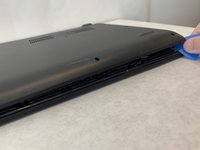
    • Use a thin, flat edge to gently break the seal of the case.

  6. Lenovo IdeaPad 130-15AST Speaker Replacement: crwdns2935265:06crwdnd2935265:01crwdnd2935265:02crwdne2935265:0 Lenovo IdeaPad 130-15AST Speaker Replacement: crwdns2935265:06crwdnd2935265:02crwdnd2935265:02crwdne2935265:0
    • Make sure that the back panel is completely free from the laptop.

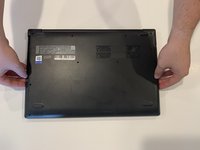
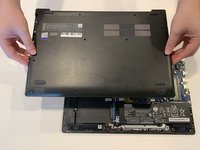
    • Grab the sides of the back panel of the laptop with two hands. Then separate the panel from the laptop by lifting up.

  7. Lenovo IdeaPad 130-15AST Speaker Replacement: crwdns2935265:07crwdnd2935265:01crwdnd2935265:01crwdne2935265:0
    • Using a Phillips #0 screwdriver, remove three 6.0mm screws.

  8. Lenovo IdeaPad 130-15AST Speaker Replacement: crwdns2935265:08crwdnd2935265:01crwdnd2935265:03crwdne2935265:0 Lenovo IdeaPad 130-15AST Speaker Replacement: crwdns2935265:08crwdnd2935265:02crwdnd2935265:03crwdne2935265:0 Lenovo IdeaPad 130-15AST Speaker Replacement: crwdns2935265:08crwdnd2935265:03crwdnd2935265:03crwdne2935265:0
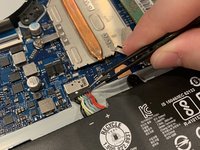
    • Using a pair of tweezers, remove the black plug which includes 8 wires.

  9. Lenovo IdeaPad 130-15AST Speaker Replacement: crwdns2935265:09crwdnd2935265:01crwdnd2935265:02crwdne2935265:0 Lenovo IdeaPad 130-15AST Speaker Replacement: crwdns2935265:09crwdnd2935265:02crwdnd2935265:02crwdne2935265:0
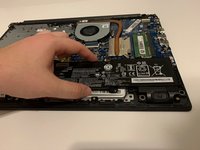
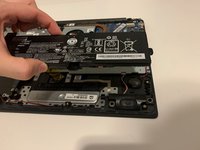
    • Grabbing the sides of the battery with one hand, remove the battery from the laptop.

  10. Lenovo IdeaPad 130-15AST Speaker Replacement, Speaker: crwdns2935265:010crwdnd2935265:01crwdnd2935265:01crwdne2935265:0
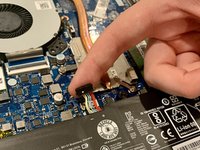
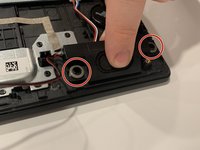
    • Using a prying tool, remove the white plug (which includes 4 different colored wires) from the motherboard. Repeat the same step for the other plug.

    • This plug is small and fragile. You should not use a lot of force to separate the plastic connection from the motherboard.

  11. Lenovo IdeaPad 130-15AST Speaker Replacement: crwdns2935265:011crwdnd2935265:01crwdnd2935265:01crwdne2935265:0
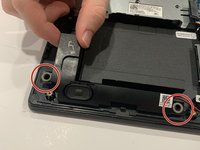
    • Disconnect the speaker wires from their connection tabs along the front of the computer.

    • These wires are not connected to anything internally. They connect the speakers from the power supply to each other.

  12. Lenovo IdeaPad 130-15AST Speaker Replacement: crwdns2935265:012crwdnd2935265:01crwdnd2935265:02crwdne2935265:0 Lenovo IdeaPad 130-15AST Speaker Replacement: crwdns2935265:012crwdnd2935265:02crwdnd2935265:02crwdne2935265:0
    • To remove the speakers, pinch the inside edge and lift upwards.

    • These speakers are help in by O-rings. Be sure not to lose these, as new speakers do not come with new O-rings.

crwdns2915888:0crwdne2915888:0

To reassemble your device, follow these instructions in reverse order.

Wesley Atteberry

crwdns2935283:009/22/19crwdne2935283:0

202 crwdns2915208:0crwdne2915208:0

crwdns2935295:0crwdne2935295:0

crwdns2915084:0crwdne2915084:0

Embry-Riddle Aeronautical University, Team S12-G3, Lamothe Fall 2019 crwdns2935289:0Embry-Riddle Aeronautical University, Team S12-G3, Lamothe Fall 2019crwdne2935289:0

ERAU-LAMOTHE-F19S12G3

crwdns2931471:04crwdne2931471:0

crwdns2935297:05crwdne2935297:0

crwdns2944067:00crwdne2944067:0

crwdns2917038:0crwdne2917038:0

crwdns2936625:0crwdne2936625:0:

crwdns2936751:024crwdne2936751:0 1

crwdns2936753:07crwdne2936753:0 3

crwdns2936753:030crwdne2936753:0 4

crwdns2942667:0crwdne2942667:0 926