crwdns2915892:0crwdne2915892:0
This guide will show how to replace the battery on the device. It walks through the process of removing the back, unscrewing the battery, and unplugging the batter from the device.
crwdns2942213:0crwdne2942213:0
-
-
Remove the thirteen 9 mm Phillips #1screws.
-
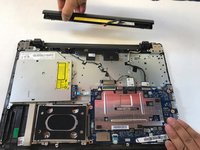
Pull out the DVD drive and unscrew the final 3 wide-head screws holding the back in place.
-
-
-
Gently pry the back off using a plastic opening tool, starting from one of the corners.
-
-
-
-
Remove the two 9 mm Phillips #1 screws holding the battery.
-
-
-
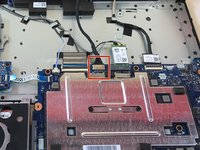
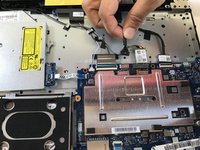
Disconnect the battery cable connector from mother board.
-
Remove battery from device.
-


To reassemble your device, follow these instructions in reverse order.
To reassemble your device, follow these instructions in reverse order.
crwdns2935221:0crwdne2935221:0
crwdns2935229:019crwdne2935229:0
crwdns2915084:0crwdne2915084:0

UW Tacoma, Team S3-G4, Liner Fall 2017 crwdns2935289:0UW Tacoma, Team S3-G4, Liner Fall 2017crwdne2935289:0
UWT-LINER-F17S3G4
crwdns2931471:04crwdne2931471:0
crwdns2935297:014crwdne2935297:0
crwdns2947412:023crwdne2947412:0
Informative except , you didn’t mention the three screws underneath the DVD drive. The DVD drive must be removed first before you can remove the 3 additional screws.
I agree Clare! I didn’t see those either! Very frustrating at first! Thanks for the lead Clare!
Just cannot see where theres 13 screws got 11 cant see anything under or near the Drive clare.
Easy to follow
I unscrew everything but to open it, it gets stuck in the middle….. i am afraid to pull hard…..