crwdns2933423:0crwdne2933423:0

Lenovo Essential G555-0873 CPU Replacement

crwdns2942213:0crwdne2942213:0

  1. Lenovo Essential G555-0873 CPU Replacement, Bottom Panel: crwdns2935265:01crwdnd2935265:01crwdnd2935265:01crwdne2935265:0
    • Unscrew the two 5.1 mm screws that secure the bottom cover.

    • Note that the screws will not come all the way out of the sockets.

  2. Lenovo Essential G555-0873 CPU Replacement: crwdns2935265:02crwdnd2935265:01crwdnd2935265:01crwdne2935265:0
    • Lift from the notch until the back panel comes up.

  3. Lenovo Essential G555-0873 CPU Replacement, Fan: crwdns2935265:03crwdnd2935265:01crwdnd2935265:01crwdne2935265:0
    • Disconnect the fan from the motherboard by pulling the plug shown in the picture.

  4. Lenovo Essential G555-0873 CPU Replacement: crwdns2935265:04crwdnd2935265:01crwdnd2935265:01crwdne2935265:0
    • Unscrew the three 4.6mm screws shown in the picture.

  5. Lenovo Essential G555-0873 CPU Replacement: crwdns2935265:05crwdnd2935265:01crwdnd2935265:01crwdne2935265:0
    • Gently lift the fan straight up until it is lifted out of the case.

  6. Lenovo Essential G555-0873 CPU Replacement, Heat Sink: crwdns2935265:06crwdnd2935265:01crwdnd2935265:01crwdne2935265:0
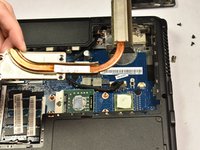
    • Unscrew the four 7.3 mm screws shown in the picture.

    • Note that springs are attached to the screws. Do not remove the springs.

  7. Lenovo Essential G555-0873 CPU Replacement: crwdns2935265:07crwdnd2935265:01crwdnd2935265:02crwdne2935265:0 Lenovo Essential G555-0873 CPU Replacement: crwdns2935265:07crwdnd2935265:02crwdnd2935265:02crwdne2935265:0
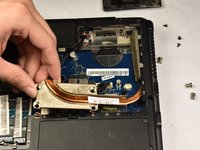
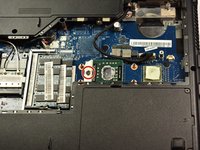
    • Pull the heat sink assembly out of the laptop.

  8. Lenovo Essential G555-0873 CPU Replacement, CPU: crwdns2935265:08crwdnd2935265:01crwdnd2935265:02crwdne2935265:0 Lenovo Essential G555-0873 CPU Replacement, CPU: crwdns2935265:08crwdnd2935265:02crwdnd2935265:02crwdne2935265:0
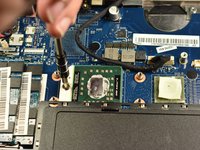
    • Use a flat-head screwdriver on the hinge shown, and turn counter-clockwise to the unlock position

  9. Lenovo Essential G555-0873 CPU Replacement: crwdns2935265:09crwdnd2935265:01crwdnd2935265:01crwdne2935265:0
    • Remove the CPU

    • There will be old thermal paste on the CPU and heat sink which should be wiped off using microfiber cloth.

    • Before putting the heat sink back in, a small droplet of thermal paste should be applied onto the center of the CPU.

crwdns2915888:0crwdne2915888:0

To reassemble your device, follow these instructions in reverse order.

Michael Elledge

crwdns2935283:002/05/19crwdne2935283:0

869 crwdns2915208:0crwdne2915208:0

crwdns2935297:07crwdne2935297:0

crwdns2915084:0crwdne2915084:0

Appalachian State University, Team S2-G6, Menagarishvili Spring 2019 crwdns2935289:0Appalachian State University, Team S2-G6, Menagarishvili Spring 2019crwdne2935289:0

APSU-MENAGARISHVILI-S19S2G6

crwdns2931471:03crwdne2931471:0

crwdns2935297:07crwdne2935297:0

crwdns2944067:00crwdne2944067:0

crwdns2917038:0crwdne2917038:0

crwdns2936625:0crwdne2936625:0:

crwdns2936751:024crwdne2936751:0 0

crwdns2936753:07crwdne2936753:0 1

crwdns2936753:030crwdne2936753:0 2

crwdns2942667:0crwdne2942667:0 377