crwdns2933423:0crwdne2933423:0

LG Optimus T Screen Replacement

crwdns2942213:0crwdne2942213:0

  1. LG Optimus T Screen Replacement, Screen: crwdns2935265:01crwdnd2935265:01crwdnd2935265:03crwdne2935265:0 LG Optimus T Screen Replacement, Screen: crwdns2935265:01crwdnd2935265:02crwdnd2935265:03crwdne2935265:0 LG Optimus T Screen Replacement, Screen: crwdns2935265:01crwdnd2935265:03crwdnd2935265:03crwdne2935265:0
    • Working on your device while it is turned on may result in electric shock. Make sure to shut down and unplug your device before you begin.

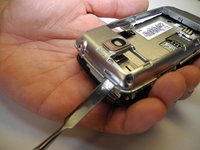
    • Using the plastic opening tool to remove the phone’s back cover. At the top of the phone, there’s an indentation to put the tool into to pop the case off.

  2. LG Optimus T Screen Replacement: crwdns2935265:02crwdnd2935265:01crwdnd2935265:01crwdne2935265:0
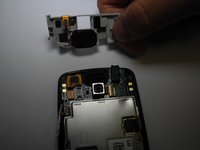
    • Remove the battery. There’s an indentation to the left of the camera lens.

  3. LG Optimus T Screen Replacement: crwdns2935265:03crwdnd2935265:01crwdnd2935265:01crwdne2935265:0
    • Remove the six (6), J0 Phillip's head, 4.5mm screws.

    • Be sure to retain all screws for reassembly.

  4. LG Optimus T Screen Replacement: crwdns2935265:04crwdnd2935265:01crwdnd2935265:02crwdne2935265:0 LG Optimus T Screen Replacement: crwdns2935265:04crwdnd2935265:02crwdnd2935265:02crwdne2935265:0
    • Remove interior case. There are indentations on the top and bottom of the phone. Using a spudger, remove the interior case.

    • You might have difficulty popping the interior case off, and a more durable prying device may be needed.

  5. LG Optimus T Screen Replacement: crwdns2935265:05crwdnd2935265:01crwdnd2935265:01crwdne2935265:0
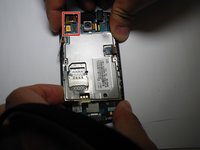
    • Pull up connector tab

    • Connector tabs may be difficult to remove, and tweezers may be required to assist removal.

  6. LG Optimus T Screen Replacement: crwdns2935265:06crwdnd2935265:01crwdnd2935265:02crwdne2935265:0 LG Optimus T Screen Replacement: crwdns2935265:06crwdnd2935265:02crwdnd2935265:02crwdne2935265:0
    • Remove SD card mount. Use a plastic opening tool to assist removal.

  7. LG Optimus T Screen Replacement: crwdns2935265:07crwdnd2935265:01crwdnd2935265:01crwdne2935265:0
    • Use a J0 screwdriver to remove two 1.8mm screws from the charging port.

    • Charging port and motherboard are connected.

    • Be sure to retain all screws for reassembly.

  8. LG Optimus T Screen Replacement: crwdns2935265:08crwdnd2935265:01crwdnd2935265:02crwdne2935265:0 LG Optimus T Screen Replacement: crwdns2935265:08crwdnd2935265:02crwdnd2935265:02crwdne2935265:0
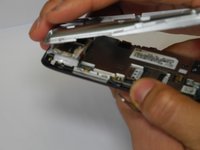
    • Remove connector tab. Then remove the motherboard.

    • Connector tabs may be difficult to remove, and tweezers may be required to assist removal.

  9. LG Optimus T Screen Replacement: crwdns2935265:09crwdnd2935265:01crwdnd2935265:02crwdne2935265:0 LG Optimus T Screen Replacement: crwdns2935265:09crwdnd2935265:02crwdnd2935265:02crwdne2935265:0
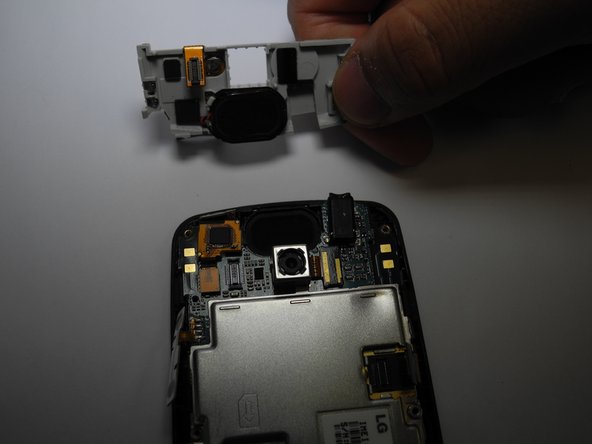
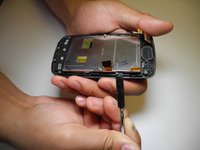
    • Using a spudger, gently pry off the metal panel on the back of the screen attached by 4 retaining points.

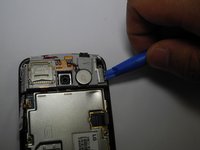
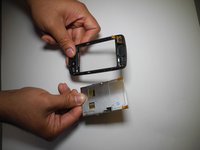
    • Remove the screen from the front of your device.

crwdns2915888:0crwdne2915888:0

To reassemble your device, follow these instructions in reverse order.

Edward Farris

crwdns2935283:002/07/17crwdne2935283:0

112 crwdns2915208:0crwdne2915208:0

crwdns2935295:0crwdne2935295:0

crwdns2915084:0crwdne2915084:0

Ohio State, Team 1-3, Wilder Spring 2017 crwdns2935289:0Ohio State, Team 1-3, Wilder Spring 2017crwdne2935289:0

OSU-WILDER-S17S1G3

crwdns2931471:04crwdne2931471:0

crwdns2935297:05crwdne2935297:0

crwdns2944067:00crwdne2944067:0

crwdns2917038:0crwdne2917038:0

crwdns2936625:0crwdne2936625:0:

crwdns2936751:024crwdne2936751:0 0

crwdns2936753:07crwdne2936753:0 0

crwdns2936753:030crwdne2936753:0 1

crwdns2942667:0crwdne2942667:0 165