crwdns2933423:0crwdne2933423:0

LG K20 PLUS Motherboard Removal

crwdns2942213:0crwdne2942213:0

  1. LG K20 PLUS Motherboard Removal, Remove the back cover and battery: crwdns2935265:01crwdnd2935265:01crwdnd2935265:02crwdne2935265:0 LG K20 PLUS Motherboard Removal, Remove the back cover and battery: crwdns2935265:01crwdnd2935265:02crwdnd2935265:02crwdne2935265:0
    • Remove the back cover by inserting a fingernail or opening pick here and disengaging the plastic clips.

    • Lift battery up here

  2. crwdns2944590:02crwdnd2944590:03crwdnd2944590:0crwdnd2944590:0crwdne2944590:0

    LG K20 PLUS Motherboard Removal, Midframe: crwdns2935265:02crwdnd2935265:01crwdnd2935265:01crwdne2935265:0
    • Remove 11 Philips screws.

  3. LG K20 PLUS Motherboard Removal: crwdns2935265:03crwdnd2935265:01crwdnd2935265:02crwdne2935265:0 LG K20 PLUS Motherboard Removal: crwdns2935265:03crwdnd2935265:02crwdnd2935265:02crwdne2935265:0
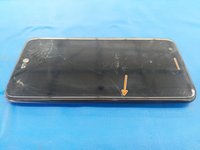
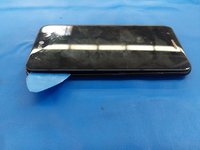
    • Use fingernails or insert an opening pick into the gap between the digitizer and the midframe and pull the midframe outwards to disengage the plastic clips.

    • Carefully disengage the clips on the bottom as the headphone jack goes through the midframe.

    • Once all the clips have been disengaged, move the midframe outwards and downwards to disengage it from the headphone jack.

  4. LG K20 PLUS Motherboard Removal, Rear-Facing Camera: crwdns2935265:04crwdnd2935265:01crwdnd2935265:01crwdne2935265:0
    • Use a Halberd spudger or an opening pick to disconnect the front camera flex from its connector on the motherboard.

  5. LG K20 PLUS Motherboard Removal, Motherboard Removal: crwdns2935265:05crwdnd2935265:01crwdnd2935265:01crwdne2935265:0
    • Using the tip of a Halberd spudger or an opening pick, disconnect the display flex cable from its socket on the motherboard.

    • Starting from the bottom, insert an opening pick between the motherboard and frame and lever apart.

    • Be careful not to break the long section of the motherboard.

    • The top part of the motherboard is lightly adhered to the frame.

    • After the motherboard is removed, compare the original and replacement part. Some components may already be installed on the replacement display assembly.

crwdns2915888:0crwdne2915888:0

To reassemble your device, follow these instructions in reverse order.

crwdns2935229:03crwdne2935229:0

Patrick

crwdns2935283:005/14/14crwdne2935283:0

6,577 crwdns2915208:0crwdne2915208:0

crwdns2935297:021crwdne2935297:0

crwdns2944067:00crwdne2944067:0

crwdns2917038:0crwdne2917038:0

crwdns2936625:0crwdne2936625:0:

crwdns2936751:024crwdne2936751:0 0

crwdns2936753:07crwdne2936753:0 6

crwdns2936753:030crwdne2936753:0 10

crwdns2942667:0crwdne2942667:0 683