crwdns2915892:0crwdne2915892:0
If your LG G8 ThinQ is having trouble holding a charge or staying turned on, use this guide to replace the battery. The battery is the main source of life for the device, and therefore can cause several issues if damaged. Refer to the troubleshooting page to decide if this is the repair you need.
Before disassembling your device, discharge the battery below 25%.
Swollen batteries can be very dangerous, so wear eye protection and exercise caution.
This phone uses a strong adhesive on the battery and back panel; iFixit’s adhesive remover or high concentration (90% or higher) of isopropyl alcohol can be used to make the process easier.
Adhesive can be replaced to closer replicate factory fit and finish.
crwdns2942213:0crwdne2942213:0
-
-
Unplug and power off your phone before you begin.
-
Insert the SIM card eject tool into the pinhole in the lower right side of the phone.
-
Remove the SIM card and tray.
-
-
-
Place the phone so that the screen is facing down.
-
Insert opening cards between the back panel and frame of the phone to loosen the clips and adhesive.
-
Using equal pressure, carefully pry the back panel away from the phone.
-
Once enough space has been created, use an opening tool to completely separate the back panel from the phone.
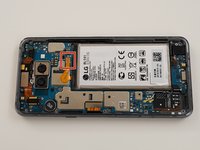
This is where I started to ponder for the first time because my camera looks different.
I also have a LG G8 ThinQ but maybe the european version
-
-
-
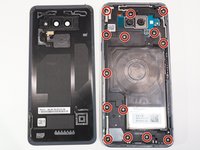
Remove all 14 screws from the midframe using a Phillips #000 screwdriver.
-
Work an opening tool around the perimeter of the midframe to pry and remove it from the phone.
and here it is true, the screws are in a different place. The sound system on the bottom is also different
-
-
-
-
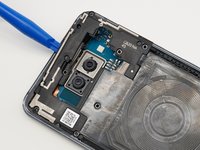
Using an opening tool, carefully pry out remove the speaker system from the phone.
-
-
-
Flip phone so that screen is facing up.
-
Using a heating pad, hairdryer, or heat gun, apply heat to loosen the adhesive beneath the battery.
-
-
-
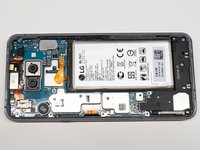
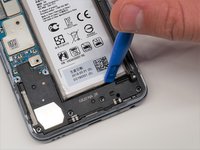
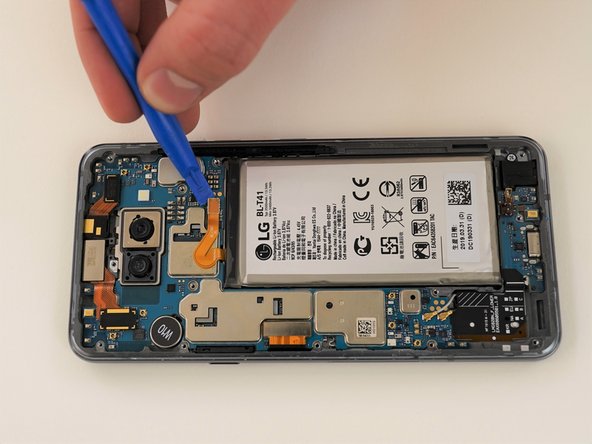
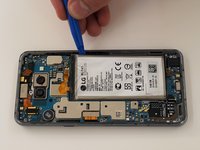
Using an opening tool, carefully pry up the ribbon cable to disconnect the battery.
-
-
-
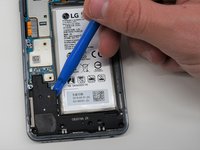
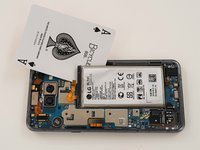
Using opening cards or an opening tool, carefully pry around the edges of the battery.
-
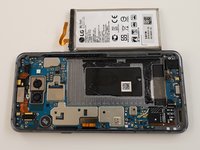
Remove the battery from the phone.
Although it is a different phone, the instructions were helpful.
Unfortunately, my battery exchange was pointless.
I think my USB socket is defective and unfortunately I can't find any instructions for it at the moment.
But if anybody want, i can send a few pics from the repairing
-


To reassemble your device, follow these instructions in reverse order.
To reassemble your device, follow these instructions in reverse order.
crwdns2935221:0crwdne2935221:0
crwdns2935229:06crwdne2935229:0
crwdns2915084:0crwdne2915084:0

Western Carolina University, Team 1-4, Virtue Fall 2021 crwdns2935289:0Western Carolina University, Team 1-4, Virtue Fall 2021crwdne2935289:0
WCU-VIRTUE-F21S1G4
crwdns2931471:04crwdne2931471:0
crwdns2935297:05crwdne2935297:0
crwdns2947412:06crwdne2947412:0
You don't use any heat to remove the back glass panel? Just suction cup and prying?
Yep need heat to remove the back. Glass shattered on mine. Ifixit needs to fix this guide.
Success! I documented the process using ifixit tools on https://waynedavis.com
thanks for your tutorial man it helped me a lot
Very helpful tutorials guys. Im in need of replacing my battery in my g8. 2 questions. Do you need to remove the speaker component at the bottom left in order to replace the battery? Some videos i watched they didnt remove it. 2nd question is how to i get the back cover back on after replacing the battery? Is there a specific adhesive i can get?
This is basically exactly the same process to open the LG G7 ThinQ. Right: on the first time ever, use some source of heat or a hairdryer to soften the glue on the back. I have a few "ice/heat gel packs" and I heat on the microware. Put it 20-30 seconds interval (up to 2 minutes) to get a good amount of heat. Massage/squish the pack to mix the gel. Helps tremendously.
When a corner lifts, things get a lot easier - keep adding cards/guitar picks.
Now the battery itself is a major pita to get it loose. I'd recommend isopropyl alcohol as the guide mentions.
You can also use an old credit cart beveling an edge to try to pry the battery. Be patient.
I usually don't put glue back to hold the battery as the remainder of the old glue is enough. Have done it 3 times for my daughter's phone.
A little amount of glue with the kit, would be nice but since it stays in its case, the remainder of glue is also usually enough to keeps things close... no more waterproof seal though.