crwdns2915892:0crwdne2915892:0
Use this guide to replace the display assembly on your LG G3 Vigor.
crwdns2942213:0crwdne2942213:0
-
-
Locate the notch on the bottom right of the phone.
-
-
-
Gently pull the cover on the back of the phone off to locate the battery.
-
-
-
Remove the battery by lifting from the slot at the bottom of the battery.
-
-
-
Remove the twelve Phillips #00 screws securing the midframe to the rest of the phone.
-
-
-
Work a plastic opening tool around the perimeter of the phone to separate the midframe from the rest of the phone.
-
-
-
-
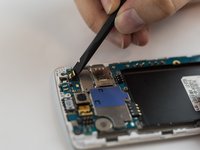
Use the spudger to gently unplug the ribbon cable connected to the motherboard. Then remove the rear facing camera.
-
-
-
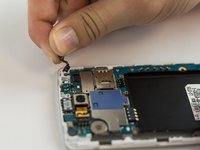
Use the spudger to gently unplug the ribbon cable connected to the motherboard.
-
Remove the front camera.
-
-
-
Use the flat edge of a spudger to disconnect the motherboard ribbon connector.
-
-
-
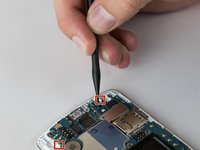
Use the pointed end of a spudger to push back the two motherboard retaining flaps.
-
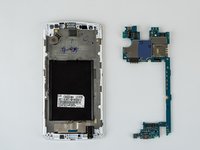
The motherboard should now be able to be lifted out of the device.
-
-
-
Use a spudger to remove the vibration motor.
-
-
-
Remove the earpiece speaker with the metal spudger by prying it out.
-
-
-
Remove the headphone jack by inserting the spudger into the jack and pulling it up and out.
-
-
crwdns2935267:0crwdne2935267:0Tweezers$4.99
-
Using tweezers peel back the glued down ribbon cable at the bottom of the phone.
-
-
-
Using a heat gun or the iFixit iOpener tool heat up the edges of the devices screen.
-
After a few minutes heating up the edges of the screen use a metal spudger tool or any other flat tool to dig under the edge of the screen.
-
Once under the edge of the screen work your way around the entire perimeter of the screen and pull the screen off.
-
-
-
Once the screen has come off pull the ribbon cables through the hole and remove the screen completely.
-


To reassemble your device, follow these instructions in reverse order.
To reassemble your device, follow these instructions in reverse order.
crwdns2935221:0crwdne2935221:0
crwdns2935229:06crwdne2935229:0
crwdns2915084:0crwdne2915084:0

USF Tampa, Team 12-5, Eyestone Spring 2016 crwdns2935289:0USF Tampa, Team 12-5, Eyestone Spring 2016crwdne2935289:0
USFT-EYESTONE-S16S12G5
crwdns2931471:04crwdne2931471:0
crwdns2935297:05crwdne2935297:0
crwdns2947412:02crwdne2947412:0
i tried to replace the glass, the phone is now stuck at boot screen. the os would load occasionally before. possible battery/water problem. are there any hardware issue that would cause the boot screen (blinking red light)
Would anyone know a place to source the glass/lcd assembly. Mucho thanks!