crwdns2933423:0crwdne2933423:0
crwdns2947577:0crwdnd2947577:0crwdne2947577:0

LG Ally VS740 Screen Replacement

crwdns2942213:0crwdne2942213:0

    1. LG Ally VS740 Screen Replacement, Screen Replacement: crwdns2935265:01crwdnd2935265:01crwdnd2935265:01crwdne2935265:0
      • Remove Battery

      • Remove all 6 screws that are on the outer edge of phone

      crwdns2952109:0crwdne2952109:0

      crwdns2917038:0crwdne2917038:0

    2. LG Ally VS740 Screen Replacement: crwdns2935265:02crwdnd2935265:01crwdnd2935265:02crwdne2935265:0 LG Ally VS740 Screen Replacement: crwdns2935265:02crwdnd2935265:02crwdnd2935265:02crwdne2935265:0
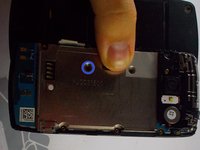
      • Remove backcasing connected to the rest of the phone.

      • Remove the phillip screw from the small white box on the top left corner that’s on the battery platform of the phone.

      crwdns2952109:0crwdne2952109:0

      crwdns2917038:0crwdne2917038:0

    3. LG Ally VS740 Screen Replacement: crwdns2935265:03crwdnd2935265:01crwdnd2935265:02crwdne2935265:0 LG Ally VS740 Screen Replacement: crwdns2935265:03crwdnd2935265:02crwdnd2935265:02crwdne2935265:0
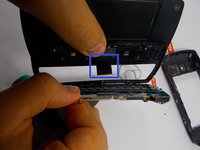
      • Remove phone sticker and remove screw under the sticker. Now you can remove the motherboard. Be careful with the tether still connected to it.

      • Remove tether.

      crwdns2952109:0crwdne2952109:0

      crwdns2917038:0crwdne2917038:0

    4. LG Ally VS740 Screen Replacement: crwdns2935265:04crwdnd2935265:01crwdnd2935265:01crwdne2935265:0
      • Remove the keyboard, and the rubber caps behind the phone.

      • To the right hand side of where the keyboard was, remove the four screws shown.

      crwdns2952109:0crwdne2952109:0

      crwdns2917038:0crwdne2917038:0

    5. LG Ally VS740 Screen Replacement: crwdns2935265:05crwdnd2935265:01crwdnd2935265:01crwdne2935265:0
      • Release clips with prying tool and take off the next layer of the phone.

      crwdns2952109:0crwdne2952109:0

      crwdns2917038:0crwdne2917038:0

      • Release the pop-connectors, and the flex cable at the top by the speaker.

      • . Now you can easily remove the yellow cabling on the phone.

      crwdns2952109:0crwdne2952109:0

      crwdns2917038:0crwdne2917038:0

      • Release jaw connector. Now remove LCD screen. You can now replace the screen.

      crwdns2952109:0crwdne2952109:0

      crwdns2917038:0crwdne2917038:0

crwdns2915888:0crwdne2915888:0

To reassemble your device, follow these instructions in reverse order.

crwdns2935221:0crwdne2935221:0

crwdns2935229:05crwdne2935229:0

Billy Carias

crwdns2935283:010/23/14crwdne2935283:0

219 crwdns2915208:0crwdne2915208:0

crwdns2935297:02crwdne2935297:0

crwdns2935287:0crwdne2935287:0

UMass Dartmouth, Team 5-6, Vijaybhaskar Fall 2014 crwdns2935289:0UMass Dartmouth, Team 5-6, Vijaybhaskar Fall 2014crwdne2935289:0

UMASSD-VIJAYBHASKAR-F14S5G6

crwdns2931471:03crwdne2931471:0

crwdns2935297:048crwdne2935297:0

crwdns2947412:00crwdne2947412:0

crwdns2917038:0crwdne2917038:0

crwdns2936625:0crwdne2936625:0:

crwdns2936751:024crwdne2936751:0 2

crwdns2936753:07crwdne2936753:0 8

crwdns2936753:030crwdne2936753:0 47

crwdns2942667:0crwdne2942667:0 1,298