crwdns2933423:0crwdne2933423:0

LCD screen Replacement

crwdns2942213:0crwdne2942213:0

  1. LCD screen Replacement, Battery: crwdns2935265:01crwdnd2935265:01crwdnd2935265:03crwdne2935265:0 LCD screen Replacement, Battery: crwdns2935265:01crwdnd2935265:02crwdnd2935265:03crwdne2935265:0 LCD screen Replacement, Battery: crwdns2935265:01crwdnd2935265:03crwdnd2935265:03crwdne2935265:0
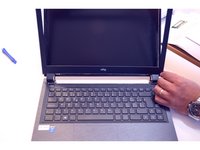
    • Unlock the battery latch on the right.

    • Unlock the battery lock on the left.

    • Remove the battery pack from its slot.

  2. LCD screen Replacement, LCD screen: crwdns2935265:02crwdnd2935265:01crwdnd2935265:03crwdne2935265:0 LCD screen Replacement, LCD screen: crwdns2935265:02crwdnd2935265:02crwdnd2935265:03crwdne2935265:0 LCD screen Replacement, LCD screen: crwdns2935265:02crwdnd2935265:03crwdnd2935265:03crwdne2935265:0
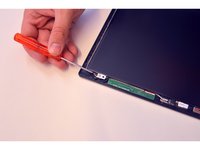
    • Gently insert the fingernail between the screen frame and the screen glass.

    • De-clipping one by one the fixing points of the frame surrounding the LCD screen

  3. LCD screen Replacement: crwdns2935265:03crwdnd2935265:01crwdnd2935265:03crwdne2935265:0 LCD screen Replacement: crwdns2935265:03crwdnd2935265:02crwdnd2935265:03crwdne2935265:0 LCD screen Replacement: crwdns2935265:03crwdnd2935265:03crwdnd2935265:03crwdne2935265:0
    • Completely detach the frame surrounding the LCD screen.

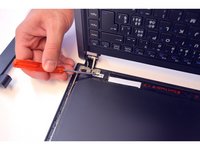
    • Mark the 2 upper fixing screws of the LCD screen. Unscrew them.

    • Mark the two lower fixing screws on the LCD screen. Unscrew them.

  4. LCD screen Replacement: crwdns2935265:04crwdnd2935265:01crwdnd2935265:03crwdne2935265:0 LCD screen Replacement: crwdns2935265:04crwdnd2935265:02crwdnd2935265:03crwdne2935265:0 LCD screen Replacement: crwdns2935265:04crwdnd2935265:03crwdnd2935265:03crwdne2935265:0
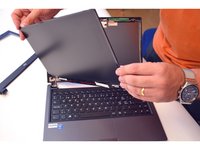
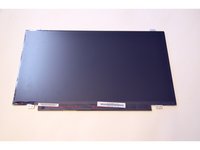
    • Gently lay the LCD screen on the keyboard.

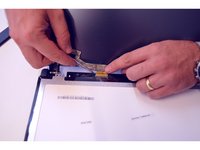
    • Locate the connector on the LCD screen

    • Release the connection cable.

  5. LCD screen Replacement: crwdns2935265:05crwdnd2935265:01crwdnd2935265:02crwdne2935265:0 LCD screen Replacement: crwdns2935265:05crwdnd2935265:02crwdnd2935265:02crwdne2935265:0
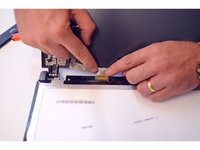
    • Remove the connector.

    • Once the connector is removed, completely remove the LCD screen.

crwdns2915888:0crwdne2915888:0

To reassemble your device follow the following instructions in reverse order

crwdns2934873:0crwdne2934873:0

fr en

100%

crwdns2934883:0irlandacrwdne2934883:0 crwdns2934875:0crwdne2934875:0
crwdns2934877:0crwdne2934877:0 ›

Felice Suglia

crwdns2935283:006/15/13crwdne2935283:0

31,564 crwdns2915208:0crwdne2915208:0

crwdns2935297:0264crwdne2935297:0

crwdns2947410:01crwdne2947410:0

I have a ultragear 32gn650-b (31.5" ) and a ultragear 32gn550 (28") . finding replacement screens on these is a b####, and for the right price.

bruhissusin1987 - crwdns2934203:0crwdne2934203:0

crwdns2917038:0crwdne2917038:0

crwdns2936625:0crwdne2936625:0:

crwdns2936751:024crwdne2936751:0 2

crwdns2936753:07crwdne2936753:0 18

crwdns2936753:030crwdne2936753:0 45

crwdns2942667:0crwdne2942667:0 5,117