crwdns2933423:0crwdne2933423:0

KitchenAid Professional 600 Drive Motor Replacement

crwdns2942213:0crwdne2942213:0

  1. KitchenAid Professional 600 Drive Motor Replacement, Top Cover: crwdns2935265:01crwdnd2935265:01crwdnd2935265:01crwdne2935265:0
    • Take out the screw which holds on the silver band using a Phillips #2 screwdriver.

    • Remove the silver band.

  2. KitchenAid Professional 600 Drive Motor Replacement: crwdns2935265:02crwdnd2935265:01crwdnd2935265:01crwdne2935265:0
    • Remove the four Phillips #2 screws located around the mixer where the band was removed.

    • This picture only shows two of the screw that you need to remove. The other two are on the exact opposite side of the mixer.

  3. KitchenAid Professional 600 Drive Motor Replacement: crwdns2935265:03crwdnd2935265:01crwdnd2935265:01crwdne2935265:0
    • Remove the top of the mixer to reveal the inner parts.

    • The top should lift off, but may not if it is stuck. A sharp strike from the back with the hand may unstick it. It will slide forward about a 3/8 of an inch. Push it back again from the front and it should be free enough to lift.

  4. KitchenAid Professional 600 Drive Motor Replacement, Speed Selector: crwdns2935265:04crwdnd2935265:01crwdnd2935265:01crwdne2935265:0
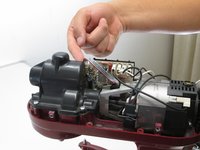
    • Locate the selector switch.

    • Remove the two Phillips #2 screws holding the selector switch in place.

  5. KitchenAid Professional 600 Drive Motor Replacement: crwdns2935265:05crwdnd2935265:01crwdnd2935265:03crwdne2935265:0 KitchenAid Professional 600 Drive Motor Replacement: crwdns2935265:05crwdnd2935265:02crwdnd2935265:03crwdne2935265:0 KitchenAid Professional 600 Drive Motor Replacement: crwdns2935265:05crwdnd2935265:03crwdnd2935265:03crwdne2935265:0
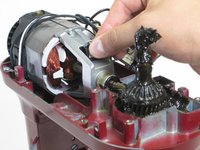
    • Unplug the cords attached the drive motor to the switch.

    • We suggest numbering them left from right so they are reattached to the replacement part in the right order.

  6. KitchenAid Professional 600 Drive Motor Replacement: crwdns2935265:06crwdnd2935265:01crwdnd2935265:01crwdne2935265:0
    • Pull out the Selector Switch.

  7. KitchenAid Professional 600 Drive Motor Replacement, Drive Motor: crwdns2935265:07crwdnd2935265:01crwdnd2935265:01crwdne2935265:0
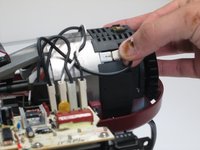
    • Remove the two Phillips #2 screws holding the motor in place, located near the fan at the back of the motor.

    • The picture only shows one of the screws. The other screw is located on the exact opposite side of the motor.

  8. KitchenAid Professional 600 Drive Motor Replacement: crwdns2935265:08crwdnd2935265:01crwdnd2935265:01crwdne2935265:0
    • Pull upward to remove the motor.

crwdns2915888:0crwdne2915888:0

To reassemble your device, follow these instructions in reverse order.

crwdns2935229:02crwdne2935229:0

Tallon Dotinga

crwdns2935283:004/11/16crwdne2935283:0

487 crwdns2915208:0crwdne2915208:0

crwdns2935297:02crwdne2935297:0

crwdns2915084:0crwdne2915084:0

Cal Poly, Team 25-4, Maness Spring 2016 crwdns2935289:0Cal Poly, Team 25-4, Maness Spring 2016crwdne2935289:0

CPSU-MANESS-S16S25G4

crwdns2931471:04crwdne2931471:0

crwdns2935297:018crwdne2935297:0

crwdns2944067:03crwdne2944067:0

anyone know where I can get the hall effect sensor receiver that is on the motor shaft? Somehow it's missing?

Barclay Berger - crwdns2934203:0crwdne2934203:0

is there not a fusible link in series with the drive motor?

wa1shm - crwdns2934203:0crwdne2934203:0

I accidentally pluged my 110v mixer to 220v. Now, what are the possible parts that i need to change? How can i check if the motor is busted?

hyalmar planta - crwdns2934203:0crwdne2934203:0

crwdns2917038:0crwdne2917038:0

crwdns2936625:0crwdne2936625:0:

crwdns2936751:024crwdne2936751:0 5

crwdns2936753:07crwdne2936753:0 37

crwdns2936753:030crwdne2936753:0 184

crwdns2942667:0crwdne2942667:0 12,017