crwdns2933423:0crwdne2933423:0

KitchenAid Professional 600 Bevel Gear Replacement

crwdns2942213:0crwdne2942213:0

  1. KitchenAid Professional 600 Bevel Gear Replacement, Top Cover: crwdns2935265:01crwdnd2935265:01crwdnd2935265:01crwdne2935265:0
    • Take out the screw which holds on the silver band using a Phillips #2 screwdriver.

    • Remove the silver band.

  2. KitchenAid Professional 600 Bevel Gear Replacement: crwdns2935265:02crwdnd2935265:01crwdnd2935265:01crwdne2935265:0
    • Remove the four Phillips #2 screws located around the mixer where the band was removed.

    • This picture only shows two of the screw that you need to remove. The other two are on the exact opposite side of the mixer.

  3. KitchenAid Professional 600 Bevel Gear Replacement: crwdns2935265:03crwdnd2935265:01crwdnd2935265:01crwdne2935265:0
    • Remove the top of the mixer to reveal the inner parts.

    • The top should lift off, but may not if it is stuck. A sharp strike from the back with the hand may unstick it. It will slide forward about a 3/8 of an inch. Push it back again from the front and it should be free enough to lift.

  4. KitchenAid Professional 600 Bevel Gear Replacement, Gear Housing Cover: crwdns2935265:04crwdnd2935265:01crwdnd2935265:01crwdne2935265:0
    • Remove the 4 Phillips #2 screws connecting the black housing cover to the device.

    • Only one of the screws is seen in the picture. The other three are also located around the black housing cover.

  5. KitchenAid Professional 600 Bevel Gear Replacement: crwdns2935265:05crwdnd2935265:01crwdnd2935265:01crwdne2935265:0
    • Take off the black housing cover.

  6. KitchenAid Professional 600 Bevel Gear Replacement, Bevel Gear: crwdns2935265:06crwdnd2935265:01crwdnd2935265:03crwdne2935265:0 KitchenAid Professional 600 Bevel Gear Replacement, Bevel Gear: crwdns2935265:06crwdnd2935265:02crwdnd2935265:03crwdne2935265:0 KitchenAid Professional 600 Bevel Gear Replacement, Bevel Gear: crwdns2935265:06crwdnd2935265:03crwdnd2935265:03crwdne2935265:0
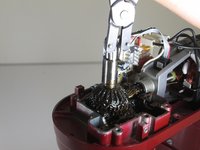
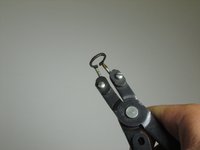
    • To remove the Bevel Gear, remove the snap ring wrapped around the base of the gear using Snap Ring pliers.

  7. KitchenAid Professional 600 Bevel Gear Replacement: crwdns2935265:07crwdnd2935265:01crwdnd2935265:01crwdne2935265:0
    • Slide the Bevel Gear off.

    • Remember to apply food safe grease onto your new replacement part before assembling the device back together.

crwdns2915888:0crwdne2915888:0

To reassemble your device, follow these instructions in reverse order.

crwdns2935229:09crwdne2935229:0

Luke

crwdns2935283:004/11/16crwdne2935283:0

1,353 crwdns2915208:0crwdne2915208:0

crwdns2935297:05crwdne2935297:0

crwdns2915084:0crwdne2915084:0

Cal Poly, Team 25-4, Maness Spring 2016 crwdns2935289:0Cal Poly, Team 25-4, Maness Spring 2016crwdne2935289:0

CPSU-MANESS-S16S25G4

crwdns2931471:04crwdne2931471:0

crwdns2935297:018crwdne2935297:0

crwdns2944067:014crwdne2944067:0

I was thinking , - my god what a excelent tec. contribution material before watched your naked hands whit a lot of greasy spots

Oscar Alfonso Lizaola Royval - crwdns2934203:0crwdne2934203:0

I’m from Ensenada Baja California “mother land of the internatiomal score baja off-road races“ and here we have a Doctor Simi drugstore’s where you can buy a pair of natural latex gloves whit or whitout powder s - m - l for less than one u.s. dollar. I buy gloves in monday’s because i pay 10 mexican pesos for it. “The little details son los que la cagan “

Oscar Alfonso Lizaola Royval - crwdns2934203:0crwdne2934203:0

Need to know if after removing this bevel gear, does that allow the gear below it to be removed also? Because this is the one I need to replace.

Thanks

Richard Lee Watson - crwdns2934203:0crwdne2934203:0

Once the Bevel Gear is removed you will see a pin that can be pushed out with a punch or small screw driver. That allows to you to remove the Worm Follower Gear. Keep you hand under the machine as the whole shaft can slide down. It’s pretty straight forward.

Steve Nasralla -

I removed the snap ring but my bevel gear is locked and I cannot remove it. I suspect the pin located below it is broken. Any suggestion? What can I do to replace both bevel and worm gears?

scoretti@gmail.com - crwdns2934203:0crwdne2934203:0

crwdns2917038:0crwdne2917038:0

crwdns2936625:0crwdne2936625:0:

crwdns2936751:024crwdne2936751:0 3

crwdns2936753:07crwdne2936753:0 63

crwdns2936753:030crwdne2936753:0 330

crwdns2942667:0crwdne2942667:0 20,845