crwdns2933423:0crwdne2933423:0

KitchenAid KHM512ER Power Cord Replacement

crwdns2942213:0crwdne2942213:0

  1. KitchenAid KHM512ER Power Cord Replacement, Power Cord: crwdns2935265:01crwdnd2935265:01crwdnd2935265:02crwdne2935265:0 KitchenAid KHM512ER Power Cord Replacement, Power Cord: crwdns2935265:01crwdnd2935265:02crwdnd2935265:02crwdne2935265:0
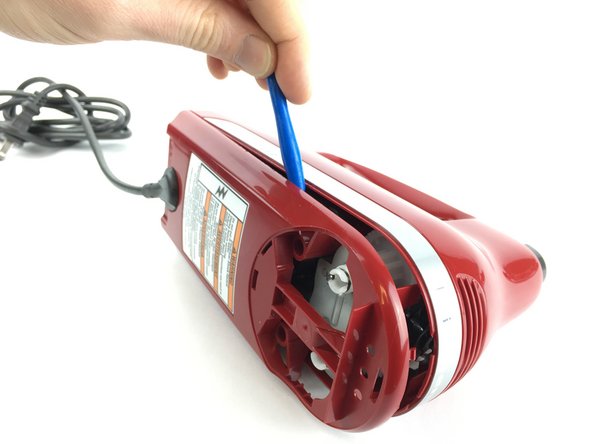
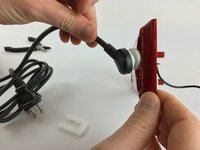
    • Insert the back of a plastic opening tool into one of the beater holes

    • Apply force to pull the circular plastic part off.

    • If necessary, use the other side of the plastic opening tool to pry the circular plastic part off.

  2. KitchenAid KHM512ER Power Cord Replacement: crwdns2935265:02crwdnd2935265:01crwdnd2935265:03crwdne2935265:0 KitchenAid KHM512ER Power Cord Replacement: crwdns2935265:02crwdnd2935265:02crwdnd2935265:03crwdne2935265:0 KitchenAid KHM512ER Power Cord Replacement: crwdns2935265:02crwdnd2935265:03crwdnd2935265:03crwdne2935265:0
    • Use a plastic opening tool to remove the speed knob.

    • Pop up the panel with a plastic opening tool.

    • Use a plastic opening tool to pry the white plastic switch assembly out.

  3. KitchenAid KHM512ER Power Cord Replacement: crwdns2935265:03crwdnd2935265:01crwdnd2935265:02crwdne2935265:0 KitchenAid KHM512ER Power Cord Replacement: crwdns2935265:03crwdnd2935265:02crwdnd2935265:02crwdne2935265:0
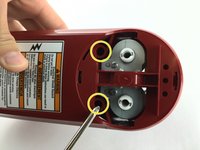
    • Use a Phillips 2 screwdriver to remove the two 20.0mm screws that hold the bottom plastic piece.

    • Your screwdriver may not be long or narrow enough to reach the screws in these holes. If that's the case, use another screwdriver.

    • Remove the bottom plastic piece using a plastic opening tool.

  4. KitchenAid KHM512ER Power Cord Replacement: crwdns2935265:04crwdnd2935265:01crwdnd2935265:03crwdne2935265:0 KitchenAid KHM512ER Power Cord Replacement: crwdns2935265:04crwdnd2935265:02crwdnd2935265:03crwdne2935265:0 KitchenAid KHM512ER Power Cord Replacement: crwdns2935265:04crwdnd2935265:03crwdnd2935265:03crwdne2935265:0
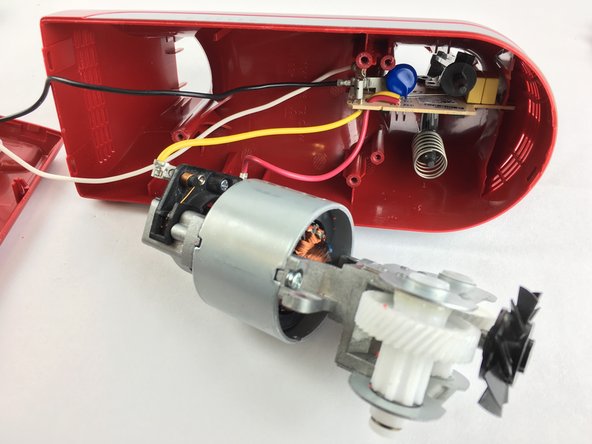
    • Using a Phillips 2 screwdriver, remove the three 20.0mm screws holding the motor assembly in place.

    • Use your hands to remove the motor assembly and circuit board.

  5. KitchenAid KHM512ER Power Cord Replacement: crwdns2935265:05crwdnd2935265:01crwdnd2935265:03crwdne2935265:0 KitchenAid KHM512ER Power Cord Replacement: crwdns2935265:05crwdnd2935265:02crwdnd2935265:03crwdne2935265:0 KitchenAid KHM512ER Power Cord Replacement: crwdns2935265:05crwdnd2935265:03crwdnd2935265:03crwdne2935265:0
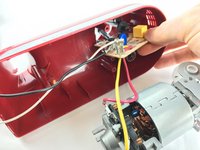
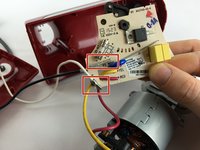
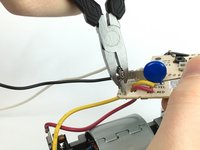
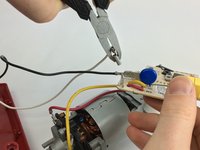
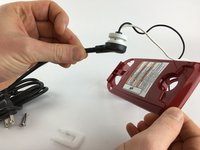
    • Firmly grip the circuit board, and using pliers, remove the black and white power cord connectors from the circuit board.

    • Some force may be required. Be careful not to cut yourself on any electrical components.

  6. KitchenAid KHM512ER Power Cord Replacement: crwdns2935265:06crwdnd2935265:01crwdnd2935265:03crwdne2935265:0 KitchenAid KHM512ER Power Cord Replacement: crwdns2935265:06crwdnd2935265:02crwdnd2935265:03crwdne2935265:0 KitchenAid KHM512ER Power Cord Replacement: crwdns2935265:06crwdnd2935265:03crwdnd2935265:03crwdne2935265:0
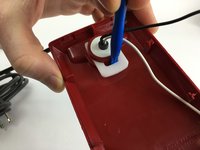
    • Using a plastic opening tool, remove the white plastic clip on the inside of the bottom plastic piece.

    • Once it's loose, remove it with your fingers.

    • Pull the power cord through the hole.

crwdns2915888:0crwdne2915888:0

To reassemble your device, follow these instructions in reverse order.

crwdns2935227:0crwdne2935227:0

Brad Daniels

crwdns2935283:002/10/16crwdne2935283:0

621 crwdns2915208:0crwdne2915208:0

crwdns2935297:03crwdne2935297:0

crwdns2915084:0crwdne2915084:0

USF Tampa, Team 2-3, Sullivan Spring 2016 crwdns2935289:0USF Tampa, Team 2-3, Sullivan Spring 2016crwdne2935289:0

USFT-SULLIVAN-S16S2G3

crwdns2931471:03crwdne2931471:0

crwdns2935297:04crwdne2935297:0

crwdns2944067:00crwdne2944067:0

crwdns2917038:0crwdne2917038:0

crwdns2936625:0crwdne2936625:0:

crwdns2936751:024crwdne2936751:0 0

crwdns2936753:07crwdne2936753:0 10

crwdns2936753:030crwdne2936753:0 40

crwdns2942667:0crwdne2942667:0 3,540