crwdns2931315:0crwdnd2931315:0crwdne2931315:0
crwdns2942213:0crwdne2942213:0
-
crwdns2935201:0crwdne2935201:0 crwdns2935203:0crwdne2935203:0
-
Remove all utensils from the drawer and remove the drawer from the slot.
-
-
crwdns2935201:0crwdne2935201:0 crwdns2935203:0crwdne2935203:0
-
Start removing the mounts and tracks by unscrewing them with your drill or screwdriver.
-
-
crwdns2935201:0crwdne2935201:0 crwdns2935203:0crwdne2935203:0
-
Once you have all your new material, insert the mounts onto your track.
-
-
-
crwdns2935201:0crwdne2935201:0 crwdns2935203:0crwdne2935203:0
-
Take the track with the new mount attached and screw it into the existing hole using the new screws that came in the packaging.
-
-
crwdns2935201:0crwdne2935201:0 crwdns2935203:0crwdne2935203:0
-
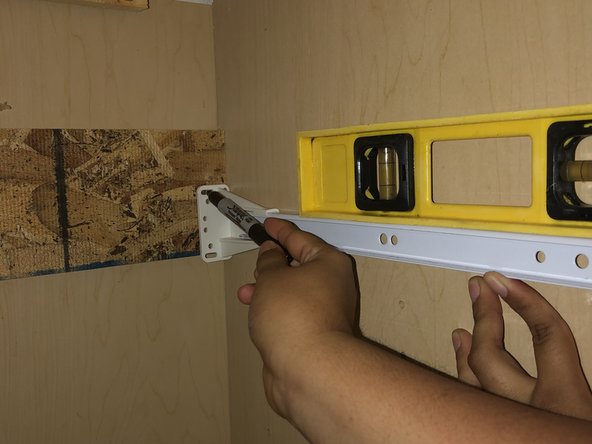
After the track has one screw drilled, use a level to make sure your track is straight.
-
-
crwdns2935201:0crwdne2935201:0 crwdns2935203:0crwdne2935203:0
-
Drill the screws in either the existing holes or marked spots to hold the mount in place.
-
-
crwdns2935201:0crwdne2935201:0 crwdns2935203:0crwdne2935203:0
-
Repeat these steps on the other side if needed.
-
-
crwdns2935201:0crwdne2935201:0 crwdns2935203:0crwdne2935203:0
-
Place your drawer back into its place and you are now done with your repair!
-


crwdns2935221:0crwdne2935221:0
crwdns2935227:0crwdne2935227:0

crwdns2915084:0crwdne2915084:0

Eastern Washington University, Team S25-G1, Crane Spring 2020 crwdns2935289:0Eastern Washington University, Team S25-G1, Crane Spring 2020crwdne2935289:0
EWU-CRANE-S20S25G1
crwdns2931471:04crwdne2931471:0
crwdns2935303:01crwdne2935303:0