crwdns2915892:0crwdne2915892:0
If the ear pads on your Kingston HyperX CloudX gaming headset (SKU: 4P5H8AA) start to become worn down, damaged, and lack comfort, you can use this guide to replace the ear pads. In order to replace the ear pads, you will need to order a new set of ear pads which can be purchased on the HyperX website.
crwdns2942213:0crwdne2942213:0
-
-
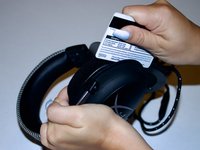
Place one finger on the inside of the cushion and place the other finger on the outer rim of the ear pad cushion.
-
Gently pull the ear pad away from the headset, removing the flap from the groove until the old ear pads are fully detached.
-
-
-
Take the new ear pad and slide the top side of the flap into the groove of the ear cup.
-
Once the flap is inside the groove, slide it all the way in to make sure the flap is secured inside the groove.
-
-
-
-
Squeeze the top part of the cushion into the earcup to keep it secure and prevent the flap from sliding out of the groove.
-
-
-
Slowly start going around the outside of the earcup and stretching the cushion so that the flap is secured into the groove.
-
-
-
Push the flap further into the groove by taking a spudger and going around the outside of the headset slowly pushing the spudger into the groove to make sure the flap is fully secured into the groove.
-
-
-
Squeeze the ear cushion and move it slightly back and forth to ensure the flap is secured.
-
Repeat on the other side.
-


crwdns2935287:0crwdne2935287:0

University of Delaware, Team 12-4, McGuire Spring 2023 crwdns2935289:0University of Delaware, Team 12-4, McGuire Spring 2023crwdne2935289:0
UD-MCGUIRE-S23S12G4
crwdns2931471:05crwdne2931471:0
crwdns2935297:04crwdne2935297:0