crwdns2915892:0crwdne2915892:0
Amazon’s Kindle Paperwhite 3rd Generation possesses a six inch, 300 PPI display. This guide requires that the Kindle is turned off, and that a plastic opening tool, angled precision tweezers, and a PH000 screwdriver are used.
crwdns2942213:0crwdne2942213:0
-
-
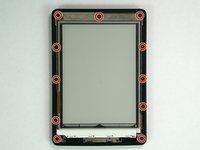
Gently pry the bezel off the screen using a plastic opening tool. Start at the corners and slide around the edges until you return to your starting point.
 crwdns2952109:0crwdne2952109:0
-
-
-
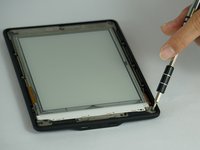
Use extreme caution when prying up the bezel. Be careful not to allow your pry tool to fall underneath the display. Look under the cover as you work, separating the display from the adhesive of the bezel.
-
You want to make sure your separator goes through both sides of the bezel over top of the display.
-
The second photo is the layer you want your tool to pass through safely.
-
The third photo is an example of what can go wrong. If this happens your digitizer layer will misread touches and the display is permanently damaged.
-
-
-
Unscrew the eleven 3.2 mm Phillips #000 screws surrounding the frame.
-
-
-
Gently lift the mid-frame out of the case with your hands.
-
-
-
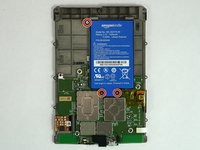
Unscrew the three 3.0 mm Phillips #000 screws that are securing the battery.
-
-
-
-
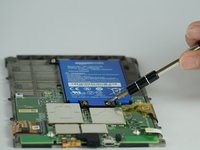
Gently lift the battery from the frame.
-
-
-
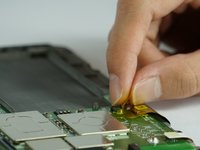
Flip the black latch with a plastic opening tool, and then gently pull back the orange ribbon cable.
-
-
crwdns2935267:0crwdne2935267:0Tweezers$4.99
-
Flip the tiny off-white latch with angled precision tweezers toward the direction of the battery.
-
Gently peel back the orange ribbon cable.
-
-
-
Peel back the orange ribbon cable near the battery.
-
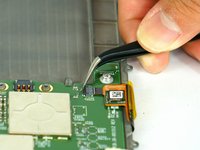
Flip the tiny black latch with angled precision tweezers toward the closest edge of the device.
-
-
-
Peel back the white connector with your fingers.
-
-
-
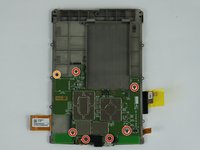
Unscrew the six 3.0 mm Phillips #000 screws surrounding the motherboard.
-
Unscrew the one 2.5 mm Phillips #000 screw.
-
-
-
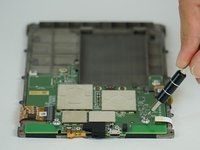
Use a plastic opening tool to lift the motherboard upwards from the frame.
-


To reassemble your device, follow these instructions in reverse order.
crwdns2935221:0crwdne2935221:0
crwdns2935229:020crwdne2935229:0

crwdns2935287:0crwdne2935287:0

USF Tampa, Team 14-3, Lacy Spring 2016 crwdns2935289:0USF Tampa, Team 14-3, Lacy Spring 2016crwdne2935289:0
USFT-LACY-S16S14G3
crwdns2931471:04crwdne2931471:0
crwdns2935297:014crwdne2935297:0
crwdns2947412:015crwdne2947412:0
hi there thank youfor your helping tutorial.
i just bought some used Kindle in order to buy at my shop. but i have a problem with some Kindle that i disassembled in order to have some spare parts and especially with the screen.
even after removing the screen it will stay frozen, even if i change the motherboard with a new one it will stay on the last screen shown.
Might you give me any explanation about the issue? and is that a way to reset the screen in order to use it as spare parts for other kindles?
charbel - crwdns2934203:0crwdne2934203:0 crwdns2950251:0crwdne2950251:0
Thank you so much for this tutorial! Thanks to it I was able to replace a (physically) broken display. I un-assembled the entire device, let it rest until the shipment from China arrived and re-assembled it. It works flawlessly again and looks like new. One word of caution, though: The new display came without frame and removing the old display from the frame (both are pretty tightly glued together) resulted in quite some patient work and many pieces of broken glass (even with having it all heated). Anyway it worked out like a charm at the end!
Uwe Ritter - crwdns2934203:0crwdne2934203:0 crwdns2950251:0crwdne2950251:0
Hello, where I can but a replacement screen for Kindle Paperwhite 300 ppi?? Thanks!!
Andres Barrera - crwdns2934203:0crwdne2934203:0 crwdns2950251:0crwdne2950251:0
For anyone curious, the panel number for the PW3 is ED060KD1. You can use this to look it up on eBay etc.
Joshua Rong Xing Ong - crwdns2934203:0crwdne2934203:0 crwdns2950251:0crwdne2950251:0
Do you have to take the broken screen out of the frame and then put the new one in? Is it difficult?
Chris - crwdns2934203:0crwdne2934203:0 crwdns2950251:0crwdne2950251:0