crwdns2933423:0crwdne2933423:0

Kindle Paperwhite 1st Generation Motherboard Replacement

crwdns2942213:0crwdne2942213:0

  1. Kindle Paperwhite 1st Generation Motherboard Replacement, Case: crwdns2935265:01crwdnd2935265:01crwdnd2935265:02crwdne2935265:0 Kindle Paperwhite 1st Generation Motherboard Replacement, Case: crwdns2935265:01crwdnd2935265:02crwdnd2935265:02crwdne2935265:0
    • Using a spudger or plastic opening tool, gently pry the bezel from the screen. It is easier to start in the corners and work your way around the bezel.

    • Do not insert the spudger too far under the bezel; it could easily damage the screen.

  2. Kindle Paperwhite 1st Generation Motherboard Replacement: crwdns2935265:02crwdnd2935265:01crwdnd2935265:03crwdne2935265:0 Kindle Paperwhite 1st Generation Motherboard Replacement: crwdns2935265:02crwdnd2935265:02crwdnd2935265:03crwdne2935265:0 Kindle Paperwhite 1st Generation Motherboard Replacement: crwdns2935265:02crwdnd2935265:03crwdnd2935265:03crwdne2935265:0
    • Remove the eleven 3.0 mm Phillips screws surrounding the midframe.

    • At the top of the display, a strip of black tape covers one screw.

  3. Kindle Paperwhite 1st Generation Motherboard Replacement: crwdns2935265:03crwdnd2935265:01crwdnd2935265:01crwdne2935265:0
    • Lift the midframe out of the case.

    • If the midframe is stuck, slide it to the left first, and then lift it out.

  4. Kindle Paperwhite 1st Generation Motherboard Replacement, Battery: crwdns2935265:04crwdnd2935265:01crwdnd2935265:02crwdne2935265:0 Kindle Paperwhite 1st Generation Motherboard Replacement, Battery: crwdns2935265:04crwdnd2935265:02crwdnd2935265:02crwdne2935265:0
    • Turn over the midframe to locate the battery.

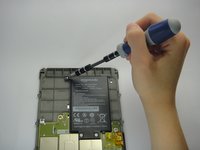
    • Remove the three Phillips 3.0 mm screws securing the battery to the midframe.

  5. Kindle Paperwhite 1st Generation Motherboard Replacement: crwdns2935265:05crwdnd2935265:01crwdnd2935265:01crwdne2935265:0
    • Gently lift the battery from the bottom, and slide it out of the midframe.

  6. Kindle Paperwhite 1st Generation Motherboard Replacement, Motherboard: crwdns2935265:06crwdnd2935265:01crwdnd2935265:03crwdne2935265:0 Kindle Paperwhite 1st Generation Motherboard Replacement, Motherboard: crwdns2935265:06crwdnd2935265:02crwdnd2935265:03crwdne2935265:0 Kindle Paperwhite 1st Generation Motherboard Replacement, Motherboard: crwdns2935265:06crwdnd2935265:03crwdnd2935265:03crwdne2935265:0
    • With the case and battery removed from the midframe, begin removing all cables attached to the motherboard.

    • Place the device so the midframe's backside faces up. Start with the cable on the bottom left corner.

    • Use a spudger to lift up the white locking cable tensioner and slide the flex cable out.

    • Proceed counterclockwise to the next cable and repeat. Small flex cable on the bottom won't need cable tensioner lifted, just carefully pull out.

  7. Kindle Paperwhite 1st Generation Motherboard Replacement: crwdns2935265:07crwdnd2935265:01crwdnd2935265:02crwdne2935265:0 Kindle Paperwhite 1st Generation Motherboard Replacement: crwdns2935265:07crwdnd2935265:02crwdnd2935265:02crwdne2935265:0
    • Remove the white flex cable by gently lifting the yellow plastic connector.

  8. Kindle Paperwhite 1st Generation Motherboard Replacement: crwdns2935265:08crwdnd2935265:01crwdnd2935265:03crwdne2935265:0 Kindle Paperwhite 1st Generation Motherboard Replacement: crwdns2935265:08crwdnd2935265:02crwdnd2935265:03crwdne2935265:0 Kindle Paperwhite 1st Generation Motherboard Replacement: crwdns2935265:08crwdnd2935265:03crwdnd2935265:03crwdne2935265:0
    • Remove the yellow anti-static tape from the display ribbon cable connector.

    • Use a spudger to lift up and disconnect the cable tensioner.

  9. Kindle Paperwhite 1st Generation Motherboard Replacement: crwdns2935265:09crwdnd2935265:01crwdnd2935265:02crwdne2935265:0 Kindle Paperwhite 1st Generation Motherboard Replacement: crwdns2935265:09crwdnd2935265:02crwdnd2935265:02crwdne2935265:0
    • Use a Philips screwdriver to remove the seven 3.0 mm Phillips screws securing the motherboard:

    • Three silver screws with silver washers

    • Two silver screws with no washers

    • One black screw with a golden washer

    • One black screw with a square washer

  10. Kindle Paperwhite 1st Generation Motherboard Replacement: crwdns2935265:010crwdnd2935265:01crwdnd2935265:01crwdne2935265:0
    • Remove the motherboard.

crwdns2915888:0crwdne2915888:0

To reassemble your device, follow these instructions in reverse order.

crwdns2935229:06crwdne2935229:0

Isabelle Burgess

crwdns2935283:001/23/13crwdne2935283:0

1,621 crwdns2915208:0crwdne2915208:0

crwdns2935297:02crwdne2935297:0

crwdns2915084:0crwdne2915084:0

Cal Poly, Team 3-33, Amido Winter 2013 crwdns2935289:0Cal Poly, Team 3-33, Amido Winter 2013crwdne2935289:0

CPSU-AMIDO-W13S3G33

crwdns2931471:04crwdne2931471:0

crwdns2935297:017crwdne2935297:0

crwdns2944067:02crwdne2944067:0

Not sure if this is an error, but on the 3G paperwhite, we needed to use a #0 Phillips, not a #2. Great guide otherwise!

Caleb Begly - crwdns2934203:0crwdne2934203:0

Please suggest what type of controller is used and the model and flash memory in the Kindle Paperwhite 1st Generation?

ven 1949, div 0004

Elecrash - crwdns2934203:0crwdne2934203:0

crwdns2917038:0crwdne2917038:0

crwdns2936625:0crwdne2936625:0:

crwdns2936751:024crwdne2936751:0 1

crwdns2936753:07crwdne2936753:0 18

crwdns2936753:030crwdne2936753:0 65

crwdns2942667:0crwdne2942667:0 20,351