crwdns2915892:0crwdne2915892:0
If your Kindle Fire HD 10 7th Generation camera is malfunctioning or damaged, use this guide to replace the camera. This guide gives instructions on how to access the rear camera. The camera allows you to take pictures or videos. While using your camera, if there are error messages, a black screen, or see physical damage to the lens, you may be unable to capture photos or videos. Use caution when removing tablet components. Before beginning, make sure to power off your device completely and disconnect from any external power source.
crwdns2942213:0crwdne2942213:0
-
-
Pry open the case using the iFixit opening tool.
-
Make sure to go around the whole case before removing the whole case.
-
-
-
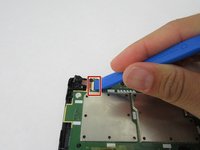
Remove yellow tape covering the connecter.
Is the black piece in this picture the same thing mentioned later in Step 4?
The black piece covers the camera lens
-
-
-
-
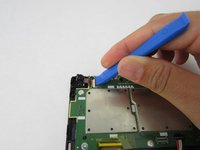
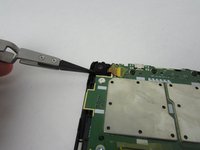
Gently flip over the black latch with the iFixit opening tool. Disconnect the camera's connector to the circuit board.
Make sure to identify the tool. How can I disconnect it? Also, make sure to proofread all steps—here, you have an apostrophe error on camera’s and missing end punctuation.
-
-
crwdns2935267:0crwdne2935267:0Tweezers$4.99
-
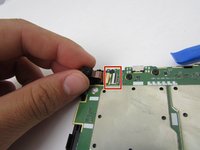
Remove the rubber casing around the camera lens using a set of tweezers.
-
-
-
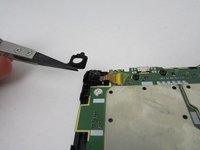
Remove and pull off the camera lens.
How can I do this? Remove is a good verb if there’s only one way to remove (e.g., screws), but if the action isn’t clear, then you want to be clearer. Do you have any flipbook style shots here?
-


To reassemble your device, follow these instructions in reverse order.
To reassemble your device, follow these instructions in reverse order.
crwdns2935221:0crwdne2935221:0
crwdns2935227:0crwdne2935227:0
crwdns2915084:0crwdne2915084:0

Embry-Riddle Aeronautical University, Team S1-G5, Watkins Fall 2019 crwdns2935289:0Embry-Riddle Aeronautical University, Team S1-G5, Watkins Fall 2019crwdne2935289:0
ERAU-WATKINS-F19S1G5
crwdns2931471:04crwdne2931471:0
crwdns2935297:011crwdne2935297:0
crwdns2947410:01crwdne2947410:0
Where can I buy the lens?