crwdns2915892:0crwdne2915892:0
The screen of this kindle 4 was broken. You could not see the break from the front, but half of the screen was frozen and did not work anymore. We ordered a new screen from aliexpress
crwdns2942213:0crwdne2942213:0
-
crwdns2935267:0crwdne2935267:0Tweezers$4.99
-
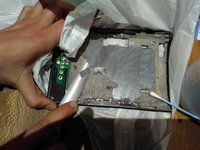
Remove the back of the kindle.
-
Start with opening the back at the sides. Push your knife or tweezers in a bit deeper at the middle and twist them to push the glued cover part from the frame. Don't do this near the side buttons as you might cut the buttons' ribbon cable.
-
See this video from 0:33 to 2:00. Do not follow it any further as you don't need every step from this video to replace the screen!
-
-
-
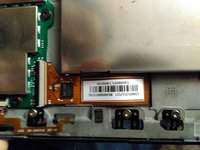
pull the black tab of the battery connector up and then pull out the cable carefully
actually you have to lift up a small plastic cover before disconnecting
-
-
-
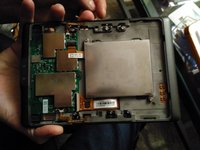
Now the back side is open, disconnect the screen cable from the motherboard as is done in this video from 3:14 until 3:21. Again do not follow the next steps from the video as we don't need them to replace the screen.
-
-
-
-
Remove the front cover as is shown in this video from 4:11 until 4:48
-
Again do not follow the video any further as we do not need these steps to replace the screen
-
-
-
Start from the sides and break of the screen piece by piece by pushing tweezers between the bezel and the screen. The glue loosens easier if you warm up the screen with a blow dryer.
-
-
-
This is the most tedious step. Remove the glue and fine bits of glass sticking to the bezel. Not all glue has to be removed, but the glass has to be gone. You can scrape off the glue with a knife (razor blade is the most convenient, but a regular knife works as well) or use the help of some solvents.
I used a flux and a dryer (280 * C), the screen is easier to remove than with a degreaser
Steps 5 & 6 are a pain in the butt, yes. It took me several hours to remove all the glass, but everything else was easy and I managed to change the screen without problems :)
-
-
-
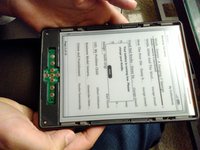
Put the new screen in place.
-
Make sure the connector sticks through the bezel.
-
Connect the connector to the motherboard
-
Test the connection by turning the device on
-
-
-
Clip the front and back cover back in.
-


This guide will help you to disassemble your device, take out the old screen, replace it by a new and reassemble your device.
This guide will help you to disassemble your device, take out the old screen, replace it by a new and reassemble your device.
crwdns2935221:0crwdne2935221:0
crwdns2935229:018crwdne2935229:0
crwdns2947412:017crwdne2947412:0
Mine has the same issue but the replacement screens are so expensive it is not interesting to repair it :-(
Thanks anyway for the guide ;-)
Mine was around €20 incl shipping: https://nl.aliexpress.com/item/LCD-Displ...
having a really hard time with breaking the screen, any advice beyond what you've posted? what tools do you recommend?
I just used a kitchen knife and a blow dryer. It is definitely the most time consuming part. Good luck!
I've bought ED060SCN LF instead of ED060SCF LF will it work? it is for kindle 5 but seller wrote it is good for Kindle 4 too... might be a good idea to uplug old screen and plug new in just for powering up before start removing the old imho, I will check..
I have no idea, I guess it its worth a try!
Followed the instructions and everything went ok. Removing the screen was very hard and I advise people doing it to take precautions with the glass as it will most likely spray all over. What I did what to cover the screen in transparent tape, so that the glass wouldn’t jump all over. I also wore gloves and protective eye gear.
Thanks Francis, managed to do the replacement without breaking anything!
Hi. I have cleaned all the glue from the bezel. I haven't ordered a screen yet so before I order it I just want to know if the new screen comes with glue or how do you put it on.
Make sure you have a completely flat area, any bits of glass left will create a pivot point under the new glass. Buy thin double sided tape, 25mm width is good and apply to the back up f the chassis. Obviously check your replacement screen works before applying the adhesive.
Hi, I didn't use any glue or tape and it still works perfectly after one year and a half ;-)
thanks
heat was really helpful for the screen removal
l used a heat gun and a (woodworking) chisel
left the old glue to stick things back together with
so far so good
I struggled a lot with the removal of the old screen. I almost gave up, even though I was using the drier. Once the screen got seriously hot though, it started to come off with relative ease. Still stabbed my hand twice and pinched two fingers. But it works now!
Thanks Francis - just completed my replacement. All worked out well!
the only issue that remains is the quality of the image. It seems like the replacement screen is not of the best quality and so there are ghost images left once in a while. It was fun though doing the repair - for sure the worst thing is removing the screen. A pain in @#$%!
Raul
My advice would be to remove everything with the possible exception of the battery, as you will likely destroy it in the process, before removing the screen. If you're replacing the battery as well then obviously remove this too. Dont try to peel off the page turn ribbons as you will likely damage them.
Cleaning the glass fragments and glue is best done with “nitro" thinners ot “acetone" however “acetone WILL MELT the plastic if you get it on it therefore “nitro" is better or 90 -100% alcohol at a push.
Stick the screen back on with the thinnest twin stick you can find.
Works well, but breaking the screen is awkward and time consuming. Price of a new screen is around 20 Euros at aliexpress, and it takes about 1 hr to do the whole replacement. To put everything back in place I used double-sided tape. Easy to use but you need to be a bit more meticulous in removing the old glue.
Steps 5 & 6 are a pain in the butt, yes. It took me several hours to remove all the glass, but everything else was easy and I managed to change the screen without problems :)
Do not remove back cover before Step 4! You might break clips! Start with front cover and you will be able to safely free them.
Viktar Simanenka - crwdns2934203:0crwdne2934203:0