crwdns2933423:0crwdne2933423:0
crwdns2947577:0crwdnd2947577:0crwdne2947577:0

Keychron K10 Max Wireless Mechanical Key Switch Replacement

crwdns2942213:0crwdne2942213:0

  1. Keychron K10 Max Wireless Mechanical Key Switch Replacement, Keycap: crwdns2935265:01crwdnd2935265:01crwdnd2935265:03crwdne2935265:0 Keychron K10 Max Wireless Mechanical Key Switch Replacement, Keycap: crwdns2935265:01crwdnd2935265:02crwdnd2935265:03crwdne2935265:0 Keychron K10 Max Wireless Mechanical Key Switch Replacement, Keycap: crwdns2935265:01crwdnd2935265:03crwdnd2935265:03crwdne2935265:0
    • Lay the keyboard face down on the workspace.

    • Use a 2.5 mm hex screwdriver to remove the eight 4.5 mm screws from the back case.

    • Carefully separate the front frame from the keyboard and set it aside.

    • There is a clear shield that sits right above the arrow keys. This shield is to diffuse the LEDs from the keyboard, and it can fall out easily. Just remember to put it back if it does when reassembly.

    crwdns2952109:0crwdne2952109:0
  2. Keychron K10 Max Wireless Mechanical Key Switch Replacement: crwdns2935265:02crwdnd2935265:01crwdnd2935265:02crwdne2935265:0 Keychron K10 Max Wireless Mechanical Key Switch Replacement: crwdns2935265:02crwdnd2935265:02crwdnd2935265:02crwdne2935265:0
    • Slide the keycap puller over the keycap until it grips underneath.

    • Pull straight upward to remove the keycap.

    • Sometimes the mechanical switch itself comes with the keycap. Just remove the switch from the button and reinstall the switch.

    crwdns2952109:0crwdne2952109:0
  3. Keychron K10 Max Wireless Mechanical Key Switch Replacement, Mechanical Key Switch: crwdns2935265:03crwdnd2935265:01crwdnd2935265:02crwdne2935265:0 Keychron K10 Max Wireless Mechanical Key Switch Replacement, Mechanical Key Switch: crwdns2935265:03crwdnd2935265:02crwdnd2935265:02crwdne2935265:0
    • Place the switch puller around the two small tabs on the front and back of the switch.

    • Squeeze the switch puller to release the tabs, then pull straight upward to remove the switch.

    • The photos show red mechanical switches, but your keyboard may have a different switch color. The removal process is the same for this style of hot-swappable mechanical switch.

    crwdns2952109:0crwdne2952109:0
  4. Keychron K10 Max Wireless Mechanical Key Switch Replacement: crwdns2935265:04crwdnd2935265:01crwdnd2935265:03crwdne2935265:0 Keychron K10 Max Wireless Mechanical Key Switch Replacement: crwdns2935265:04crwdnd2935265:02crwdnd2935265:03crwdne2935265:0 Keychron K10 Max Wireless Mechanical Key Switch Replacement: crwdns2935265:04crwdnd2935265:03crwdnd2935265:03crwdne2935265:0
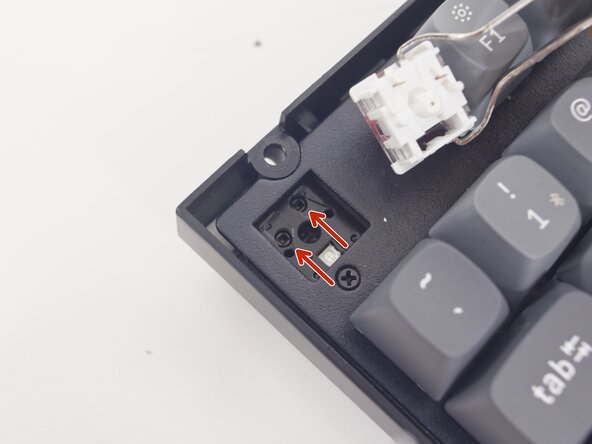
    • The replacement switch is oriented to fit only one way.

    • Align the copper pins on the bottom of the switch with the socket.

    • Make sure the copper pins are aligned before pressing the switch into place. Installing the switch in the wrong orientation can bend or break the pins.

    • Press the switch straight down until it clicks into place.

    • The switch should sit flush with the surrounding switches and the keyboard frame.

    crwdns2952109:0crwdne2952109:0
crwdns2915888:0crwdne2915888:0

Once the switch is installed, you can reassemble your device back to normal. To reassemble your device, follow these instructions in reverse order.

Richard Witkowski

crwdns2935283:003/23/26crwdne2935283:0

595 crwdns2915208:0crwdne2915208:0

crwdns2935297:05crwdne2935297:0

crwdns2935287:0crwdne2935287:0

Purdue University Northwest, Team 7-8, Dieterle Spring 2026 crwdns2935289:0Purdue University Northwest, Team 7-8, Dieterle Spring 2026crwdne2935289:0

PNW-DIETERLE-S26S7G8

crwdns2931471:03crwdne2931471:0

crwdns2935297:05crwdne2935297:0

crwdns2947412:00crwdne2947412:0

crwdns2917038:0crwdne2917038:0

crwdns2936625:0crwdne2936625:0:

crwdns2936751:024crwdne2936751:0 0

crwdns2936753:07crwdne2936753:0 16

crwdns2936753:030crwdne2936753:0 22

crwdns2942667:0crwdne2942667:0 56