crwdns2933423:0crwdne2933423:0

Kenwood KMM-BT522HD LCD Screen Replacement

crwdns2942213:0crwdne2942213:0

  1. Kenwood KMM-BT522HD LCD Screen Replacement, Face Plate: crwdns2935265:01crwdnd2935265:01crwdnd2935265:01crwdne2935265:0
    • Press the ejection button on the lower left corner of the face plate.

  2. Kenwood KMM-BT522HD LCD Screen Replacement: crwdns2935265:02crwdnd2935265:01crwdnd2935265:02crwdne2935265:0 Kenwood KMM-BT522HD LCD Screen Replacement: crwdns2935265:02crwdnd2935265:02crwdnd2935265:02crwdne2935265:0
    • Remove the face plate by pulling upwards and in the direction of the ejection button.

  3. Kenwood KMM-BT522HD LCD Screen Replacement, LCD Screen: crwdns2935265:03crwdnd2935265:01crwdnd2935265:01crwdne2935265:0
    • Remove the three 7.5mm Phillips #1 screws.

  4. Kenwood KMM-BT522HD LCD Screen Replacement: crwdns2935265:04crwdnd2935265:01crwdnd2935265:02crwdne2935265:0 Kenwood KMM-BT522HD LCD Screen Replacement: crwdns2935265:04crwdnd2935265:02crwdnd2935265:02crwdne2935265:0
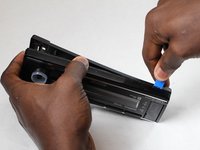
    • Separate the two halves of the housing by prying along the length of the device with a plastic opening tool.

  5. Kenwood KMM-BT522HD LCD Screen Replacement: crwdns2935265:05crwdnd2935265:01crwdnd2935265:01crwdne2935265:0
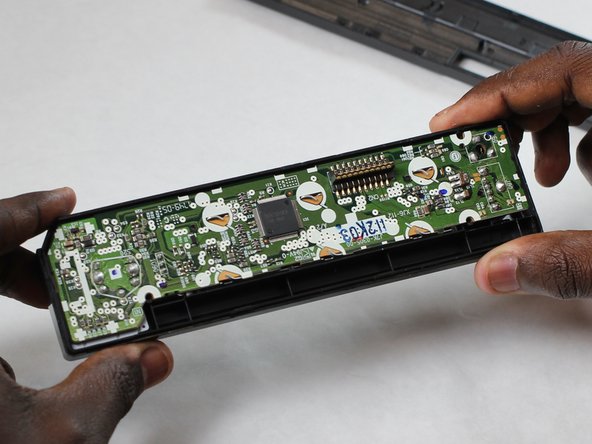
    • Remove the motherboard from the housing.

crwdns2915888:0crwdne2915888:0

To reassemble your device, follow these instructions in reverse order.

Andrew Waldon

crwdns2935283:007/05/18crwdne2935283:0

265 crwdns2915208:0crwdne2915208:0

crwdns2935297:03crwdne2935297:0

crwdns2915084:0crwdne2915084:0

IUPUI, Team S2-G4, Harley Summer 2018 crwdns2935289:0IUPUI, Team S2-G4, Harley Summer 2018crwdne2935289:0

IUPUI-HARLEY-SU18S2G4

crwdns2931471:03crwdne2931471:0

crwdns2935297:03crwdne2935297:0

crwdns2944067:00crwdne2944067:0

crwdns2917038:0crwdne2917038:0

crwdns2936625:0crwdne2936625:0:

crwdns2936751:024crwdne2936751:0 2

crwdns2936753:07crwdne2936753:0 3

crwdns2936753:030crwdne2936753:0 3

crwdns2942667:0crwdne2942667:0 165