crwdns2915892:0crwdne2915892:0
While this guide is essential to replacing many parts on the Jawbone MINI JAMBOX, it requires an advanced level of technical knowledge. Only attempt to remove the motherboard if it is absolutely necessary.
crwdns2942213:0crwdne2942213:0
-
-
Using the standard metal spudger, begin by prying at the bottom of the plain rubber end cap (the end without the USB or auxiliary input).
-
-
-
Continue prying around the end panel, prying at different points until the entire panel is out of its seating.
-
Carefully remove the end panel.
-
-
-
Slide out the rubber foot located on the bottom of the case.
-
-
-
-
Using a T6 bit, remove the flat topped 5mm screw located on the bottom of the casing, underneath the rubber foot.
-
-
-
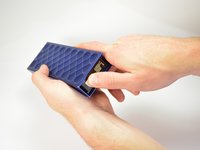
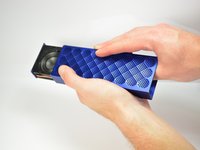
Push against the side without end cap to slide the internal components out of the case.
-
While holding the metal outset casing with one hand, press on the black inner plastic casing with your thumb.
-
-
-
Remove all connecting ribbons from the motherboard.
-
One ZIF or "zero insertion force" ribbon connecting at the side.
-
One standard ribbon connector in the middle (Note: this ZIF ribbon is lightly glued to the surface).
-
-
-
Unscrew all four 5mm T6 screws holding the motherboard to the plastic case.
-
-
-
Desolder the grounding plug from the motherboard.
-
Make sure your soldering iron is tinned and carefully touch the tip of your iron to the grounding lug. Allow the the solder to liquify. While liquified, lift the motherboard off the grounding lug.
-
-
-
Carefully lift the motherboard out of the plastic housing.
-


To reassemble your device, follow these instructions in reverse order.
To reassemble your device, follow these instructions in reverse order.
crwdns2935221:0crwdne2935221:0
crwdns2935229:06crwdne2935229:0
crwdns2915084:0crwdne2915084:0

Cal Poly, Team 12-1, Lancaster Spring 2015 crwdns2935289:0Cal Poly, Team 12-1, Lancaster Spring 2015crwdne2935289:0
CPSU-LANCASTER-S15S12G1
crwdns2931471:05crwdne2931471:0
crwdns2935297:011crwdne2935297:0