crwdns2915892:0crwdne2915892:0
If your Jabra Elite 85h will not charge or cannot retain a charge, it may have a faulty battery. This guide will show you how to replace the battery for the device.
crwdns2942213:0crwdne2942213:0
-
-
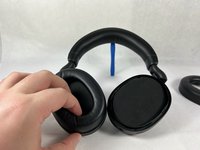
Remove each ear cushion by hooking your fingers along the inside of the ear cushion and pulling up and away from the ear cup.
-
If the cushion does not fully release, move your hand to the opposite side and pull up inn the same manner.
-
-
-
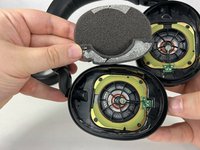
Using the small plastic spudger to assist, begin lifting up and removing the foam inserts with attached backing tape.
-
-
-
Repeat the previous steps for the other side, removing the foam inserts with care.
-
-
-
Unscrew and remove the four T6 screws holding the speaker in place.
-
-
-
-
Repeat the previous step for the other side, removing the four T6 screws.
-
-
-
Tilt the headphones over so that the speaker tilts out of the plastic holder.
-
Repeat for both sides.
Battery is behind left speaker ONLY.
and after ? how to pop up the speaker from his green/yellow support ?
-
-
-
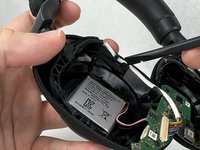
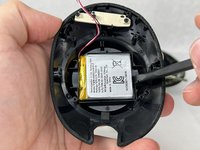
Remove the plastic speaker housing from the left ear of the headphones. This should reveal the battery and motherboard.
-
-
-
Using a plastic spudger, release the enclosure from the headband.
-
-
-
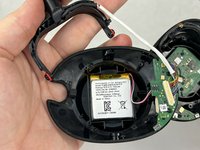
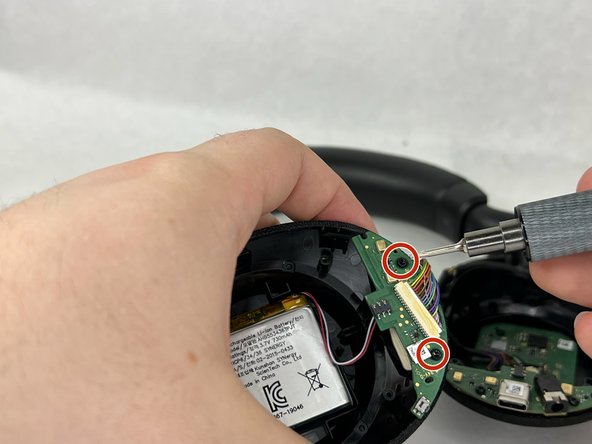
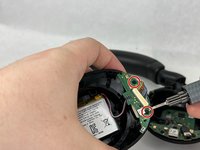
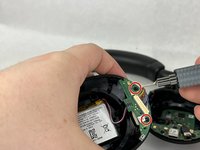
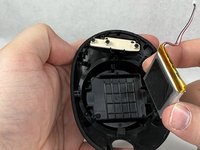
Unscrew the two screws holding the motherboard in place and remove the motherboard from the enclosure.
If all you want to do is reset the headset to get rid of the blinking or flashing red LED light then this is as far as you have to go. (This assumes the battery is indeed NOT defective.) And only on the LEFT ear cup. Once you've disconnected the battery, wait a minute or two (so the unit is truly reset - I think it forgets it's battery's identity or some other nonsense while the power is disconnected. Then, reassemble it all. You should be able to charge it now.
Looks very simple but I will need the tools, when I get it I will be back.
Thank you
Jose
-
-
-
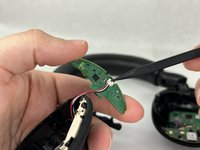
Flip the motherboard to reveal a 2-pin JST connector. Carefully unplug the connector from the motherboard and use a plastic spudger to remove the battery from the enclosure.
It looks like a 3 pin JST. Do you know the size in mm?
If you're here to fix the blinking red light fault where the unit will no longer charge due to some internal fault, then only do the left earcup and reassemble it after you've:
1. disconnected the battery,
2. left it unpowered for a minute or two, and
3. then reconnected the battery.
The flasing should go away and you should be able to charge your headset (until it all starts again a few months later... Keep that T6 bit handy...)
Blinking red light is likely to start again even when battery is changed? Thinking if i should replace it or not. I actually like Jabra set a lot, hoping i'll find a more permanent solution to this charging problem.
LauriT -
Where i can get a new battery?
www.hr-kom.de/Akku-fuer-Elite-85H-Battery-Batterie-fuer-Jabra-Elite85H
Best price for battery & shipping
-


To reassemble your device, follow these instructions in reverse order.
To reassemble your device, follow these instructions in reverse order.
crwdns2935221:0crwdne2935221:0
crwdns2935229:020crwdne2935229:0
crwdns2915084:0crwdne2915084:0

UMass Dartmouth, Team 3-4, Petersen Spring 2023 crwdns2935289:0UMass Dartmouth, Team 3-4, Petersen Spring 2023crwdne2935289:0
UMASSD-PETERSEN-S23S3G4
crwdns2931471:04crwdne2931471:0
crwdns2935297:09crwdne2935297:0
crwdns2947412:09crwdne2947412:0
Where do you find a battery to match the connector size?
Thanks, I have the Evolve 2 85h, which is similar and this helped me fix it.
I wish to add that my headset refused to charge at all, due to the battery voltage going to low and then the headset did not manage to trickle charge it to a safe charging level. Thus it was dead and Jabra would not repair or replace it claiming the warranty had passed.
By applying 3.8 volts (and limiting it to 300mA) on a test pin connected to the battery + pole for a split second, the charger was tricked into accepting the battery and started charging. Now everything works fine.
Photo of were to apply the voltage. Plus is red. Ground is black.
Some notes -
How it started - I got a battery low warning while listening on a video conference. I attached a USB-C charger cable while wearing the headset. After about 30 minutes the headset just died.
When connecting to a computer, the Jabra App recognized the headset, but said 0% battery. No charging and no Bluetooth communication was possible.
Does it has 2 batteries? One on left and one on right?
It has just one battery
I also would like to know how to find a battery that matches the size, or at least gets close enough. Unfortunately just by looking up "3.7v Rechargeable Lithium Polymer Battery" I am finding quite the wide variety of shapes and sizes...
On the Battery is a code 553436 which is the form factor of 55mm x 34mm x 36mm. A quick google search couldnt find one suitable for the jabra, the guide speaks about a 2 pin jst but you need a 3 pin battery.
“I replaced the original AHB553436T battery with the more readily available AHB572535PST, and it works perfectly fine.”
Why do you have to disassemble the right ear when the motherboard and battery are all in the left ear?
Link to Jabra Evolve2 85 battery, 3.7 volt:
Hi sir, I think your guide is incomplete. Do you have the opportunity to bring a sequel?
Oğuzhan Sancak - crwdns2934203:0crwdne2934203:0
The battery is under the left earcup.
NOT the earcup into which you plug the USB cable.
Not sure why the demo asks you to disassemble the right earcup...
Jimbo - crwdns2934203:0crwdne2934203:0
These instructions could use some work! There is no need to disassemble both sides as the battery is under the left ear cup only.
kelly1 - crwdns2934203:0crwdne2934203:0
I have just disassembled mine, Jabra Elite 85h, model OTE100. The cushions (as described in this step) can not be removed. If that's the case, The foam in the center has to be removed to access the speaker screws. Undoing the screws will split the headphone in half, releasing the pad together with the speaker. This will uncover the rest of the components
Besides, I agree with the rest of the comments - If you're after the battery there is no need to disassemble the right headphone as the battery resides in the left
bystrzak14 - crwdns2934203:0crwdne2934203:0
This is very easy. I just finished mine. You dont need special tools as a tweeser will pull the wire connection apart. The cushions will come off and are replaceable. Do just the left one. Pull it apart like you mean it. Do have a small piece of thick double-sided tape on hand. The AOLIKES 3.7v 850mAh battery from amazon works but the wire is a bit short to orient it like the original. Just don’t press it in place until the circuit board is screwed in place. All I can say now is that it’s charging.
Lastly, I’ve learned from experience that if you’re using metal screws in plastic, when reassembling turn counter clockwise until you hear a click. Thats when they are aligned properly and you’re less likely to strip the thread.
CJ ? - crwdns2934203:0crwdne2934203:0