crwdns2933423:0crwdne2933423:0
crwdns2947577:0crwdnd2947577:0crwdne2947577:0

JBL Charge Micro USB / Aux Port Replacement

crwdns2942213:0crwdne2942213:0

    1. JBL Charge Micro USB / Aux Port Replacement, Case: crwdns2935265:01crwdnd2935265:01crwdnd2935265:03crwdne2935265:0 JBL Charge Micro USB / Aux Port Replacement, Case: crwdns2935265:01crwdnd2935265:02crwdnd2935265:03crwdne2935265:0 JBL Charge Micro USB / Aux Port Replacement, Case: crwdns2935265:01crwdnd2935265:03crwdnd2935265:03crwdne2935265:0
      • Make sure the device is powered off before you begin to disassemble the speaker.

      • Remove the trim from the speaker using a jimmy or metal spudger.

      crwdns2952109:0crwdne2952109:0

      crwdns2917038:0crwdne2917038:0

    2. JBL Charge Micro USB / Aux Port Replacement: crwdns2935265:02crwdnd2935265:01crwdnd2935265:02crwdne2935265:0 JBL Charge Micro USB / Aux Port Replacement: crwdns2935265:02crwdnd2935265:02crwdnd2935265:02crwdne2935265:0
      • Use the PH1 screwdriver to remove all five of the 6 mm screws from the battery cover.

      • Remove the battery cover and set the cover aside.

      crwdns2952109:0crwdne2952109:0

      crwdns2917038:0crwdne2917038:0

    3. JBL Charge Micro USB / Aux Port Replacement: crwdns2935265:03crwdnd2935265:01crwdnd2935265:02crwdne2935265:0 JBL Charge Micro USB / Aux Port Replacement: crwdns2935265:03crwdnd2935265:02crwdnd2935265:02crwdne2935265:0
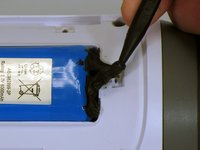
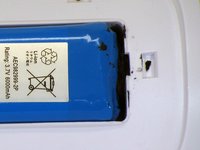
      • Use a spudger to carefully remove the liquid electrical tape that holds the battery inside the battery compartment.

      • Be careful not to puncture the battery, or damage the battery wire underneath the liquid electrical tape.

      crwdns2952109:0crwdne2952109:0

      crwdns2917038:0crwdne2917038:0

    4. JBL Charge Micro USB / Aux Port Replacement: crwdns2935265:04crwdnd2935265:01crwdnd2935265:02crwdne2935265:0 JBL Charge Micro USB / Aux Port Replacement: crwdns2935265:04crwdnd2935265:02crwdnd2935265:02crwdne2935265:0
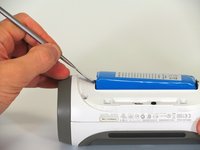
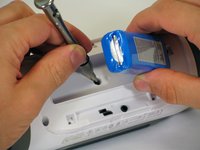
      • Use a spudger to lift the battery out of the device.

      • Lift the end of the battery that does not have the wire connection and remove the 16 mm PH2 screw underneath the battery.

      • Notice the wire that is connecting the battery to the device. Attempting to remove the battery completely could cause damage to the wire. Do not use a metal spudger to remove the battery, this could cause damage.

      crwdns2952109:0crwdne2952109:0

      crwdns2917038:0crwdne2917038:0

    5. JBL Charge Micro USB / Aux Port Replacement: crwdns2935265:05crwdnd2935265:01crwdnd2935265:02crwdne2935265:0 JBL Charge Micro USB / Aux Port Replacement: crwdns2935265:05crwdnd2935265:02crwdnd2935265:02crwdne2935265:0
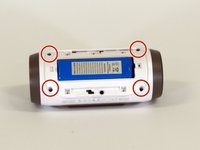
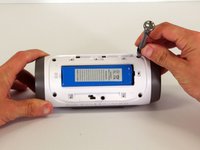
      • Remove the four 16 mm screws from the white plastic casing using the PH2 screwdriver.

      crwdns2952109:0crwdne2952109:0

      crwdns2917038:0crwdne2917038:0

    6. JBL Charge Micro USB / Aux Port Replacement: crwdns2935265:06crwdnd2935265:01crwdnd2935265:02crwdne2935265:0 JBL Charge Micro USB / Aux Port Replacement: crwdns2935265:06crwdnd2935265:02crwdnd2935265:02crwdne2935265:0
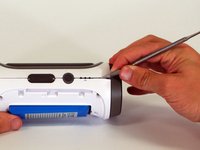
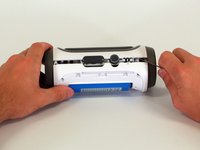
      • Starting in a corner of the device where the casing and the side meet, use a pointed metal spudger to pry the back casing off the speaker and the glue holding the seam together.

      • Slide the metal spudger along the seam to separate the back casing from the rest of the speaker.

      crwdns2952109:0crwdne2952109:0

      crwdns2917038:0crwdne2917038:0

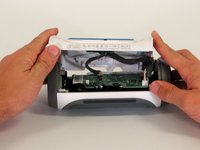
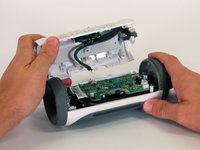
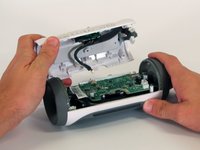
    7. JBL Charge Micro USB / Aux Port Replacement: crwdns2935265:07crwdnd2935265:01crwdnd2935265:02crwdne2935265:0 JBL Charge Micro USB / Aux Port Replacement: crwdns2935265:07crwdnd2935265:02crwdnd2935265:02crwdne2935265:0
      • Once the back casing is open, disconnect the three white connectors from the motherboard.

      • Remove the upper casing.

      crwdns2952109:0crwdne2952109:0

      crwdns2917038:0crwdne2917038:0

    1. JBL Charge Micro USB / Aux Port Replacement, Battery: crwdns2935265:08crwdnd2935265:01crwdnd2935265:01crwdne2935265:0
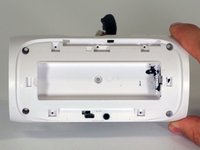
      • Turn your attention to the back casing removed in Step 7.

      crwdns2952109:0crwdne2952109:0

      crwdns2917038:0crwdne2917038:0

    2. JBL Charge Micro USB / Aux Port Replacement: crwdns2935265:09crwdnd2935265:01crwdnd2935265:01crwdne2935265:0
      • Using a razor blade, remove the glue holding the battery cable in place.

      • Use multiple vertical cuts to remove pieces of the glue.

      • Be careful not to cut the battery cables.

      crwdns2952109:0crwdne2952109:0

      crwdns2917038:0crwdne2917038:0

    3. JBL Charge Micro USB / Aux Port Replacement: crwdns2935265:010crwdnd2935265:01crwdnd2935265:01crwdne2935265:0
      • Remove the foam surrounding the battery cable.

      crwdns2952109:0crwdne2952109:0

      crwdns2917038:0crwdne2917038:0

    4. JBL Charge Micro USB / Aux Port Replacement: crwdns2935265:011crwdnd2935265:01crwdnd2935265:01crwdne2935265:0
      • To remove the battery, pull the battery cable through the hole.

      • This entire white piece needs to be replaced (if replacing the aux/usb port).

      crwdns2952109:0crwdne2952109:0

      crwdns2917038:0crwdne2917038:0

    1. JBL Charge Micro USB / Aux Port Replacement, Micro USB / Aux Port: crwdns2935265:012crwdnd2935265:01crwdnd2935265:02crwdne2935265:0 JBL Charge Micro USB / Aux Port Replacement, Micro USB / Aux Port: crwdns2935265:012crwdnd2935265:02crwdnd2935265:02crwdne2935265:0
      • Place the battery into the new white casing.

      • Reassemble the device by following the steps in reverse order.

      crwdns2952109:0crwdne2952109:0

      crwdns2917038:0crwdne2917038:0

crwdns2915888:0crwdne2915888:0

To reassemble your device, follow these instructions in reverse order.

crwdns2935221:0crwdne2935221:0

crwdns2935229:014crwdne2935229:0

Alexander Castanares

crwdns2935283:004/01/15crwdne2935283:0

891 crwdns2915208:0crwdne2915208:0

crwdns2935297:02crwdne2935297:0

crwdns2935287:0crwdne2935287:0

Cal Poly, Team 12-4, Lancaster Spring 2015 crwdns2935289:0Cal Poly, Team 12-4, Lancaster Spring 2015crwdne2935289:0

CPSU-LANCASTER-S15S12G4

crwdns2931471:02crwdne2931471:0

crwdns2935297:048crwdne2935297:0

crwdns2947412:021crwdne2947412:0

Hi. This is the problem my speaker is having, but all I need to know is where to buy the replacement back. That's certainly something you should have included in your guide.

trevormeyer - crwdns2934203:0crwdne2934203:0 crwdns2950251:0crwdne2950251:0
The purpose of a guide is to show how to fix the device, not obtain parts. I suggest eBay.

Joe Durand - crwdns2934203:0crwdne2934203:0 crwdns2950251:0crwdne2950251:0

Joe Durand. Thank you for taking time out of your busy day to share such an enlightening comment.

Pete Hyde - crwdns2934203:0crwdne2934203:0 crwdns2950251:0crwdne2950251:0

Yeah what was the point of this if people can't actually do it. BS

Gabriel Bohlmann - crwdns2934203:0crwdne2934203:0 crwdns2950251:0crwdne2950251:0

The point is to guide people on the replacement of parts, not obtaining parts. I suggest eBay.

Joe Durand - crwdns2934203:0crwdne2934203:0 crwdns2950251:0crwdne2950251:0

crwdns2917038:0crwdne2917038:0

crwdns2936625:0crwdne2936625:0:

crwdns2936751:024crwdne2936751:0 4

crwdns2936753:07crwdne2936753:0 44

crwdns2936753:030crwdne2936753:0 98

crwdns2942667:0crwdne2942667:0 115,381