crwdns2933423:0crwdne2933423:0

JBL Charge 3 Battery Replacement

crwdns2942213:0crwdne2942213:0

  1. JBL Charge 3 Battery Replacement, Front Cover: crwdns2935265:01crwdnd2935265:01crwdnd2935265:03crwdne2935265:0 JBL Charge 3 Battery Replacement, Front Cover: crwdns2935265:01crwdnd2935265:02crwdnd2935265:03crwdne2935265:0 JBL Charge 3 Battery Replacement, Front Cover: crwdns2935265:01crwdnd2935265:03crwdnd2935265:03crwdne2935265:0
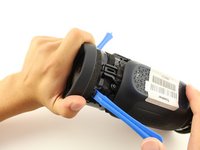
    • Turn your speaker upside down and insert the plastic opening tool vertically into the slit in the front cover.

    • Slowly pull the plastic opening tool outward to remove the four clips holding the covering in place.

    • Repeat this process for all four edges of the front cover.

  2. JBL Charge 3 Battery Replacement: crwdns2935265:02crwdnd2935265:01crwdnd2935265:01crwdne2935265:0
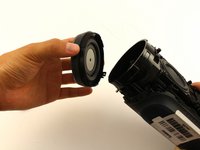
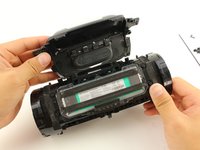
    • Pull apart your cover gently from both sides and remove it from the speaker housing.

    • The inside of the front cover has holes that must match with their corresponding pins on the speaker housing for proper reassembly.

    • Removing the Front Cover does not affect the waterproof seals of the device. However, removing any further disassembly of your speaker will require removing waterproof seals and gaskets. Your device may no longer be waterproof after these have been altered.

  3. JBL Charge 3 Battery Replacement, Passive Radiators: crwdns2935265:03crwdnd2935265:01crwdnd2935265:03crwdne2935265:0 JBL Charge 3 Battery Replacement, Passive Radiators: crwdns2935265:03crwdnd2935265:02crwdnd2935265:03crwdne2935265:0 JBL Charge 3 Battery Replacement, Passive Radiators: crwdns2935265:03crwdnd2935265:03crwdnd2935265:03crwdne2935265:0
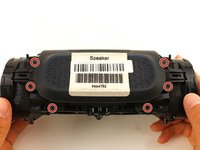
    • Remove the two 8mm Phillips #1 screws from the tabs.

    • NOTE: There may be only one screw.

  4. JBL Charge 3 Battery Replacement: crwdns2935265:04crwdnd2935265:01crwdnd2935265:02crwdne2935265:0 JBL Charge 3 Battery Replacement: crwdns2935265:04crwdnd2935265:02crwdnd2935265:02crwdne2935265:0
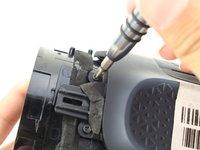
    • Insert the plastic opening tools underneath both tabs.

  5. JBL Charge 3 Battery Replacement: crwdns2935265:05crwdnd2935265:01crwdnd2935265:01crwdne2935265:0
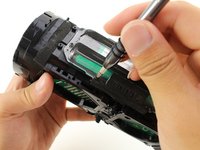
    • Twist and pull open the passive radiator. The left radiator twists off clockwise; the right counterclockwise.

  6. JBL Charge 3 Battery Replacement: crwdns2935265:06crwdnd2935265:01crwdnd2935265:02crwdne2935265:0 JBL Charge 3 Battery Replacement: crwdns2935265:06crwdnd2935265:02crwdnd2935265:02crwdne2935265:0
    • Repeat all previous steps for the other passive radiator.

    • NOTE: only the right radiator needs to be removed for changing the battery.

  7. JBL Charge 3 Battery Replacement, Battery: crwdns2935265:07crwdnd2935265:01crwdnd2935265:03crwdne2935265:0 JBL Charge 3 Battery Replacement, Battery: crwdns2935265:07crwdnd2935265:02crwdnd2935265:03crwdne2935265:0 JBL Charge 3 Battery Replacement, Battery: crwdns2935265:07crwdnd2935265:03crwdnd2935265:03crwdne2935265:0
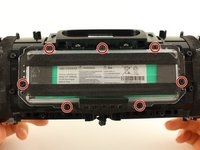
    • Remove the six 8mm Phillips #1 screws from the outer battery cover.

    • Peel the outer battery cover away from the speaker housing.

  8. JBL Charge 3 Battery Replacement: crwdns2935265:08crwdnd2935265:01crwdnd2935265:03crwdne2935265:0 JBL Charge 3 Battery Replacement: crwdns2935265:08crwdnd2935265:02crwdnd2935265:03crwdne2935265:0 JBL Charge 3 Battery Replacement: crwdns2935265:08crwdnd2935265:03crwdnd2935265:03crwdne2935265:0
    • Remove the seven 8mm Phillips #1 screws from interior battery cover.

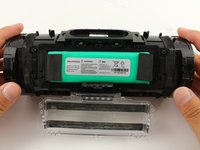
    • Remove the interior battery cover.

  9. JBL Charge 3 Battery Replacement: crwdns2935265:09crwdnd2935265:01crwdnd2935265:02crwdne2935265:0 JBL Charge 3 Battery Replacement: crwdns2935265:09crwdnd2935265:02crwdnd2935265:02crwdne2935265:0
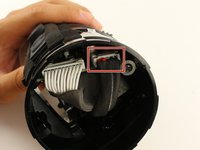
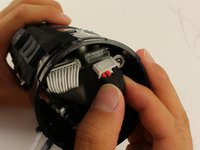
    • Pull gently to disconnect the bundled cable connector in the side of the speaker. This action will separate the battery from the motherboard.

  10. JBL Charge 3 Battery Replacement: crwdns2935265:010crwdnd2935265:01crwdnd2935265:01crwdne2935265:0
    • Pull the battery and battery cable out from their housing.

crwdns2915888:0crwdne2915888:0

To reassemble your device, follow these instructions in reverse order.

crwdns2935229:0132crwdne2935229:0

Jack Ng

crwdns2935283:010/08/18crwdne2935283:0

2.140 crwdns2915208:0crwdne2915208:0

crwdns2935297:04crwdne2935297:0

crwdns2915084:0crwdne2915084:0

Cal Poly, Team S1-G6, Zimmerman Spring 2020 crwdns2935289:0Cal Poly, Team S1-G6, Zimmerman Spring 2020crwdne2935289:0

CPSU-ZIMMERMAN-S20S1G6

crwdns2931471:04crwdne2931471:0

crwdns2935297:027crwdne2935297:0

crwdns2944067:032crwdne2944067:0

you legend. thank you so much! i was worried it was a seal unit!

Anthony Hilfischer - crwdns2934203:0crwdne2934203:0

Super Anleitung! Hat der Akkutausch hat problemlos funktioniert!

Tomas Opmann - crwdns2934203:0crwdne2934203:0

Great Guide! Where can I get the foamy coating of the battery’s wires? Or what is the proper term?

Dom Heizmann - crwdns2934203:0crwdne2934203:0

I saw one on youtube taking the one from the old battery and putting it on the new one

Dominik Spreuer -

crwdns2917038:0crwdne2917038:0

crwdns2936625:0crwdne2936625:0:

crwdns2936751:024crwdne2936751:0 100

crwdns2936753:07crwdne2936753:0 609

crwdns2936753:030crwdne2936753:0 2,831

crwdns2942667:0crwdne2942667:0 213,960