crwdns2915892:0crwdne2915892:0
How to open a MiniMax enclosure.
crwdns2942213:0crwdne2942213:0
-
-
Before you begin:
-
If your disk is mounted and running, be sure to eject it from your desktop.
-
Turn power off via the physical switch on the rear of the enclosure.
-
Remove all cables from the rear of the device. Make note of which cables were used in which ports if you have multiple devices and may mix them up. It's best to use the exact same ports to eliminate any potential issues in case you have a bad port.
-
-
-
On the rear of the device, remove the 2 philips screws, with a small screwdriver. Screws are both the same.
-
(Sorry for the poor quality photos.)
-
-
-
-
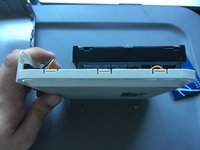
Using a thin rigid tool (or old credit card), start on the rear, wedge it into the gap between the upper and lower cases as shown.
-
Slowly work your way around the device while gently pulling up on the separating cover.
-
Make sure to use care near the rear center, to avoid breaking a single center tab at this location. By the time you get to the front, the upper case should almost be falling off, and can be easily removed.
-
-
-
Remove upper case. One each of the Left, Front, and Right sides, you can see 3 tabs (per side), that were holding the case on. On the rear you will see the fragile clip that should be removed last, if possible.
-


To reassemble your device, follow these instructions in reverse order.
crwdns2935221:0crwdne2935221:0
crwdns2935229:012crwdne2935229:0
crwdns2947412:07crwdne2947412:0
EXACTLY what I was seeking!
kend - crwdns2934203:0crwdne2934203:0 crwdns2950251:0crwdne2950251:0
Thanks for the tip! What kind of internal bus does the drive use, should I want to upgrade it?
Mariano B. - crwdns2934203:0crwdne2934203:0 crwdns2950251:0crwdne2950251:0
No idea on the internal bus. Not my area of expertise.
scottbernardis - crwdns2934203:0crwdne2934203:0 crwdns2950251:0crwdne2950251:0
The hardest part was finding an old credit card! BTW, the hard drive in my unit is a 2TB Seagate Barracuda LP with a SATA interface. I’m considering replacing it with a SSD.
Jon Noxon - crwdns2934203:0crwdne2934203:0 crwdns2950251:0crwdne2950251:0
This is exactly what I was looking for. I have an old one that stopped working and I want to replace the drive.
Noah Preston - crwdns2934203:0crwdne2934203:0 crwdns2950251:0crwdne2950251:0