crwdns2915892:0crwdne2915892:0
This guide shows how to fix an intermittant lorex wired (24V) camera doorbell such as Lorex B451AJ-Z 2K wired doorbell with WiFi, likely other units as well. This guide is useful if:
1) your doorbell camera is intermittently disconnecting from unit (no video)
2) when disconnected, the doorbell button is not illuminated blue or green (indicating no power)
3) and yet, you have 16-24VAC at the Lorex doorbell video unit input screws.
What has likely happened is the internal lithium ion battery inside the unit has outgassed into its containment wrapper and battery inflated the wrapper to the point of opening the connection between the rear screw terminals and the internal circuit board. See pictures following.
crwdns2942213:0crwdne2942213:0
-
-
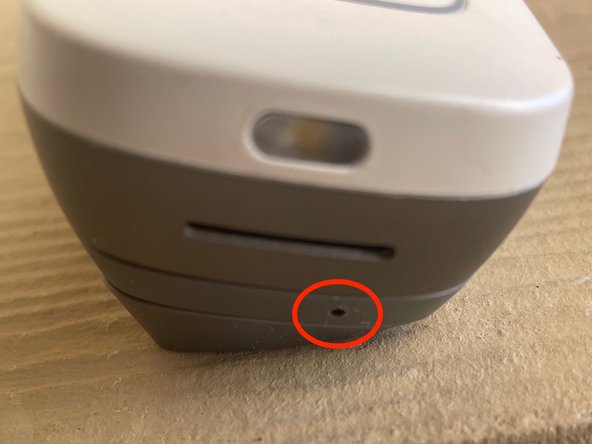
push a thin paper clip or small drill bit held with pliers into this hole on the bottom of the doorbell mount plate and pull up on the doorbell mechanism, which will release it from the mount.
-
Remove two wires in back (verify 16-24VAC is present, connecting these together should ring the doorbell inside your house.
-
-
-
Remove the 8 rubber plugs and the 8 philips screws below them, gently separate the two halves
-
-
-
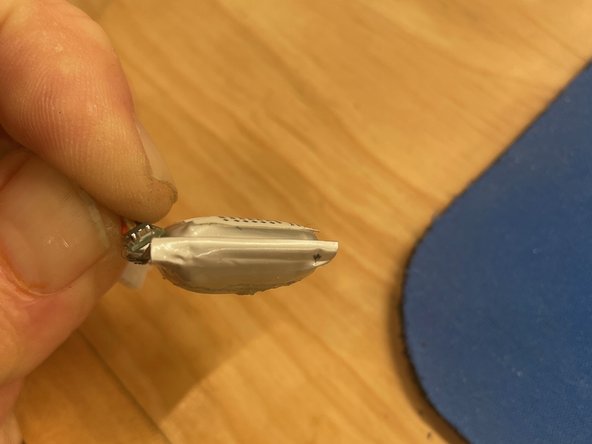
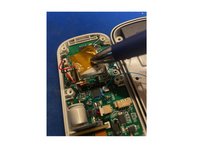
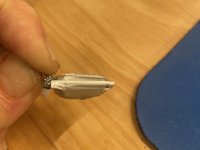
The problem is caused by the battery swelling (located under the RF antenna by the pen in the first photo). The second photo shows the swollen battery after removal. The swelling of the battery causes the front and rear of the enclosure to separate and open the connection from the bottom housing to the circuit board, as seen in the next step
-
-
-
-
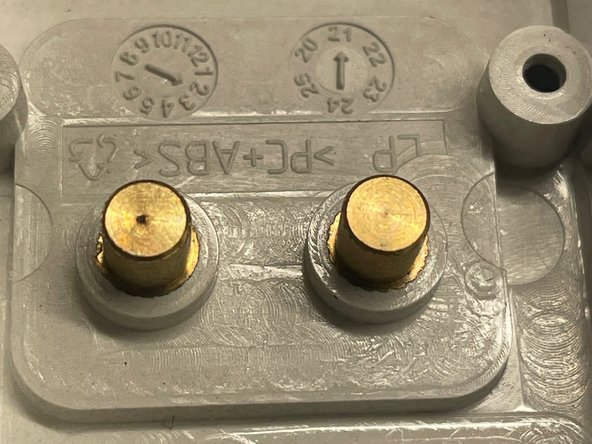
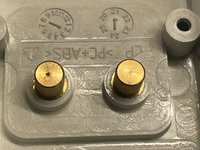
Here, you can see the contacts on the front PCB and matching posts from the rear piece (screws on backside) with a bit of surface pitting caused by the posts not making contact with the PCB pins. The 24VAC doorbell actuation current measures around 1A, the poor connection resulted in the pitting at the posts.
-
-
-
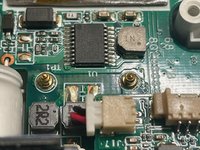
If your posts are pitted, you can just directly solder a wire between each pin and post as shown in the first photo. This may not be necessary if your connection is restored simply by removing the puffy battery (button will illuminate when 16-24VAC is applied to backside screws and unit held together).
-
Taking out the puffed battery may be sufficient to let the pin-to-post contacts close, that didn't work on my unit, so I soldered wires from post to matching pin, although polarity doesn't matter, since it's the 24VAC input supply.
-
Use caution soldering the pegs pressed into the back housing so you don't melt the plastic or change the angle or position of the brass pegs so the unit won't close fully.
-
-
-
Now, to remove the battery, gently separate the antenna from the puffy battery below, and then the puffy battery from the PCB. If you reinstall everything without the battery, the video camera will work and the doorbell will light up (blue for powered on, green for RF link and operation).
-
But without the battery, the inside doorbell won't ring when the button is pressed. The battery provides power to the PCB when the doorbell is pushed.
-
16-24VAC is only present with the doorbell switch is open - it goes to 0V when the doorbell switch is briefly closed to complete the circuit to ring the doorbell, during which time the 3.7V battery provides continuous voltage to the electronics on the PCB which close an electronic switch. The battery is charged by the 16-24VAC input.
-
This is primarily a mechanical failure - The battery is probably in early stage of electrical failure as evidenced by the outgassing, this one is putting out correct 3.7V and plenty of current capacity from my measurements. The outgassing pushes the two halves of the doorbell apart, opening the 24V contacts as shown earlier.
-
-
-
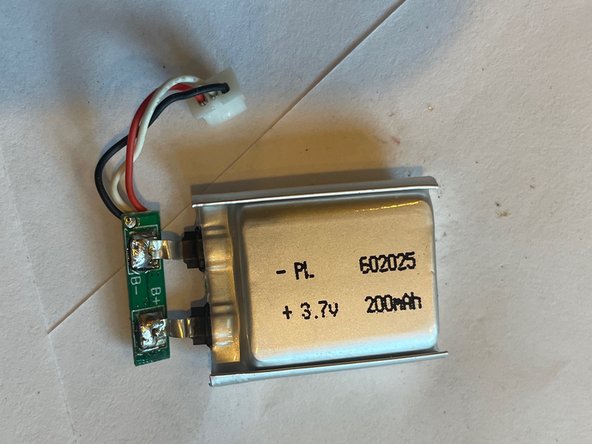
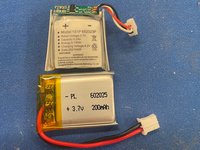
The puffed-out battery on top is marked p/n 652023 with three pin connector, the replacement battery is the same size mechanically and electrically, available on amazon and others 602025 with a two terminal connector: https://www.amazon.com/dp/B07C9R84QS . We'll remove the 3 wire harness from the old battery and put it on the new one.
-
-
-
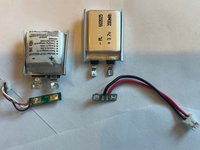
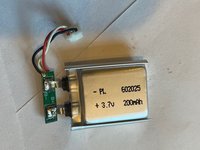
We'll remove the small circuit board and harness as a single unit from the old battery and install it on the new battery. The battery terminals are large, be sure to observe polarity (both battery and circuit board are marked + and -), it's straightforward if you have soldering experience.
-
Fold over the circuit board and put some new Kapton tape over the assembly after the third photo, and it's ready to be reinstalled.
-
-
-
The battery is installed, RF antenna Kapton taped over the battery
-
You can put in a few screws, and connect it to the 24VAC doorbell to test, the doorbell button will light up blue after a few seconds (indicating that it's receiving power) and about 20-30 seconds after will turn green indicating that it's linked to your Lorex base unit. Press to test doorbell.
-
If all of that happens with fanfare and success, put in the rest of the screws and rubber feet, hook up the 2 doorbell wires permanently, place it about 1/2" raised and against the base mount, apply modest pressure and slide it downwards until it locks into place.
-


To reassemble your device, follow the first few steps in reverse order.
To reassemble your device, follow the first few steps in reverse order.
crwdns2935221:0crwdne2935221:0
crwdns2935227:0crwdne2935227:0
crwdns2947412:03crwdne2947412:0
Excellent tutorial, thank you @jayches for sharing! A shameful design flaw from lorex that ultimately fails right after the warranty ends, but doing this saves you from falling prey into buying a new doorbell cam altogether when it starts acting up like this for no apparent reason. I would add that some flux and basic soldering knowledge is necessary!
Also getting the small pcb off the puffed battery is impossible, so I resorted to unfolding both and cutting then soldering the trimmed terminals from the new battery to the trimmed terminals from the existing old battery (Of note also is my replacement battery was a 602025 with 3.7v 300mAh and 1.1Wh available here: https://a.co/d/istvWDH - and I can conclude that what matters out of this is the size of the battery being the same in order to fit and the voltage, so don't worry if a higher amperage and wattage).
Lastly I would highly recommend soldering jump wires as illustrated above to avoid needing to do this over again when the new battery puffs up after some use.
Hello @jayches . Thank you for great finding and tutorial on how to replace puffed battery. I do have a bit different problem with my Wifi Lorex Doorbell where Lorex at all cannot help me. My 2 broken doorbells had stopped working from 16-24V transformers. I tried different transormers for the same voltage on the market. It did not help. My 2 failed Lorex Wifi doorbells work only thorugh Micro USB cable and power adapter. Event more, I bought from Lorex Website recommended power adapter with long cable for this model of Wifi Doorbell and it did not help either. I did disassemble doorbell and found 2 curcuit boards as it shows on your pictures. Those are like main curcuit board with camera and Micro SD, and a power curcuit board. Any ideas why Lorex Wifi doorbell cannot be powered by official Power adapter ?
As a test, put long wires from the screw terminals to the circuit contacts as shown in the instruction pic so you can measure directly at the pcb and then verify you have 16-24vac to the Lorex pcb (or just directly wire as an experiment). If the doorbell button isn’t lit (blue or green) with 16-24vac directly applied then something about the local power supply circuit is bad. I didn’t get into that part of the circuit. I’m guessing yours will work if the pbc gets the applied voltage. As you can see from my pics, the internal contacts were corroding from light pressure plus amps of doorbell current. Good luck!