crwdns2915892:0crwdne2915892:0
There are many benefits to adding a second hard drive to your laptop such as improved speeds, greater storage space, and less heartache when installing new software. Use this guide to install one using our optical bay hard drive enclosure.
crwdns2942213:0crwdne2942213:0
-
-
Remove the following ten screws securing the lower case to the upper case:
-
Three 13.5 mm (14.1 mm) Phillips screws.
-
Seven 3 mm Phillips screws.
-
-
-
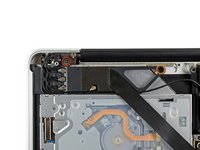
Using both hands, lift the lower case near the vent to pop it off two clips securing it to the upper case.
-
Remove the lower case and set it aside.
-
-
-
Use the edge of a spudger to pry the battery connector upwards from its socket on the logic board.
-
-
-
Bend the battery cable slightly away from its socket on the logic board so it does not accidentally connect itself while you work.
-
-
-
Disconnect the camera cable connector from its socket on the logic board.
-
-
-
Use the flat end of a spudger to pry the AirPort/Bluetooth connector up from its socket on the logic board.
-
-
-
-
Use the flat end of a spudger to pry the optical drive connector up from its socket on the logic board.
-
-
-
Remove following two screws:
-
One 8.6 mm Phillips screw
-
One 3.9 mm Phillips screw
-
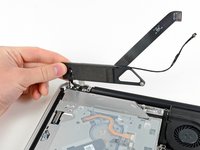
Carefully rotate the AirPort/Bluetooth board housing (with AirPort/Antenna cables still attached) out of the lower case.
-
-
-
Remove the three 3.5 mm T6 Torx screws securing the optical drive to the upper case.
-
-
-
Lift the optical drive near its connector and pull it away from the upper case to remove it from the computer.
-
-
-
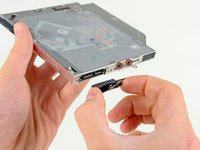
Pull the optical drive cable out of the optical drive.
-
Remove the two black Phillips #0 screws securing the small metal mounting bracket. Transfer this bracket to your new optical drive or hard drive enclosure.
-
-
-
Remove the plastic spacer from the optical bay hard drive enclosure by pressing in on one of the clips on either side and lifting it up and out of the enclosure.
-
-
-
Make sure that the hard drive connectors are facing down before placing it into the enclosure.
-
Gently place the hard drive into the enclosure's hard drive slot.
-
While firmly holding the enclosure in place with one hand, use your other hand to press the hard drive into the enclosure connectors.
-
-
-
Once the hard drive is snug, reinsert the plastic spacer while holding the hard drive against the bottom of the enclosure.
-
-
-
Use two Phillips #1 screws to secure the drive to its enclosure.
-
-
-
Attach the optical drive bracket to the new enclosure with two Phillips #0 screws.
-
Reconnect any cables you have removed from the original optical drive onto the optical bay enclosure.
-
-
-
Align the cable's SATA connector with the drive's port and plug in securely.
-
Plug the USB connector into your laptop and your optical drive is ready for use.
-


To reassemble your device, follow these instructions in reverse order.
crwdns2935221:0crwdne2935221:0
crwdns2935229:0123crwdne2935229:0

crwdns2947412:013crwdne2947412:0
great guide!
I had problems initialising the SDD drive in the optical bay. But have placed it in HD bay and it works fine.
My old Hard drive is a really snug fit in the caddy (its a 9.5mm drive) - when installed in the HD bay it sits on rubber shock absorbers and has air around it.
With a HD in the optical bay, I expect there to be some overheating or shock problems in the future.
!! Hard drive !! The Harddrive with the OS X on it for booting, has to be to be in the Harddisk bay and not the optical bay!
The System does only startup regularly on the SATA connector meant for the Harddrive, not the SATA connector of the former optical drive! (Even for MID 2012)
So, cause the most of us will add a SSD and want to run the System from it, we have to change the old Harddisk to the Optical bay where it is mounted without the anti shock rubbers.
In my case it did´t die there for over a year yet, so, not the big deal it seems at the first look ;-) lucky
I have a mid-2012 MBP. I just replaced the superdrive with a Samsung Evo 840 1TB SSD. My mac will boot from this drive when it is in the primary bay, and also if it is connected externally with a USB3/SATA cable. However it will not boot from the optical drive bay.
Also, if I install my original drive (Seagate Momentus XT 750GB hybrid) in the optical drive bay it will not boot.
If however I install an old 5400 HDD in to the optical drive bay, it WILL boot.
All three of the above mentioned drives have the same cloned OS on them. When the hybrid or the SSD are installed in the optical drive bay I can see them in the system profiler; both read a negotiated link speed of 6g.
Am I missing something...?
Crumbs :
Yes you are missing something… MPB MI2012 have just ONE Sata3 to read SSD… The sata for optical drive bay is on sata2.. So it can’t read SSD drive. Put your DD5400 on the optical drive bay, and boot with your SSD (install on the primary bay) and everything will be okay ;)!
Micke -