crwdns2915892:0crwdne2915892:0
There are many benefits to adding a second hard drive to your laptop such as improved speeds, greater storage space, and less heartache when installing new software. Use this guide to install one using our optical bay hard drive enclosure.
crwdns2942213:0crwdne2942213:0
-
-
Remove the following ten screws securing the lower case to the upper case:
-
Three 13.5 mm (14.1 mm) Phillips screws.
-
Seven 3 mm Phillips screws.
-
-
-
Using both hands, lift the lower case near the vent to pop it off two clips securing it to the upper case.
-
Remove the lower case and set it aside.
-
-
-
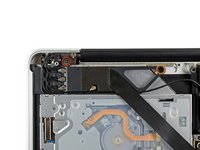
Use the edge of a spudger to pry the battery connector upwards from its socket on the logic board.
-
-
-
Bend the battery cable slightly away from its socket on the logic board so it does not accidentally connect itself while you work.
-
-
-
Disconnect the camera cable connector from its socket on the logic board.
-
-
-
Use the flat end of a spudger to pry the AirPort/Bluetooth connector up from its socket on the logic board.
-
-
-
-
Use the flat end of a spudger to pry the optical drive connector up from its socket on the logic board.
-
-
-
Remove following two screws:
-
One 8.6 mm Phillips screw
-
One 3.9 mm Phillips screw
-
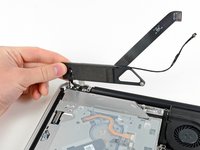
Carefully rotate the AirPort/Bluetooth board housing (with AirPort/Antenna cables still attached) out of the lower case.
-
-
-
Remove the three 3.5 mm T6 Torx screws securing the optical drive to the upper case.
-
-
-
Lift the optical drive near its connector and pull it away from the upper case to remove it from the computer.
-
-
-
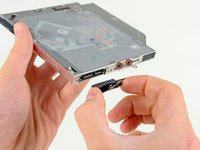
Pull the optical drive cable out of the optical drive.
-
Remove the two black Phillips #0 screws securing the small metal mounting bracket. Transfer this bracket to your new optical drive or hard drive enclosure.
-
-
-
Remove the plastic spacer from the optical bay hard drive enclosure by pressing in on one of the clips on either side and lifting it up and out of the enclosure.
-
-
-
Make sure that the hard drive connectors are facing down before placing it into the enclosure.
-
Gently place the hard drive into the enclosure's hard drive slot.
-
While firmly holding the enclosure in place with one hand, use your other hand to press the hard drive into the enclosure connectors.
-
-
-
Once the hard drive is snug, reinsert the plastic spacer while holding the hard drive against the bottom of the enclosure.
-
-
-
Use two Phillips #1 screws to secure the drive to its enclosure.
-
-
-
Attach the optical drive bracket to the new enclosure with two Phillips #0 screws.
-
Reconnect any cables you have removed from the original optical drive onto the optical bay enclosure.
-
-
-
Align the cable's SATA connector with the drive's port and plug in securely.
-
Plug the USB connector into your laptop and your optical drive is ready for use.
-


To reassemble your device, follow these instructions in reverse order.
To reassemble your device, follow these instructions in reverse order.
crwdns2935221:0crwdne2935221:0
crwdns2935229:0139crwdne2935229:0

crwdns2947412:010crwdne2947412:0
Doesn't this work with SSD's?
4 years later.... Yes, it would work exactly the same as the 2.5" SSDs are the exact same size and shape as the 2.5" HDD
dauffret -
I have a Macbook Pro 15″ (late 2011) running OS Sierra with 128GB SSD in the main bay and a 1TB Toshiba MQ01ABD100 HDD Sata II (3Gb/s) in the optical bay. Both formated as Mac OS Extended Journaled. OS and apps are running fine from the SSD, however the HDD is behaving odd: I can’t write anything on it, even when permissions say “anyone can read and write”. I got error code -50. Sometimes, the drive icon takes a while to appear in my desktop. I already:
– Replaced the optical drive flex cable.
– Tested the HDD as external drive via USB connection. (It works)
– Relaunched the finder.
– Reset SMC and PRAM.
As the optical drive was “out of service” long before I made the dual drive setup, I begun to think it might be a problem with the computer hardware itself, but then I remembered my logic board was replaced by Apple only few months ago. And a friend told me he succesfully did the dual setup regardless his optical drive wasn’t working.
I don’t know what else to try. Help!
I have same Macbook Pro 15" late 2011 with similar setup and the same problem. Unfortunately I haven't found the solution yet... :(
Rafal -
Very similar problem here!
Macbook Pro13" late 2011 (8.1)
I removed the optical driver some years ago moving in it the HDD and using as my main system drive an SSD.
Now the HDD in the optical bay is very slow, repairing it with disk utility didn't resolve the problem.
I read similar stories solved replacing the cable. Some one solved in that way?