crwdns2915892:0crwdne2915892:0
This guide will help you replace a broken or damaged power button on the outside of the Insignia NS-HTMC01-B ceramic heater. A broken or damaged power button can prevent your heater from shutting off, or turning on.
crwdns2942213:0crwdne2942213:0
-
-
Flip your device over so the bottom panel faces you. You should see a hole containing a screw in each corner of the device.
-
Insert a 4-inch Phillips #1 screwdriver into each hole until connected with the 20 millimeter, sharp-point screw.
-
-
-
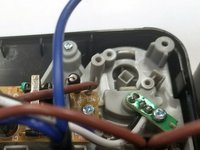
Find the power switch, located inside the heater on the bottom left corner.
-
-
-
-
Using a Phillips #1 screwdriver, unscrew the two 7 millimeter screws attaching the power switch to the power button.
-
-
-
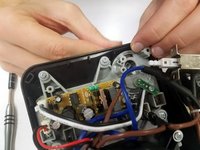
Find the clips holding the power button in place.
-
Press down on the clips to remove the button.
-


To reassemble your device, follow these instructions in reverse order.
To reassemble your device, follow these instructions in reverse order.
crwdns2915084:0crwdne2915084:0

University of North Texas, Team 1-1, Campbell Spring 2017 crwdns2935289:0University of North Texas, Team 1-1, Campbell Spring 2017crwdne2935289:0
UNT-CAMPBELL-S17S1G1
crwdns2931471:03crwdne2931471:0
crwdns2935297:012crwdne2935297:0