crwdns2915892:0crwdne2915892:0
This guide will teach you to replace the battery in an Insignia Flex 10.1 NS-P10W8100. If you are experiencing other issues, please check out the troubleshooting page. Be careful when dealing with batteries as they can contain corroded material and potentially stored electricity.
crwdns2942213:0crwdne2942213:0
-
-
Carefully open the laptop and remove the keyboard by disconnecting it.
-
Place keyboard to the side as you will not need it.
-
-
-
Lay the screen flat on its surface and use the iFixit opening tool to remove the cover by gently prying the back cover from the screen.
-
-
-
Use your fingers and pry the back cover from the screen. You may need to wiggle the cover a bit to separate the pieces.
-
If the back cover does not come off, work your fingers around the corners and slowly pry the cover off using your fingers.
-
-
-
-
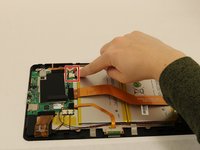
Unplug the power supply by disconnecting the red and blue wires found on the motherboard.
-
-
-
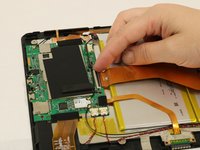
Remove the black tape from the Zero Insertion Force (ZIF) ribbon connector.
-
-
-
Lift up on the black locking flap, being careful not to damage the surrounding hardware parts.
-
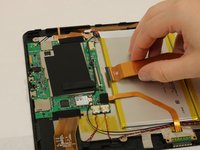
Remove the ZIF ribbon wire by pulling horizontally towards the battery.
-
-
-
Remove the black tape from the small ribbon wire connector.
-
Pull the ribbon connector out of the plug the same way that was mentioned in step 4.
-
-
-
Use the spudger to separate the battery from the base.
-


To reassemble your device, follow these instructions in reverse order.
crwdns2935221:0crwdne2935221:0
crwdns2935227:0crwdne2935227:0
crwdns2935287:0crwdne2935287:0

Western Carolina University, Team S1-G2, Virtue Spring 2019 crwdns2935289:0Western Carolina University, Team S1-G2, Virtue Spring 2019crwdne2935289:0
WCU-VIRTUE-S19S1G2
crwdns2931471:04crwdne2931471:0
crwdns2935297:05crwdne2935297:0
crwdns2947412:02crwdne2947412:0
Very concise and helpful. Thank you
where can i buy the replacement battery?