crwdns2933423:0crwdne2933423:0

Insignia Flex 10.1 NS-P10A7100 Battery Replacement

crwdns2942213:0crwdne2942213:0

  1. Insignia Flex 10.1 NS-P10A7100 Battery Replacement, Battery: crwdns2935265:01crwdnd2935265:01crwdnd2935265:03crwdne2935265:0 Insignia Flex 10.1 NS-P10A7100 Battery Replacement, Battery: crwdns2935265:01crwdnd2935265:02crwdnd2935265:03crwdne2935265:0 Insignia Flex 10.1 NS-P10A7100 Battery Replacement, Battery: crwdns2935265:01crwdnd2935265:03crwdnd2935265:03crwdne2935265:0
    • Use the blue iFixit opening tool to remove the backing of the device.

    • Wedge the tool in the crease between the device backing and screen.

  2. Insignia Flex 10.1 NS-P10A7100 Battery Replacement: crwdns2935265:02crwdnd2935265:01crwdnd2935265:02crwdne2935265:0 Insignia Flex 10.1 NS-P10A7100 Battery Replacement: crwdns2935265:02crwdnd2935265:02crwdnd2935265:02crwdne2935265:0
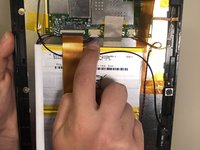
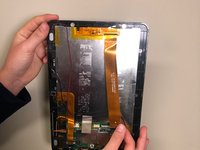
    • Disconnect the larger ribbon that runs along the top of the battery and connects to the motherboard.

    • Lift up the connector by pulling it up with your fingernail. The ribbon will then be released and you can detach it.

  3. Insignia Flex 10.1 NS-P10A7100 Battery Replacement: crwdns2935265:03crwdnd2935265:01crwdnd2935265:02crwdne2935265:0 Insignia Flex 10.1 NS-P10A7100 Battery Replacement: crwdns2935265:03crwdnd2935265:02crwdnd2935265:02crwdne2935265:0
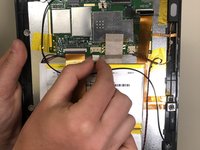
    • Detach the five colored wires that connect the battery to the motherboard.

    • Use two fingers and place one on either side of the white plastic encasing the wires.

    • Pull on this piece to release it from the motherboard.

    • Now the battery is detached from the motherboard.

  4. Insignia Flex 10.1 NS-P10A7100 Battery Replacement: crwdns2935265:04crwdnd2935265:01crwdnd2935265:03crwdne2935265:0 Insignia Flex 10.1 NS-P10A7100 Battery Replacement: crwdns2935265:04crwdnd2935265:02crwdnd2935265:03crwdne2935265:0 Insignia Flex 10.1 NS-P10A7100 Battery Replacement: crwdns2935265:04crwdnd2935265:03crwdnd2935265:03crwdne2935265:0
    • The battery is now only connected to the device by the glue on the bottom.

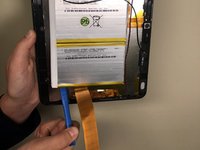
    • Use the iFixit opening tool to wedge the battery off of the device. You will have to use some force to pry the battery off of the device.

    • Now that your battery is removed it is ready for replacement.

crwdns2915888:0crwdne2915888:0

To reassemble your device, follow these instructions in reverse order.

Hannah

crwdns2935283:002/05/19crwdne2935283:0

289 crwdns2915208:0crwdne2915208:0

crwdns2935295:0crwdne2935295:0

crwdns2915084:0crwdne2915084:0

University of Michigan, Team S1-G3, Li Winter 2019 crwdns2935289:0University of Michigan, Team S1-G3, Li Winter 2019crwdne2935289:0

UMIC-LI-W19S1G3

crwdns2931471:04crwdne2931471:0

crwdns2935303:01crwdne2935303:0

crwdns2944067:00crwdne2944067:0

crwdns2917038:0crwdne2917038:0

crwdns2936625:0crwdne2936625:0:

crwdns2936751:024crwdne2936751:0 0

crwdns2936753:07crwdne2936753:0 8

crwdns2936753:030crwdne2936753:0 17

crwdns2942667:0crwdne2942667:0 971