crwdns2933423:0crwdne2933423:0

InFocus Screenplay 4805 Light Tunnel Replacement

crwdns2942213:0crwdne2942213:0

  1. InFocus Screenplay 4805 Light Tunnel Replacement, Top Panel: crwdns2935265:01crwdnd2935265:01crwdnd2935265:03crwdne2935265:0 InFocus Screenplay 4805 Light Tunnel Replacement, Top Panel: crwdns2935265:01crwdnd2935265:02crwdnd2935265:03crwdne2935265:0 InFocus Screenplay 4805 Light Tunnel Replacement, Top Panel: crwdns2935265:01crwdnd2935265:03crwdnd2935265:03crwdne2935265:0
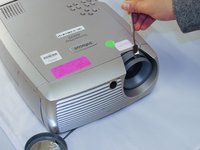
    • Flip the projector on its back.

    • Use the Phillips #2 screwdriver to remove the (4) four 2 cm gold screws.

    • Use the Phillips #2 screwdriver to remove the (3) three 1 cm silver screws.

  2. InFocus Screenplay 4805 Light Tunnel Replacement: crwdns2935265:02crwdnd2935265:01crwdnd2935265:02crwdne2935265:0 InFocus Screenplay 4805 Light Tunnel Replacement: crwdns2935265:02crwdnd2935265:02crwdnd2935265:02crwdne2935265:0
    • Turn the projector, facing the back cable board towards you.

    • Using the Phillips #0 screwdriver, remove the (3) three 1.0 cm silver screws on the back panel.

    • Gently take off back cable panel.

  3. InFocus Screenplay 4805 Light Tunnel Replacement: crwdns2935265:03crwdnd2935265:01crwdnd2935265:03crwdne2935265:0 InFocus Screenplay 4805 Light Tunnel Replacement: crwdns2935265:03crwdnd2935265:02crwdnd2935265:03crwdne2935265:0 InFocus Screenplay 4805 Light Tunnel Replacement: crwdns2935265:03crwdnd2935265:03crwdnd2935265:03crwdne2935265:0
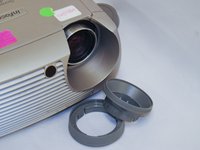
    • Turn the projector so the front side with the lens is facing you.

    • Gently pry the both of the grey lens rings using the metal spudger.

  4. InFocus Screenplay 4805 Light Tunnel Replacement: crwdns2935265:04crwdnd2935265:01crwdnd2935265:01crwdne2935265:0
    • Now that the screws have been removed, proceed with the removal of the outer panel.

    • Gently remove the front lens panel.

    • Be forewarned, the panel will resist. Be careful not to break the lens.

  5. InFocus Screenplay 4805 Light Tunnel Replacement: crwdns2935265:05crwdnd2935265:01crwdnd2935265:01crwdne2935265:0
    • Being careful not to pull the wires inside the projector, gently lift the top panel off the projector.

    • Rest the lid behind the projector so the insides are exposed and undamaged.

  6. InFocus Screenplay 4805 Light Tunnel Replacement, Light Tunnel: crwdns2935265:06crwdnd2935265:01crwdnd2935265:03crwdne2935265:0 InFocus Screenplay 4805 Light Tunnel Replacement, Light Tunnel: crwdns2935265:06crwdnd2935265:02crwdnd2935265:03crwdne2935265:0 InFocus Screenplay 4805 Light Tunnel Replacement, Light Tunnel: crwdns2935265:06crwdnd2935265:03crwdnd2935265:03crwdne2935265:0
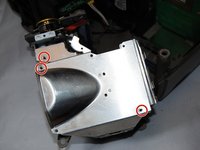
    • With the lens facing you, remove the following screws:

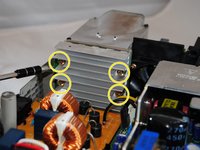
    • Using the Phillips #1 screwdriver, remove the (3) three 1.25 cm gold screws holding the metal grate between the color wheel unit and the bulb.

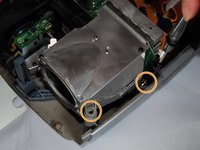
    • Using the Phillips #1 screwdriver, remove the (2) two 2 cm gold screws on the right side of the lens house.

    • Using the Phillips #1 screwdriver and a bent driver, remove the (4) four 2 cm screws on the back of the lens house.

  7. InFocus Screenplay 4805 Light Tunnel Replacement: crwdns2935265:07crwdnd2935265:01crwdnd2935265:03crwdne2935265:0 InFocus Screenplay 4805 Light Tunnel Replacement: crwdns2935265:07crwdnd2935265:02crwdnd2935265:03crwdne2935265:0 InFocus Screenplay 4805 Light Tunnel Replacement: crwdns2935265:07crwdnd2935265:03crwdnd2935265:03crwdne2935265:0
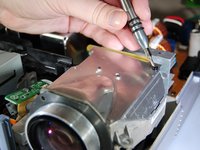
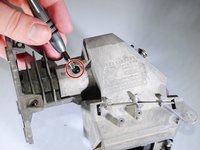
    • Using a Phillips #0 screwdriver remove the three 1 cm black screws from the lens house.

    • Remove the lens unit.

  8. InFocus Screenplay 4805 Light Tunnel Replacement: crwdns2935265:08crwdnd2935265:01crwdnd2935265:03crwdne2935265:0 InFocus Screenplay 4805 Light Tunnel Replacement: crwdns2935265:08crwdnd2935265:02crwdnd2935265:03crwdne2935265:0 InFocus Screenplay 4805 Light Tunnel Replacement: crwdns2935265:08crwdnd2935265:03crwdnd2935265:03crwdne2935265:0
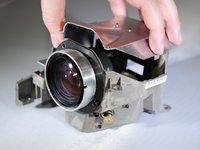
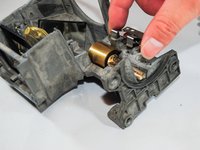
    • Using the Phillips #0 head, unscrew the four 1 cm black screws.

    • Remove the metal casings holding the tunnel in place.

  9. InFocus Screenplay 4805 Light Tunnel Replacement: crwdns2935265:09crwdnd2935265:01crwdnd2935265:02crwdne2935265:0 InFocus Screenplay 4805 Light Tunnel Replacement: crwdns2935265:09crwdnd2935265:02crwdnd2935265:02crwdne2935265:0
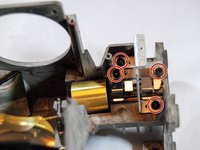
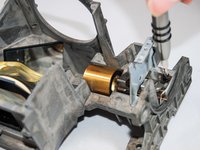
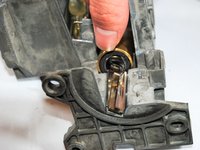
    • Using the Phillips #0 head, unscrew the black 0.5 cm screw on the bottom of the lens house.

    • Remove the light tunnel.

crwdns2915888:0crwdne2915888:0

To reassemble the device, follow these instructions in reverse order.

Marilyn Urness

crwdns2935283:009/28/17crwdne2935283:0

671 crwdns2915208:0crwdne2915208:0

crwdns2935297:07crwdne2935297:0

crwdns2915084:0crwdne2915084:0

Eastern Washington University, Team S2-G3, Crane Fall 2017 crwdns2935289:0Eastern Washington University, Team S2-G3, Crane Fall 2017crwdne2935289:0

EWU-CRANE-F17S2G3

crwdns2931471:05crwdne2931471:0

crwdns2935297:07crwdne2935297:0

crwdns2947412:00crwdne2947412:0

crwdns2917038:0crwdne2917038:0

crwdns2936625:0crwdne2936625:0:

crwdns2936751:024crwdne2936751:0 0

crwdns2936753:07crwdne2936753:0 0

crwdns2936753:030crwdne2936753:0 10

crwdns2942667:0crwdne2942667:0 921