crwdns2915892:0crwdne2915892:0
The lamp bulb may be faulty or may even be blown. Use this guide to replace it and or access other parts of the projector. The lamp housing removal steps are required to provide access to other parts like the fan.
crwdns2942213:0crwdne2942213:0
-
-
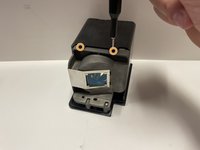
Use a Phillips #1 screwdriver to remove the 1.2 cm Phillips-head screw from each side of the projector.
-
-
-
Use your hands to slide the top plate off of the projector.
-
Lift and remove the plate.
-
-
-
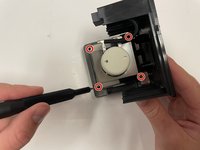
Use a Phillips #1 screwdriver to unscrew the two 9 mm screws on the top of the lamp housing unit.
-
-
-
-
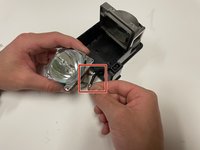
Use your hands to pull up on the silver handle and remove the lamp housing unit.
-
-
-
Once the lamp housing is removed flip it over where silver pull tab is face down.
-
Use a Phillips #00 screwdriver to remove the 5 mm screw from the right side of the lamp housing unit.
-
Use a Phillips #00 screwdriver to remove the two 5 mm screws from the top of the unit.
-
-
-
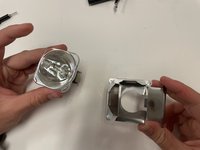
Use hands to pull off the black unit cover.
-
-
-
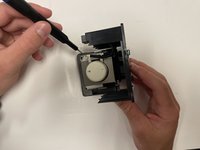
Once the cover is removed, flip the housing unit so the bulb is face down.
-
Remove the four 4 mm screws with a Phillips #00 screwdriver.
-
-
-
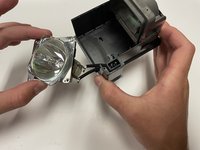
Use hands to pull out the bulb and silver cover.
-
Gently pull on the two wires that connect the bulb to its housing to disconnect them.
-
-
-
Once wires are disconnected, Remove the bulb from the silver cover and replace.
-


To reassemble your device, follow these instructions in reverse order.
crwdns2935287:0crwdne2935287:0

University of Alabama, Team 3-3, Bedsole Spring 2022 crwdns2935289:0University of Alabama, Team 3-3, Bedsole Spring 2022crwdne2935289:0
UA-BEDSOLE-S22S3G3
crwdns2931471:04crwdne2931471:0
crwdns2935297:04crwdne2935297:0