crwdns2933423:0crwdne2933423:0

InFocus IN3114 Fans Replacement

crwdns2942213:0crwdne2942213:0

  1. InFocus IN3114 Fans Replacement, Top Plate: crwdns2935265:01crwdnd2935265:01crwdnd2935265:02crwdne2935265:0 InFocus IN3114 Fans Replacement, Top Plate: crwdns2935265:01crwdnd2935265:02crwdnd2935265:02crwdne2935265:0
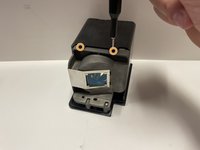
    • Use a Phillips #1 screwdriver to remove the 1.2 cm Phillips-head screw from each side of the projector.

  2. InFocus IN3114 Fans Replacement: crwdns2935265:02crwdnd2935265:01crwdnd2935265:03crwdne2935265:0 InFocus IN3114 Fans Replacement: crwdns2935265:02crwdnd2935265:02crwdnd2935265:03crwdne2935265:0 InFocus IN3114 Fans Replacement: crwdns2935265:02crwdnd2935265:03crwdnd2935265:03crwdne2935265:0
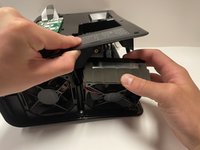
    • Use your hands to slide the top plate off of the projector.

    • Lift and remove the plate.

  3. InFocus IN3114 Fans Replacement, Lamp: crwdns2935265:03crwdnd2935265:01crwdnd2935265:01crwdne2935265:0
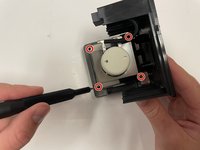
    • Use a Phillips #1 screwdriver to unscrew the two 9 mm screws on the top of the lamp housing unit.

    • Screws will not come all the way out. It is best to just loosen them as much as possible.

  4. InFocus IN3114 Fans Replacement: crwdns2935265:04crwdnd2935265:01crwdnd2935265:01crwdne2935265:0
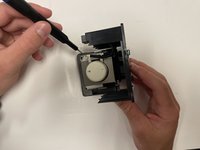
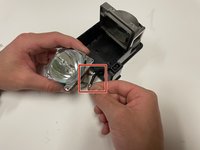
    • Use your hands to pull up on the silver handle and remove the lamp housing unit.

  5. InFocus IN3114 Fans Replacement: crwdns2935265:05crwdnd2935265:01crwdnd2935265:02crwdne2935265:0 InFocus IN3114 Fans Replacement: crwdns2935265:05crwdnd2935265:02crwdnd2935265:02crwdne2935265:0
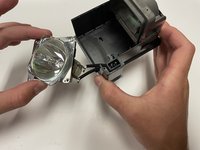
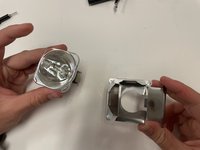
    • Once the lamp housing is removed flip it over where silver pull tab is face down.

    • Use a Phillips #00 screwdriver to remove the 5 mm screw from the right side of the lamp housing unit.

    • Use a Phillips #00 screwdriver to remove the two 5 mm screws from the top of the unit.

  6. InFocus IN3114 Fans Replacement: crwdns2935265:06crwdnd2935265:01crwdnd2935265:01crwdne2935265:0
    • Use hands to pull off the black unit cover.

  7. InFocus IN3114 Fans Replacement: crwdns2935265:07crwdnd2935265:01crwdnd2935265:02crwdne2935265:0 InFocus IN3114 Fans Replacement: crwdns2935265:07crwdnd2935265:02crwdnd2935265:02crwdne2935265:0
    • Once the cover is removed, flip the housing unit so the bulb is face down.

    • Remove the four 4 mm screws with a Phillips #00 screwdriver.

  8. InFocus IN3114 Fans Replacement: crwdns2935265:08crwdnd2935265:01crwdnd2935265:02crwdne2935265:0 InFocus IN3114 Fans Replacement: crwdns2935265:08crwdnd2935265:02crwdnd2935265:02crwdne2935265:0
    • Use hands to pull out the bulb and silver cover.

    • Gently pull on the two wires that connect the bulb to its housing to disconnect them.

  9. InFocus IN3114 Fans Replacement: crwdns2935265:09crwdnd2935265:01crwdnd2935265:02crwdne2935265:0 InFocus IN3114 Fans Replacement: crwdns2935265:09crwdnd2935265:02crwdnd2935265:02crwdne2935265:0
    • Once wires are disconnected, Remove the bulb from the silver cover and replace.

  10. InFocus IN3114 Fans Replacement, Fans: crwdns2935265:010crwdnd2935265:01crwdnd2935265:01crwdne2935265:0
    • Use a Phillips #1 screwdriver to loosen and remove the five 7 mm screws that secure the frame.

  11. InFocus IN3114 Fans Replacement: crwdns2935265:011crwdnd2935265:01crwdnd2935265:01crwdne2935265:0
    • Pull back the top of the front face slightly.

    • Use a Phillips #1 screwdriver to remove the two 7 mm screws, and lift upwards.

    • These screws are held in tightly. In order to prevent stripping, be sure to apply ample downward pressure to the screwdriver when unscrewing the screws.

  12. InFocus IN3114 Fans Replacement: crwdns2935265:012crwdnd2935265:01crwdnd2935265:02crwdne2935265:0 InFocus IN3114 Fans Replacement: crwdns2935265:012crwdnd2935265:02crwdnd2935265:02crwdne2935265:0
    • Use hands to unplug wiring connecting the front face to the main projector.

    • Wiring should pull out with moderate force.

  13. InFocus IN3114 Fans Replacement: crwdns2935265:013crwdnd2935265:01crwdnd2935265:01crwdne2935265:0
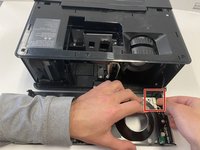
    • Carefully pull the left vent back, and use a Phillips #1 screwdriver to remove the screws that secure it in place.

    • These screws are held in tightly. In order to prevent stripping, be sure to apply ample downward pressure.

  14. InFocus IN3114 Fans Replacement: crwdns2935265:014crwdnd2935265:01crwdnd2935265:03crwdne2935265:0 InFocus IN3114 Fans Replacement: crwdns2935265:014crwdnd2935265:02crwdnd2935265:03crwdne2935265:0 InFocus IN3114 Fans Replacement: crwdns2935265:014crwdnd2935265:03crwdnd2935265:03crwdne2935265:0
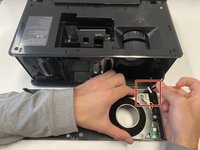
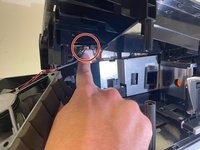
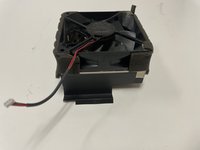
    • Carefully remove each fan, and use your hands to gently unplug their connectors from the circuit board.

    • The wires should unplug easily with a moderate tug.

crwdns2915888:0crwdne2915888:0

To reassemble your device, follow these instructions in reverse order.

Isaac Sherman

crwdns2935283:003/21/22crwdne2935283:0

221 crwdns2915208:0crwdne2915208:0

crwdns2935295:0crwdne2935295:0

crwdns2915084:0crwdne2915084:0

University of Alabama, Team 3-3, Bedsole Spring 2022 crwdns2935289:0University of Alabama, Team 3-3, Bedsole Spring 2022crwdne2935289:0

UA-BEDSOLE-S22S3G3

crwdns2931471:04crwdne2931471:0

crwdns2935297:04crwdne2935297:0

crwdns2947412:00crwdne2947412:0

crwdns2917038:0crwdne2917038:0

crwdns2936625:0crwdne2936625:0:

crwdns2936751:024crwdne2936751:0 1

crwdns2936753:07crwdne2936753:0 1

crwdns2936753:030crwdne2936753:0 4

crwdns2942667:0crwdne2942667:0 318