crwdns2933423:0crwdne2933423:0

ILVE Microwave Replacement Bulb Replacement

crwdns2942213:0crwdne2942213:0

  1. ILVE Microwave  Replacement Bulb Replacement, Remove the microwave from cabinate: crwdns2935265:01crwdnd2935265:01crwdnd2935265:01crwdne2935265:0
    • Remove the brown plug.

    • The screw attaching the microwave is below

  2. ILVE Microwave  Replacement Bulb Replacement, Remove the outer case: crwdns2935265:02crwdnd2935265:01crwdnd2935265:02crwdne2935265:0 ILVE Microwave  Replacement Bulb Replacement, Remove the outer case: crwdns2935265:02crwdnd2935265:02crwdnd2935265:02crwdne2935265:0
    • Remove the cross point screws from the outer case back

    • One screw has a tamper proof head so cut a slot it in and unscrew with a flat head screw driver.

    • Take caution to ensure that no metal shards fall inside the microwave. You may want to tape over the holes or wipe the area off with a damp cloth or paper towel once finished.

  3. ILVE Microwave  Replacement Bulb Replacement, Remove the bulb socket: crwdns2935265:03crwdnd2935265:01crwdnd2935265:01crwdne2935265:0
    • The socket is on top right side of the microwave

    • Remove the plugs

    • Bend up the metal clips, and pull out the socket

  4. ILVE Microwave  Replacement Bulb Replacement, Remove the bulb from the socket: crwdns2935265:04crwdnd2935265:01crwdnd2935265:02crwdne2935265:0 ILVE Microwave  Replacement Bulb Replacement, Remove the bulb from the socket: crwdns2935265:04crwdnd2935265:02crwdnd2935265:02crwdne2935265:0
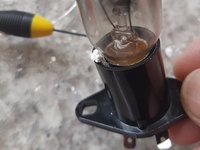
    • Remove the white glue (or sealer) that's around the bulb screw using a small screw driver.

    • The glue goes all the way down the thread so remove as much as you can see.
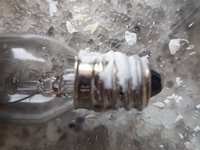
    • Use leather gloves to unscrew incase the bulb breaks. It need quite a lot of force so make really sure you've got every bit a glue out.

  5. ILVE Microwave  Replacement Bulb Replacement, Re assmeble: crwdns2935265:05crwdnd2935265:01crwdnd2935265:01crwdne2935265:0
    • When you re assemble the outer case make sure the tabs on the front go either side of the front.

crwdns2915888:0crwdne2915888:0

To reassemble your device, follow these instructions in reverse order.

crwdns2935229:03crwdne2935229:0

Martin Hampton

crwdns2935283:002/13/16crwdne2935283:0

1,308 crwdns2915208:0crwdne2915208:0

crwdns2935297:07crwdne2935297:0

crwdns2944067:00crwdne2944067:0

crwdns2917038:0crwdne2917038:0

crwdns2936625:0crwdne2936625:0:

crwdns2936751:024crwdne2936751:0 0

crwdns2936753:07crwdne2936753:0 4

crwdns2936753:030crwdne2936753:0 60

crwdns2942667:0crwdne2942667:0 2,951