crwdns2933423:0crwdne2933423:0

IBM ThinkPad T42 Mini-PCI Port Replacement

crwdns2942213:0crwdne2942213:0

  1. IBM ThinkPad T42 Mini-PCI Port Replacement, Bottom cover: crwdns2935265:01crwdnd2935265:01crwdnd2935265:01crwdne2935265:0
    • Using a Phillips #0 screwdriver, identify and unscrew the twenty screws located on the underside of the T42.

  2. IBM ThinkPad T42 Mini-PCI Port Replacement, Rear screws: crwdns2935265:02crwdnd2935265:01crwdnd2935265:01crwdne2935265:0
    • Unscrew the four Phillips screws located on either side of the rear of the T42 (there are two located on each end.)

  3. IBM ThinkPad T42 Mini-PCI Port Replacement, Keyboard and Trackpad: crwdns2935265:03crwdnd2935265:01crwdnd2935265:01crwdne2935265:0
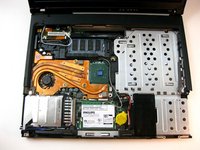
    • Flip the laptop over and open the screen to access the keyboard and trackpad.

    • The keyboard and trackpad are connected to the motherboard. Before removing the keyboard and trackpad, disconnect both components from the motherboard, as shown in the following step.

    • The bezel and keyboard will be loose, be careful.

  4. IBM ThinkPad T42 Mini-PCI Port Replacement: crwdns2935265:04crwdnd2935265:01crwdnd2935265:02crwdne2935265:0 IBM ThinkPad T42 Mini-PCI Port Replacement: crwdns2935265:04crwdnd2935265:02crwdnd2935265:02crwdne2935265:0
    • Carefully maneuver the palm rest away from the keyboard, as both the keyboard and palm rest/trackpad will come off together.

    • Remember, both the keyboard and trackpad have connectors to the motherboard. Disconnect these before completely removing either component.

  5. IBM ThinkPad T42 Mini-PCI Port Replacement, Port Bracket: crwdns2935265:05crwdnd2935265:01crwdnd2935265:01crwdne2935265:0
    • Remove the screw affixing the bracket down.

  6. IBM ThinkPad T42 Mini-PCI Port Replacement, Bracket Removal: crwdns2935265:06crwdnd2935265:01crwdnd2935265:01crwdne2935265:0
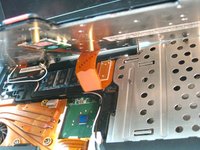
    • Lift the bracket up and out.

  7. IBM ThinkPad T42 Mini-PCI Port Replacement, Port Removal: crwdns2935265:07crwdnd2935265:01crwdnd2935265:01crwdne2935265:0
    • Carefully disconnect it from the motherboard and pull it out of the device.

crwdns2915888:0crwdne2915888:0

To reassemble your device, follow these instructions in reverse order.

crwdns2935227:0crwdne2935227:0

Gerald Watanabe

crwdns2935283:004/14/10crwdne2935283:0

279 crwdns2915208:0crwdne2915208:0

crwdns2935297:07crwdne2935297:0

crwdns2915084:0crwdne2915084:0

Cal Poly, Team 29-76, Johann Spring 2010 crwdns2935289:0Cal Poly, Team 29-76, Johann Spring 2010crwdne2935289:0

CPSU-JOHANN-S10S29G76

crwdns2931471:04crwdne2931471:0

crwdns2935297:035crwdne2935297:0

crwdns2944067:00crwdne2944067:0

crwdns2917038:0crwdne2917038:0

crwdns2936625:0crwdne2936625:0:

crwdns2936751:024crwdne2936751:0 1

crwdns2936753:07crwdne2936753:0 3

crwdns2936753:030crwdne2936753:0 5

crwdns2942667:0crwdne2942667:0 4,396