crwdns2915892:0crwdne2915892:0
Removal/repair of the display
crwdns2942213:0crwdne2942213:0
-
-
Use a Phillips #0 screwdriver to remove the twenty screws on the underside of the T42.
-
-
-
Remove the four Phillips screws located on either side of the rear of the T42 (there are two on each end.)
leave these four screws alone. No need to remove them.
There are tiny numbers showing the lengths of the screws. 1-2-3-4 where 1 is the shortest.
The dark red circles are not very easy to see. How about white ones?
-
-
-
Flip the laptop over and open the screen to access the keyboard and trackpad.
-
-
-
-
Carefully maneuver the palm rest away from the keyboard, as both the keyboard and palm rest/trackpad will come off together.
-
-
-
Remove the plastic bezel along the edges, you may need to pry the areas circled with a spudger to remove the bezel.
-
-
-
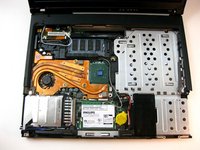
Unscrew the screws holding down the display.
could you post a pic of all the screws and where they go?
-
-
-
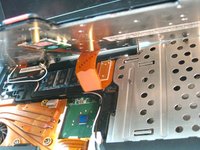
Carefully unplug the display ribbon on the motherboard, then carefully lift the display free from the device.
-


To reassemble your device, follow these instructions in reverse order.
To reassemble your device, follow these instructions in reverse order.
crwdns2935221:0crwdne2935221:0
crwdns2935229:06crwdne2935229:0

crwdns2915084:0crwdne2915084:0

Cal Poly, Team 29-76, Johann Spring 2010 crwdns2935289:0Cal Poly, Team 29-76, Johann Spring 2010crwdne2935289:0
CPSU-JOHANN-S10S29G76
crwdns2931471:04crwdne2931471:0
crwdns2935297:037crwdne2935297:0
crwdns2947412:02crwdne2947412:0
@Seth
Just use the pic numbering left to right each of the 4 rows.
Start at the top and remove in sequence, placing each on a strip of heavy tape to keep the screws in sequence.
Place a second strip on top when finished to secure the sequence until it's time to re-assemble.
Very poor & sketchy guide! NO mention at all of how to handle the other wires involved in disconnecting the screen (lid) from the laptop base, eg: the wireless antenna connections and instructions like: "Unscrew the screws holding it down" are far too vague! holding WHAT down ffs!!!!