crwdns2933423:0crwdne2933423:0

IBM ThinkPad T30 Keyboard Replacement

crwdns2942213:0crwdne2942213:0

  1. IBM ThinkPad T30 Keyboard Replacement, Battery: crwdns2935265:01crwdnd2935265:01crwdnd2935265:03crwdne2935265:0 IBM ThinkPad T30 Keyboard Replacement, Battery: crwdns2935265:01crwdnd2935265:02crwdnd2935265:03crwdne2935265:0 IBM ThinkPad T30 Keyboard Replacement, Battery: crwdns2935265:01crwdnd2935265:03crwdnd2935265:03crwdne2935265:0
    • Make sure the ThinkPad is off and the power supply is unplugged.

    • Flip the ThinkPad upside down with the bottom facing you.

    • Slide the latch to the right into the unlock position.

    • While holding the latch in the unlock position, lift the battery out with your other hand.

  2. IBM ThinkPad T30 Keyboard Replacement, Keyboard: crwdns2935265:02crwdnd2935265:01crwdnd2935265:02crwdne2935265:0 IBM ThinkPad T30 Keyboard Replacement, Keyboard: crwdns2935265:02crwdnd2935265:02crwdnd2935265:02crwdne2935265:0
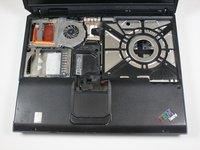
    • Begin by removing the two black 16 mm Phillips #0 screws. The screws can be identified by the two notches next to each screw. One (marked in red) is near the battery lock and the other (not pictured) is next to the Wi-Fi cover.

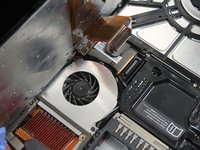
    • Push up the bottom of the keyboard by poking your finger through the hole to the right of the yellow bios battery. You will feel slight resistance.

    • Be sure to not lift the keyboard too far. It is still attached to the computer with a ribbon connector.

  3. IBM ThinkPad T30 Keyboard Replacement: crwdns2935265:03crwdnd2935265:01crwdnd2935265:03crwdne2935265:0 IBM ThinkPad T30 Keyboard Replacement: crwdns2935265:03crwdnd2935265:02crwdnd2935265:03crwdne2935265:0 IBM ThinkPad T30 Keyboard Replacement: crwdns2935265:03crwdnd2935265:03crwdnd2935265:03crwdne2935265:0
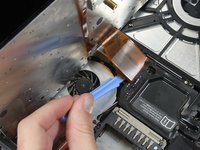
    • Lift the keyboard to expose the ribbon connector and lean it against the computer screen to keep the ribbon intact.

    • If the ribbon is broken, the keyboard is permanently unusable and needs to be replaced

    • Use the plastic opening tool to gently pry the connector up from the motherboard.

    • You can now safely remove the keyboard.

crwdns2915888:0crwdne2915888:0

To reassemble your device, follow these instructions in reverse order.

crwdns2935229:02crwdne2935229:0

Alex Kost

crwdns2935283:010/05/12crwdne2935283:0

271 crwdns2915208:0crwdne2915208:0

crwdns2935297:05crwdne2935297:0

crwdns2915084:0crwdne2915084:0

Cal Poly, Team 3-20, Amido Fall 2012 crwdns2935289:0Cal Poly, Team 3-20, Amido Fall 2012crwdne2935289:0

CPSU-AMIDO-F12S3G20

crwdns2931471:03crwdne2931471:0

crwdns2935297:016crwdne2935297:0

crwdns2944067:00crwdne2944067:0

crwdns2917038:0crwdne2917038:0

crwdns2936625:0crwdne2936625:0:

crwdns2936751:024crwdne2936751:0 0

crwdns2936753:07crwdne2936753:0 1

crwdns2936753:030crwdne2936753:0 18

crwdns2942667:0crwdne2942667:0 2,950