crwdns2915892:0crwdne2915892:0
This guide will provide step-by-step instructions on replacing the LCD Display in a Huawei Honor 8.
crwdns2942213:0crwdne2942213:0
-
-
Using a heat gun or hairdryer, apply heat approximately three inches above the glass panel to warm up the adhesive around the outside edge of the phone.
 crwdns2952109:0crwdne2952109:0
-
-
-
Using a plastic opening tool, gently pry up a corner of the rear glass panel.
-
Slowly slide the plastic opening tool around the outside of the glass panel to break through the adhesive.
-
Gently lift the back panel off once all the adhesive has been removed.
-
-
-
Using a Phillips PH00 screwdriver, remove the silver Phillips 3.5 mm screw circled in red.
-
Using a spudger, gently lift off the small metal tab that was held in place by the screw.
-
Gently pry off the orange ribbon wire on the back panel.
-
-
-
Using a Phillips PH00 screwdriver, remove the eight silver Phillips 3.5 mm screws circled in red.
-
Using a Phillips PH00 screwdriver, remove the six black Phillips 4.0 mm screws circled in orange.
-
Using a Phillips PH00 screwdriver, remove the single silver 3.0 mm Phillips screw circled in yellow.
-
Using the Phillips PH00 screwdriver tip, gently scratch away the white stickers outlined in green circles to expose hidden screws.
-
Using a Phillips PH00 screwdriver, remove the two black Phillips 4.0 mm screws circled in green.
-
-
-
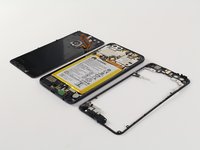
Slowly slide the plastic opening tool around the perimeter of the inner lining.
-
Gently pull the inner lining up to remove it from the phone body.
-
-
-
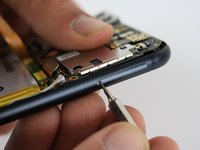
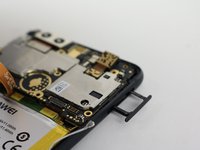
Holding the phone so that the cameras are at the top, locate the small hole on the top right edge of the device.
-
Using the 0.8 mm Sim Eject tool, push down on the small hole to release the Sim Card tray.
-
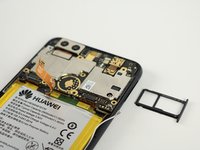
Gently pull out the Sim Card tray and set it aside.
-
-
-
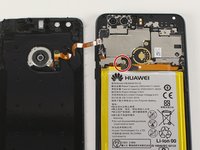
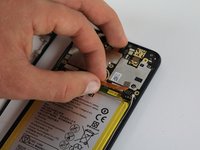
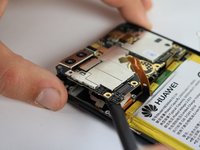
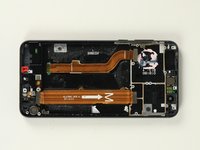
In the following steps you will disconnect the five connectors circled in red holding the motherboard in place.
-
-
-
-
Gently pull the small ribbon connection between the battery and motherboard upward to disconnect it.
-
-
-
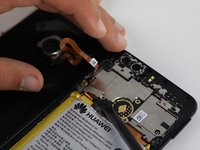
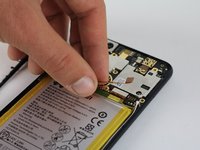
Use a spudger to gently pry off the small antenna cable on the right side of the motherboard.
-
-
-
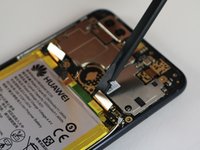
Using a spudger, gently pry up the small connection that holds the motherboard in place.
-
-
-
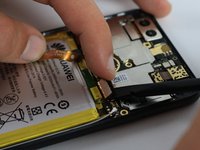
Using a spudger, gently pry up the connector near the left edge of the motherboard.
-
-
-
Use a spudger to gently pry off the small connection on the far left edge of the motherboard.
-
-
-
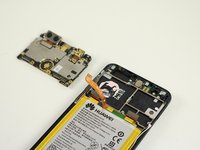
Use a spudger to pry up a corner of the motherboard.
-
Lift the motherboard to remove it from the body of the phone.
-
-
-
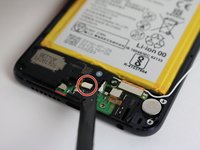
Using a spudger, pry off the small connection between the speaker and phone body located near the bottom of the device circled in red.
-
Gently pry up a corner of the speaker using a spudger.
-
Lift the speaker up and out of the phone body.
-
-
-
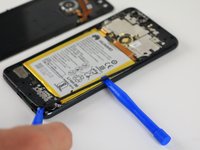
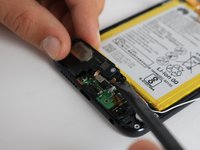
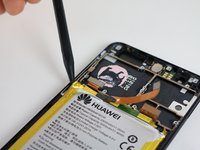
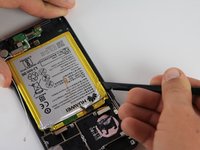
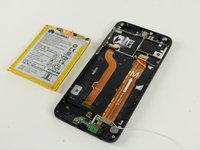
Insert the plastic spudger into the gap between the frame and the battery.
-
Move the spudger around the outside edge of the battery to remove the adhesive.
-
-
-
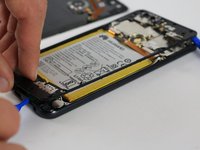
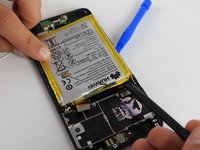
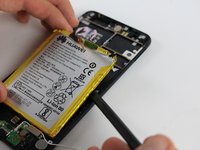
Once all the adhesive has been removed from the battery, use the spudger and plastic opening tools to gently pry the battery away from the frame.
-
-
-
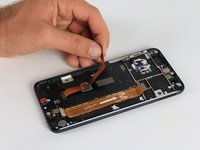
Gently pull the ribbon cable that connects the LCD screen away from the phone body.
-
-
-
Using a heat gun or hairdryer, apply heat approximately three inches above the LCD Display to warm up the adhesive around the outside edge of the phone.
-
-
-
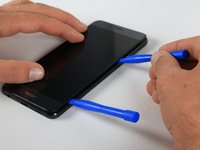
Using a plastic opening tool, gently pry up a corner of the LCD Display.
-
Slowly slide the plastic opening tool around the outside of the LCD Display to break through the adhesive.
-
Once all the adhesive has been removed, gently lift the LCD Display off.
-


To reassemble your device, follow these instructions in reverse order.
crwdns2935221:0crwdne2935221:0
crwdns2935229:09crwdne2935229:0
crwdns2935287:0crwdne2935287:0

Cal Poly, Team S18-G2, Forte Fall 2017 crwdns2935289:0Cal Poly, Team S18-G2, Forte Fall 2017crwdne2935289:0
CPSU-FORTE-F17S18G2
crwdns2931471:04crwdne2931471:0
crwdns2935297:024crwdne2935297:0
crwdns2947412:05crwdne2947412:0
When removing the LCD I wrongly thought the line on the metal frame was where I should pry and damaged it. You should include a closeup in the guide to show the two and let people know which one to start sticking stuff into. It required a lot of force to get the screen off, the metal frame actually bent outwards from the pressure..
Andreas Østhus Saltveit - crwdns2934203:0crwdne2934203:0 crwdns2950251:0crwdne2950251:0
When opening the back cover, make sure not to pry the glass itself off, there’s a really thin piece of plastic (?) behind it. I almost destroyed the cover because of it.
robonxt - crwdns2934203:0crwdne2934203:0 crwdns2950251:0crwdne2950251:0
When removing the antenna, don’t force, try removing the antenna by the cable. I broke the connector because it was hard, I somehow managed to repair it (by solder) but DON’T DO THAT the connector is 1mm long, it’s nearly impossible to repair
Gabmiral - crwdns2934203:0crwdne2934203:0 crwdns2950251:0crwdne2950251:0
I have just finished replacing the battery and the screen one this smartphone and it took me forever !!! Unfortunately I forgot to put back the metal tab that holds the screen and fingerprint cable and I am wondering if that is going to be an issue for me in the future as I really don’t want to open the device again !!!
Adel Hachmi - crwdns2934203:0crwdne2934203:0 crwdns2950251:0crwdne2950251:0
I accidentaly broke the charging cable under the battery while trying to remove the damm thing. The replacment cable is a bit longer. For me the metal tabs are necessary to hold the connectors in place. I supposse in your case everything should be fine.
Jonas Linter - crwdns2934203:0crwdne2934203:0 crwdns2950251:0crwdne2950251:0