crwdns2933423:0crwdne2933423:0
crwdns2947577:0crwdnd2947577:0crwdne2947577:0

How to replace the Nintendo 2DS charging port

crwdns2942213:0crwdne2942213:0

crwdns2936621:0crwdne2936621:0

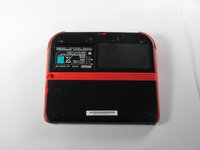
    1. How to replace the Nintendo 2DS charging port, Battery: crwdns2935265:01crwdnd2935265:01crwdnd2935265:01crwdne2935265:0
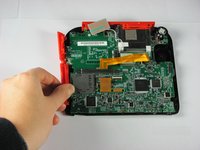
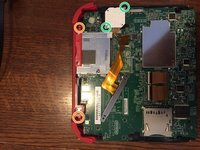
      • Remove the two Phillips captive screws securing the upper rear panel.

      • The captive screws will not completely detach from the back panel.

      crwdns2952109:0crwdne2952109:0

      crwdns2917038:0crwdne2917038:0

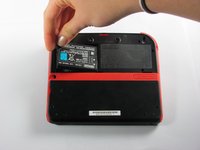
    2. How to replace the Nintendo 2DS charging port: crwdns2935265:02crwdnd2935265:01crwdnd2935265:02crwdne2935265:0 How to replace the Nintendo 2DS charging port: crwdns2935265:02crwdnd2935265:02crwdnd2935265:02crwdne2935265:0
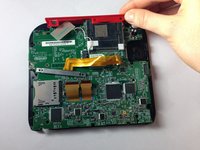
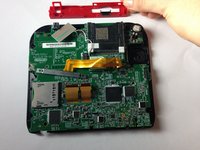
      • Hinge the upper rear panel upwards and outwards to remove it.

      crwdns2952109:0crwdne2952109:0

      crwdns2917038:0crwdne2917038:0

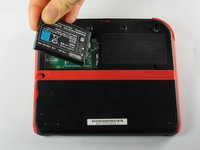
    3. How to replace the Nintendo 2DS charging port: crwdns2935265:03crwdnd2935265:01crwdnd2935265:03crwdne2935265:0 How to replace the Nintendo 2DS charging port: crwdns2935265:03crwdnd2935265:02crwdnd2935265:03crwdne2935265:0 How to replace the Nintendo 2DS charging port: crwdns2935265:03crwdnd2935265:03crwdnd2935265:03crwdne2935265:0
      • Remove the battery from its housing by lifting it up from the side closest to the outside edge.

      crwdns2952109:0crwdne2952109:0

      crwdns2917038:0crwdne2917038:0

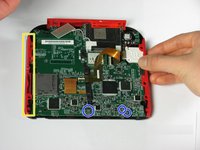
    1. How to replace the Nintendo 2DS charging port, Rear Panel: crwdns2935265:04crwdnd2935265:01crwdnd2935265:01crwdne2935265:0
      • Remove the ten Phillips screws attaching the rear panel.

      crwdns2952109:0crwdne2952109:0

      crwdns2917038:0crwdne2917038:0

    2. How to replace the Nintendo 2DS charging port: crwdns2935265:05crwdnd2935265:01crwdnd2935265:01crwdne2935265:0
      • The rear panel is attached to the motherboard by a ribbon cable, so be careful not to lift the rear panel too far from the device.

      • Carefully pull the rear panel straight up from the device.

      crwdns2952109:0crwdne2952109:0

      crwdns2917038:0crwdne2917038:0

    3. How to replace the Nintendo 2DS charging port: crwdns2935265:06crwdnd2935265:01crwdnd2935265:01crwdne2935265:0
      • Use your fingernail or the flat end of a spudger to flip up the connector securing the ribbon cable to the motherboard

      • Remove the cable from the connector

      • Take the opportunity to remove the Left and Right triggers, they have hinges that may break and springs that may jump away.

      crwdns2952109:0crwdne2952109:0

      crwdns2917038:0crwdne2917038:0

    1. How to replace the Nintendo 2DS charging port, Remove Side Panels: crwdns2935265:07crwdnd2935265:01crwdnd2935265:02crwdne2935265:0 How to replace the Nintendo 2DS charging port, Remove Side Panels: crwdns2935265:07crwdnd2935265:02crwdnd2935265:02crwdne2935265:0
      • Hold the side panels of the device's case with your fingers and pull outward to remove them.

      • The panels should come off easily with little force required.

      • There are three ribbon cables which have already been unplugged in this picture, disconnect these before disassembling the device further.

      crwdns2952109:0crwdne2952109:0

      crwdns2917038:0crwdne2917038:0

    2. How to replace the Nintendo 2DS charging port, Unscrew Motherboard: crwdns2935265:08crwdnd2935265:01crwdnd2935265:01crwdne2935265:0
      • Remove the 12 brass-colored Phillips screws securing the main board.

      • Be very careful not to strip any of these screws. Stripping can occur very easily, and may make replacement of the motherboard impossible.

      • The circle pad has disappeared in this picture. Don't worry, we'll deal with that in the next step

      crwdns2952109:0crwdne2952109:0

      crwdns2917038:0crwdne2917038:0

    3. How to replace the Nintendo 2DS charging port, Remove Top Panel: crwdns2935265:09crwdnd2935265:01crwdnd2935265:03crwdne2935265:0 How to replace the Nintendo 2DS charging port, Remove Top Panel: crwdns2935265:09crwdnd2935265:02crwdnd2935265:03crwdne2935265:0 How to replace the Nintendo 2DS charging port, Remove Top Panel: crwdns2935265:09crwdnd2935265:03crwdnd2935265:03crwdne2935265:0
      • The top panel can only be removed when the mother board is not secured.

      • There are two additional screws located on the top rail. Remove these to fully remove the buttons and top rail.

      • There are two screws holding down the joystick base that must be removed. (Be careful of the ribbon cable—it stays connected!)

      • Hold the top panel with your fingers and pull away from the device to remove it.

      • The top panel should come off easily, with very little force applied.

      crwdns2952109:0crwdne2952109:0

      crwdns2917038:0crwdne2917038:0

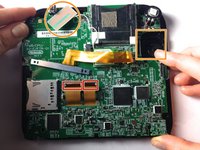
    4. How to replace the Nintendo 2DS charging port, Remove Motherboard: crwdns2935265:010crwdnd2935265:01crwdnd2935265:02crwdne2935265:0 How to replace the Nintendo 2DS charging port, Remove Motherboard: crwdns2935265:010crwdnd2935265:02crwdnd2935265:02crwdne2935265:0
      • Detach the 2 ribbon cables by lifting the black flip connectors that hold them.

      • Lift out the rectangular board seated in the face and lift out the white square which is the joystick motor (takes a little effort). Both stay attached to the motherboard.

      • On some models, you'll need to remove three more tiny ribbon cables at the bottom of the screen. They are secured by flip up connectors. BE GENTLE!

      • Holding the motherboard on either side, lift to remove it.

      crwdns2952109:0crwdne2952109:0

      crwdns2917038:0crwdne2917038:0

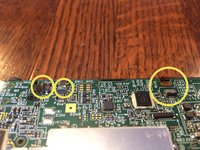
    1. How to replace the Nintendo 2DS charging port, Charging Port: crwdns2935265:011crwdnd2935265:01crwdnd2935265:02crwdne2935265:0 How to replace the Nintendo 2DS charging port, Charging Port: crwdns2935265:011crwdnd2935265:02crwdnd2935265:02crwdne2935265:0
      • Desolder and remove the charging port

      • Don't try to force the port off the board. If it's not coming off, the solder isn't fully melted

      crwdns2952109:0crwdne2952109:0

      crwdns2917038:0crwdne2917038:0

    2. How to replace the Nintendo 2DS charging port: crwdns2935265:012crwdnd2935265:01crwdnd2935265:01crwdne2935265:0
      • Set the new port in the board, then solder it in place

      crwdns2952109:0crwdne2952109:0

      crwdns2917038:0crwdne2917038:0

crwdns2915888:0crwdne2915888:0

To reassemble your device, follow these instructions in reverse order, starting at step 10

crwdns2935221:0crwdne2935221:0

crwdns2935229:05crwdne2935229:0

Nick Myers

crwdns2935283:004/15/18crwdne2935283:0

5,917 crwdns2915208:0crwdne2915208:0

crwdns2935297:033crwdne2935297:0

crwdns2947412:00crwdne2947412:0

crwdns2917038:0crwdne2917038:0

crwdns2936625:0crwdne2936625:0:

crwdns2936751:024crwdne2936751:0 13

crwdns2936753:07crwdne2936753:0 54

crwdns2936753:030crwdne2936753:0 262

crwdns2942667:0crwdne2942667:0 13,839