crwdns2933423:0crwdne2933423:0

How to fix Logitech M171 Mouse Laser

  1. How to fix Logitech M171 Mouse Laser, Remove the plastic cover: crwdns2935265:01crwdnd2935265:01crwdnd2935265:01crwdne2935265:0
    • Remove the plastic cover at the bottom of the mouse

  2. How to fix Logitech M171 Mouse Laser, Remove the battery and wireless key: crwdns2935265:02crwdnd2935265:01crwdnd2935265:01crwdne2935265:0
    • Remove the battery and wireless key

  3. How to fix Logitech M171 Mouse Laser, Removing the front cover: crwdns2935265:03crwdnd2935265:01crwdnd2935265:02crwdne2935265:0 How to fix Logitech M171 Mouse Laser, Removing the front cover: crwdns2935265:03crwdnd2935265:02crwdnd2935265:02crwdne2935265:0
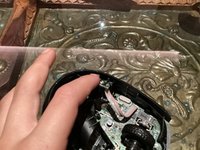
    • Remove the front cover as show

    Do not do this! There are three clips under the mouse, you just need to move them gently out of the way. Two are available when the battery cover is removed, the third is accessible after you remove the battery.

    Sid R - crwdns2934203:0crwdne2934203:0

  4. How to fix Logitech M171 Mouse Laser, Removing the sensor: crwdns2935265:04crwdnd2935265:01crwdnd2935265:01crwdne2935265:0
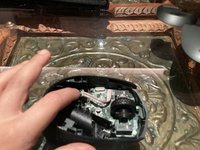
    • Pull on the sensor to remove it

  5. How to fix Logitech M171 Mouse Laser, Clean the sensor: crwdns2935265:05crwdnd2935265:01crwdnd2935265:02crwdne2935265:0 How to fix Logitech M171 Mouse Laser, Clean the sensor: crwdns2935265:05crwdnd2935265:02crwdnd2935265:02crwdne2935265:0
    • Clean the sensor with an tissue soaked in alcohol

  6. How to fix Logitech M171 Mouse Laser, Reassembly insert sensor: crwdns2935265:06crwdnd2935265:01crwdnd2935265:02crwdne2935265:0 How to fix Logitech M171 Mouse Laser, Reassembly insert sensor: crwdns2935265:06crwdnd2935265:02crwdnd2935265:02crwdne2935265:0
    • Insert sensor as shown

  7. How to fix Logitech M171 Mouse Laser: crwdns2935265:07crwdnd2935265:01crwdnd2935265:02crwdne2935265:0 How to fix Logitech M171 Mouse Laser: crwdns2935265:07crwdnd2935265:02crwdnd2935265:02crwdne2935265:0
    • Install the front plate put the front plate down on the mouse and push Down until it clips in

    • Install battery and USB key and back cover and you’re done

crwdns2915888:0crwdne2915888:0

You’re done Thanks for completing the guide

crwdns2935229:02crwdne2935229:0

Maimlian

crwdns2935283:001/27/22crwdne2935283:0

504 crwdns2915208:0crwdne2915208:0

crwdns2935297:02crwdne2935297:0

crwdns2915084:0crwdne2915084:0

Kid fixers crwdns2935289:0Kid fixerscrwdne2935289:0

Community

crwdns2931471:0188crwdne2931471:0

crwdns2935297:0273crwdne2935297:0

crwdns2947412:03crwdne2947412:0

Frying the darker plastic cover open without damaging it is near impossible. I have a problem with my mouse wheel and I don't know how to lubricate it or fix the sensor. Can someone help with that?

Efe Şimşek - crwdns2934203:0crwdne2934203:0

These are bad instructions, the top is released with 3 clips accessible under the battery cover, prising it off from above will break those clips. It can be hard to work out where the clips are and how to release them, but there are 3 one on each side and on under the battery. Aside from that the only other retention is a couple of hooks on the mouse buttons.

Gordon Wrigley - crwdns2934203:0crwdne2934203:0

Agree that prizing the top off like this is going to damage it! Maybe my mouse, being blue on top, and black on bottom made this easier to spot, but it was very easy for me to see the three clips on the bottom. Hopefully anyone who wants to open theirs will see your comment and not use the opening tool like this.

Sid R -

crwdns2917038:0crwdne2917038:0

crwdns2936625:0crwdne2936625:0:

crwdns2936751:024crwdne2936751:0 5

crwdns2936753:07crwdne2936753:0 27

crwdns2936753:030crwdne2936753:0 139

crwdns2942667:0crwdne2942667:0 4,976