crwdns2933423:0crwdne2933423:0

How to check Black and Decker 3-Cup Rice Cooker continuity

crwdns2942213:0crwdne2942213:0

  1. How to check Black and Decker 3-Cup Rice Cooker continuity, Remove the Lid and Bowl: crwdns2935265:01crwdnd2935265:01crwdnd2935265:01crwdne2935265:0
    • Make sure the device is unplugged before beginning disassembly!

    • Lift the lid and bowl from the top of the device.

  2. How to check Black and Decker 3-Cup Rice Cooker continuity, Turn the Device Upside-Down: crwdns2935265:02crwdnd2935265:01crwdnd2935265:01crwdne2935265:0
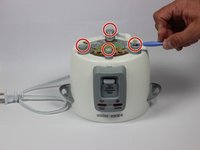
    • Turn the device upside-down, so that the four legs of the device point upwards.

  3. How to check Black and Decker 3-Cup Rice Cooker continuity, Remove the Rubber Cushions: crwdns2935265:03crwdnd2935265:01crwdnd2935265:02crwdne2935265:0 How to check Black and Decker 3-Cup Rice Cooker continuity, Remove the Rubber Cushions: crwdns2935265:03crwdnd2935265:02crwdnd2935265:02crwdne2935265:0
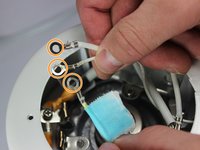
    • Each of the four legs has a rubber cushion on its bottom. For each cushion, insert a plastic opening tool between the plastic leg and rubber cushion, and pry off the rubber cushion.

  4. How to check Black and Decker 3-Cup Rice Cooker continuity, Remove the Spanning Screw: crwdns2935265:04crwdnd2935265:01crwdnd2935265:01crwdne2935265:0
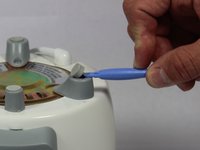
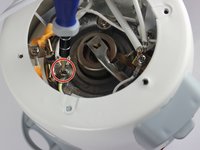
    • Using a spanner screwdriver, remove the one 10mm long 7mm diameter spanner screw from the side of the brass panel.

  5. How to check Black and Decker 3-Cup Rice Cooker continuity, Remove the Leg Screws: crwdns2935265:05crwdnd2935265:01crwdnd2935265:01crwdne2935265:0
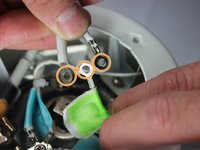
    • Using a Phillips screwdriver, remove the 10mm long 7mm diameter Phillips-head screws from the inside of all four legs.

    • The smaller leg at the bottom is now loose and not attached to the device. Set it aside.

  6. How to check Black and Decker 3-Cup Rice Cooker continuity, Remove the Brass Plate: crwdns2935265:06crwdnd2935265:01crwdnd2935265:01crwdne2935265:0
    • Lift the brass plate off the device and set it aside.

  7. How to check Black and Decker 3-Cup Rice Cooker continuity, Color the Wires: crwdns2935265:07crwdnd2935265:01crwdnd2935265:02crwdne2935265:0 How to check Black and Decker 3-Cup Rice Cooker continuity, Color the Wires: crwdns2935265:07crwdnd2935265:02crwdnd2935265:02crwdne2935265:0
    • Color coordinating wire groups make it easier to identify the wire groups during reassembly.

    • Inside the device, there are three junctions with wires joined by Phillips-head screws. The first is connected to two wires, and the other two are connected to three wires each.

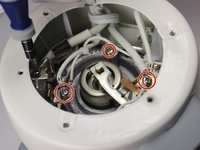
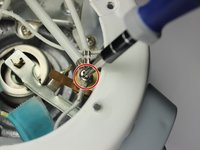
    • Unscrew the screw at the junction near the opposite side of the device from the front panel.

    • Label each of the two wires at this junction with a single color of tape.

  8. How to check Black and Decker 3-Cup Rice Cooker continuity, Label the Second Wire Junction: crwdns2935265:08crwdnd2935265:01crwdnd2935265:02crwdne2935265:0 How to check Black and Decker 3-Cup Rice Cooker continuity, Label the Second Wire Junction: crwdns2935265:08crwdnd2935265:02crwdnd2935265:02crwdne2935265:0
    • Unscrew the screw at the junction just clockwise from the button panel.

    • Label the three wires of this junction with tape of a second color.

  9. How to check Black and Decker 3-Cup Rice Cooker continuity, Label the Third Wire Junction: crwdns2935265:09crwdnd2935265:01crwdnd2935265:02crwdne2935265:0 How to check Black and Decker 3-Cup Rice Cooker continuity, Label the Third Wire Junction: crwdns2935265:09crwdnd2935265:02crwdnd2935265:02crwdne2935265:0
    • Unscrew the screw from the wire junction just behind the front panel.

    • Label the three wires at this junction with a third color of tape.

  10. How to check Black and Decker 3-Cup Rice Cooker continuity, Plug the Device into an Outlet: crwdns2935265:010crwdnd2935265:01crwdnd2935265:01crwdne2935265:0
    • During these steps, DO NOT touch the wires directly. You may be electrocuted.

    • Plug the device's power cord into a functioning outlet.

  11. How to check Black and Decker 3-Cup Rice Cooker continuity, Check the Voltage between the Wires: crwdns2935265:011crwdnd2935265:01crwdnd2935265:01crwdne2935265:0
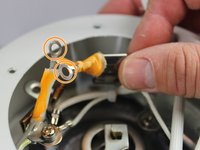
    • Locate the two wires which are connected directly to the power cord. Unlike the other wires, they are sheathed in a particularly thick, dot-textured plastic.

    • Make sure the voltmeter is on and set to a setting beween 120 and 500V. For most voltmeters the proper setting for this is the 200V setting.

    • Attach one of the voltmeter's probes to the metal portions of each of the two wires connected to the power cord's end on the device

    • The voltmeter should read a number significantly above 20V. A reading between 100 and 150 V indicates that the device is getting enough power. A lower number indicates the power cord is broken.

crwdns2915888:0crwdne2915888:0

This guide alters no parts of the device, so no reassembly is needed from these steps.

Lillian Heng

crwdns2935283:009/26/14crwdne2935283:0

679 crwdns2915208:0crwdne2915208:0

crwdns2935297:04crwdne2935297:0

crwdns2915084:0crwdne2915084:0

Cal Poly, Team 12-1, Forte Fall 2014 crwdns2935289:0Cal Poly, Team 12-1, Forte Fall 2014crwdne2935289:0

CPSU-FORTE-F14S12G1

crwdns2931471:05crwdne2931471:0

crwdns2935297:07crwdne2935297:0

crwdns2944067:00crwdne2944067:0

crwdns2917038:0crwdne2917038:0

crwdns2936625:0crwdne2936625:0:

crwdns2936751:024crwdne2936751:0 1

crwdns2936753:07crwdne2936753:0 3

crwdns2936753:030crwdne2936753:0 6

crwdns2942667:0crwdne2942667:0 1,268