crwdns2915892:0crwdne2915892:0
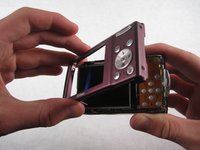
After removing the LCD screen, you will be prompted to remove screws and metal plates within the camera.
crwdns2942213:0crwdne2942213:0
-
-
Place thumb on the battery cover panel on the bottom of the device.
-
Slide the panel to the right away from the camera.
-
-
-
Slide the orange latch outward towards the corner of the camera.
-
The battery should pop out.
-
Remove the battery and reattach the cover.
-
-
-
After removing the battery, unscrew the four 3.10mm screws on the side opposite the buttons.
-
-
-
Unscrew the three 4.05mm screws on the bottom of the camera below the lens.
-
-
-
Unscrew the two 4.05mm screws on the side next to the buttons.
-
-
-
-
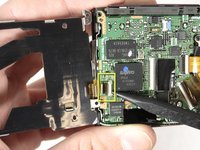
Gently wedge the flat end of the spudger between the back case and the wrist-strap mount.
-
Carefully pry the back case away from the camera and then gently lift it off.
-
-
-
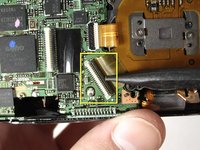
To remove the wide ribbon, gently pry the spudger underneath the black plastic latch where the ribbon connects and lift up. The ribbon should slide out easily.
-
Repeat the same process with the smaller ribbon, this time looking for a light blue latch.
-
-
-
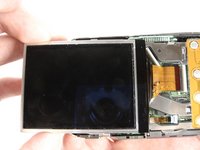
After removing the LCD screen, unscrew the four 3.8mm screws that hold down the metal plate
-
Unscrew the 2.5mm screw next to the wrist-strap mount.
-
-
-
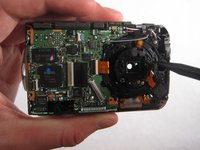
Position the camera with the lens facing down and the shutter button facing you.
-
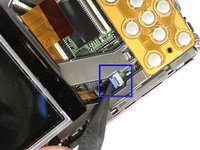
Lift the metal plate away from the camera without removing it fully. There is a ribbon attaching the edge of the plate to the camera.
-
Carefully pry the spudger under the black latch and lift gently upward. The ribbon will slide out easily.
-
With the ribbon unlatched, the entire metal plate should now be detached.
-
-
-
Remove the two silver 3.1mm screws from the silver plate.
-
-
-
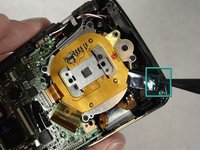
Pry the spudger under the black latch and lift gently. The ribbon will release easily.
-
Slide the tip of the spudger inside the loop of tape and pry upward while removing the yellow plate with your other hand.
-
-
-
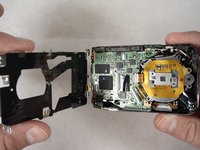
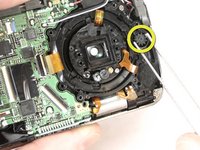
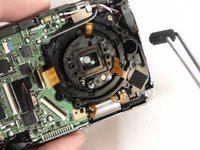
Remove all six 3.5mm screws from the silver plate.
-
Lift up on the silver plate to remove.
-
Note: When reassembling, pay careful attention to the circled screw locations.
-
-
crwdns2935267:0crwdne2935267:0Tweezers$4.99
-
Using tweezers, remove the cylindrical gear from the camera.
-
-
-
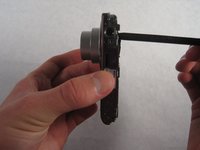
Place the spudger on the outermost surface of the lens and push in. This will extend your camera lens.
-


To reassemble your device, follow these instructions in reverse order, paying careful attention to the locations of the different screws.
To reassemble your device, follow these instructions in reverse order, paying careful attention to the locations of the different screws.
crwdns2935221:0crwdne2935221:0
crwdns2935229:011crwdne2935229:0
crwdns2915084:0crwdne2915084:0

Cal Poly, Team 5-17, Amido Winter 2011 crwdns2935289:0Cal Poly, Team 5-17, Amido Winter 2011crwdne2935289:0
CPSU-AMIDO-W11S5G17
crwdns2931471:06crwdne2931471:0
crwdns2935297:012crwdne2935297:0
crwdns2947412:09crwdne2947412:0
i read all info but too scared to try it . is there a camera repair store near mt. home ar. ? thank you
my lens are jammed open
wd 40 helps
spray it on the jamed lens
and it will open and close
I forgot my login information on the old account used to write the guide but:
Do NOT use wd 40 on the jammed lens cap. Getting any of it on the lens itself can severely harm the optics and essentially ruin the camera.
John -
What do you do when you push the lens out?