crwdns2933423:0crwdne2933423:0

How to Replace KBD67 Lite R3 Keyboard Switch Spring

crwdns2942213:0crwdne2942213:0

  1. How to Replace KBD67 Lite R3 Keyboard Switch Spring, Switch Spring: crwdns2935265:01crwdnd2935265:01crwdnd2935265:02crwdne2935265:0 How to Replace KBD67 Lite R3 Keyboard Switch Spring, Switch Spring: crwdns2935265:01crwdnd2935265:02crwdnd2935265:02crwdne2935265:0
    • Align the keycap puller to the keycap.

    • Gently pull vertically on the keycap to remove it, exposing the key switch.

  2. How to Replace KBD67 Lite R3 Keyboard Switch Spring: crwdns2935265:02crwdnd2935265:01crwdnd2935265:03crwdne2935265:0 How to Replace KBD67 Lite R3 Keyboard Switch Spring: crwdns2935265:02crwdnd2935265:02crwdnd2935265:03crwdne2935265:0 How to Replace KBD67 Lite R3 Keyboard Switch Spring: crwdns2935265:02crwdnd2935265:03crwdnd2935265:03crwdne2935265:0
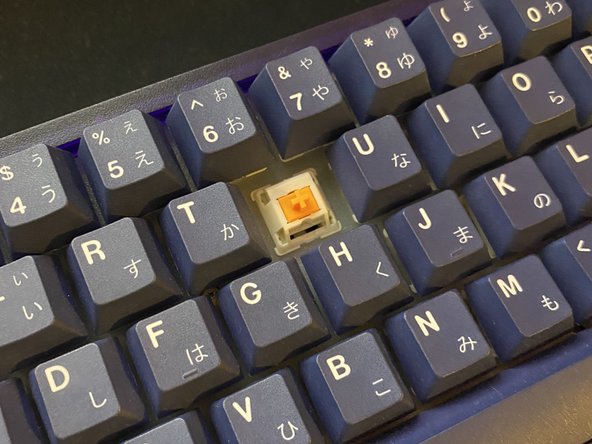
    • Align the key switch puller with the key switch that you're removing.

    • Pull the key switch out of the keyboard.

  3. How to Replace KBD67 Lite R3 Keyboard Switch Spring: crwdns2935265:03crwdnd2935265:01crwdnd2935265:03crwdne2935265:0 How to Replace KBD67 Lite R3 Keyboard Switch Spring: crwdns2935265:03crwdnd2935265:02crwdnd2935265:03crwdne2935265:0 How to Replace KBD67 Lite R3 Keyboard Switch Spring: crwdns2935265:03crwdnd2935265:03crwdnd2935265:03crwdne2935265:0
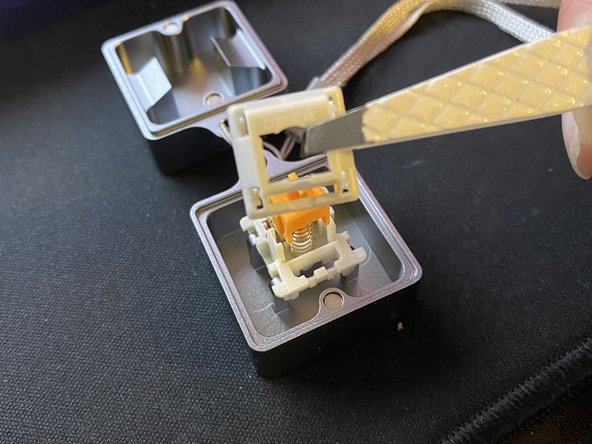
    • Locate the side of the switch that has latches.

    • Place the side of the switch with latches on top of the key switch opener legs.

    • Apply gentle force pushing the switch down on the switch opener to open up the switch.

  4. How to Replace KBD67 Lite R3 Keyboard Switch Spring: crwdns2935265:04crwdnd2935265:01crwdnd2935265:02crwdne2935265:0 How to Replace KBD67 Lite R3 Keyboard Switch Spring: crwdns2935265:04crwdnd2935265:02crwdnd2935265:02crwdne2935265:0
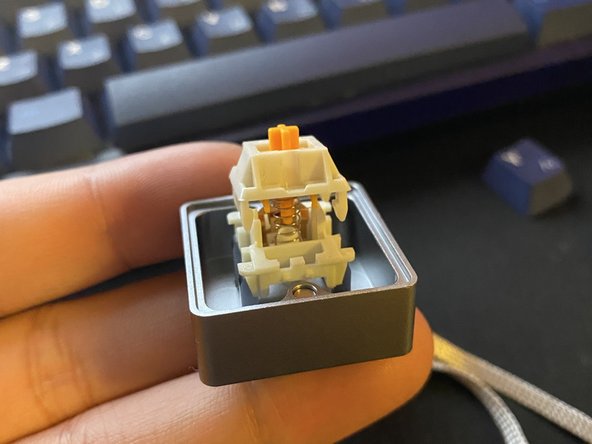
    • Remove the top housing and stem to reveal the switch spring.

    • Remove the switch spring and proceed to replace it with another spring of your choice.

  5. How to Replace KBD67 Lite R3 Keyboard Switch Spring: crwdns2935265:05crwdnd2935265:01crwdnd2935265:03crwdne2935265:0 How to Replace KBD67 Lite R3 Keyboard Switch Spring: crwdns2935265:05crwdnd2935265:02crwdnd2935265:03crwdne2935265:0 How to Replace KBD67 Lite R3 Keyboard Switch Spring: crwdns2935265:05crwdnd2935265:03crwdnd2935265:03crwdne2935265:0
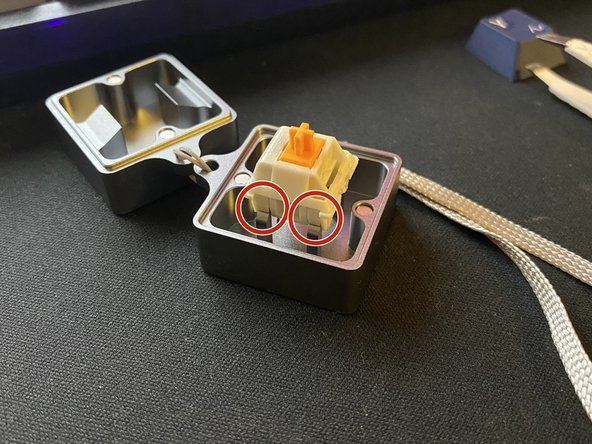
    • Locate the side of the switch that has legs, then place the switch on top of the spring. with the legs facing the metal plate.

    • Push the top and bottom housing together to assemble the switch.

    • Do not do this on the switch opener. The switch opener was used for photography purposes.

  6. How to Replace KBD67 Lite R3 Keyboard Switch Spring: crwdns2935265:06crwdnd2935265:01crwdnd2935265:03crwdne2935265:0 How to Replace KBD67 Lite R3 Keyboard Switch Spring: crwdns2935265:06crwdnd2935265:02crwdnd2935265:03crwdne2935265:0 How to Replace KBD67 Lite R3 Keyboard Switch Spring: crwdns2935265:06crwdnd2935265:03crwdnd2935265:03crwdne2935265:0
    • Locate the switch pin holes on your keyboard.

    • Locate the pins on your key switch and line it up with the keyboard pin holes.

    • Apply gentle force pushing down until it clicks onto place.

  7. How to Replace KBD67 Lite R3 Keyboard Switch Spring: crwdns2935265:07crwdnd2935265:01crwdnd2935265:01crwdne2935265:0
    • Put the key cap back onto the switch.

    • Test the keyboard input and ensure that everything is functioning correctly.

crwdns2915888:0crwdne2915888:0

To reassemble your device, follow these instructions in reverse order.

Frank Loi

crwdns2935283:007/04/22crwdne2935283:0

145 crwdns2915208:0crwdne2915208:0

crwdns2935295:0crwdne2935295:0

crwdns2915084:0crwdne2915084:0

York University, Team M-14, Allen Summer 2022 crwdns2935289:0York University, Team M-14, Allen Summer 2022crwdne2935289:0

YORK-ALLEN-SU22SMG14

crwdns2934841:01crwdne2934841:0

crwdns2935297:02crwdne2935297:0

crwdns2917034:0crwdne2917034:0

Frank you did an amazing job on this one. I always wondered how to replace a keyboard key and finally you provided a perfect guide. Your introduction covers everything one needs to know including the parts required - thank you for the where to buy links. Talking about the guide it's clear and precise - all steps are documented well with those amazing parts focused pictures. Language is easy to read and understand. After reading your guide I feel more confident now to replace the key or the spring within.

Krushi Patel - crwdns2934203:0crwdne2934203:0

crwdns2917038:0crwdne2917038:0

crwdns2936625:0crwdne2936625:0:

crwdns2936751:024crwdne2936751:0 1

crwdns2936753:07crwdne2936753:0 9

crwdns2936753:030crwdne2936753:0 29

crwdns2942667:0crwdne2942667:0 782