crwdns2933423:0crwdne2933423:0

How to Remove the Top Panel of Your Whirlpool WED87HED Dryer Prereq

crwdns2862623:0crwdne2862623:0
crwdns2942641:0crwdne2942641:0

crwdns2942213:0crwdne2942213:0

  1. How to Remove the Top Panel of Your Whirlpool WED87HED Dryer Prereq, Safety Precautions: crwdns2935265:01crwdnd2935265:01crwdnd2935265:01crwdne2935265:0
    • Before you begin your repair, unplug your dryer.

    • Your power cord may have four prongs rather than three. The additional prong is a ground connection.

  2. How to Remove the Top Panel of Your Whirlpool WED87HED Dryer Prereq, Unfasten the top panel: crwdns2935265:02crwdnd2935265:01crwdnd2935265:03crwdne2935265:0 How to Remove the Top Panel of Your Whirlpool WED87HED Dryer Prereq, Unfasten the top panel: crwdns2935265:02crwdnd2935265:02crwdnd2935265:03crwdne2935265:0 How to Remove the Top Panel of Your Whirlpool WED87HED Dryer Prereq, Unfasten the top panel: crwdns2935265:02crwdnd2935265:03crwdnd2935265:03crwdne2935265:0
    crwdns2935267:0crwdne2935267:0
    FixMat
    $36.95
    • Throughout this guide, keep track of each screw and reinstall it exactly where it came from.

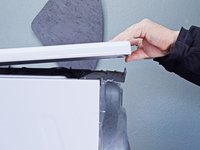
    • Use a 5/16 inch nut driver to remove the two 15.7 mm-long screws securing the top panel to the rear panel bracket.

  3. How to Remove the Top Panel of Your Whirlpool WED87HED Dryer Prereq, Remove the top panel: crwdns2935265:03crwdnd2935265:01crwdnd2935265:02crwdne2935265:0 How to Remove the Top Panel of Your Whirlpool WED87HED Dryer Prereq, Remove the top panel: crwdns2935265:03crwdnd2935265:02crwdnd2935265:02crwdne2935265:0
    • Grasp the top and slide it 1/2 to 1 inch toward the rear of the machine.

  4. How to Remove the Top Panel of Your Whirlpool WED87HED Dryer Prereq: crwdns2935265:04crwdnd2935265:01crwdnd2935265:02crwdne2935265:0 How to Remove the Top Panel of Your Whirlpool WED87HED Dryer Prereq: crwdns2935265:04crwdnd2935265:02crwdnd2935265:02crwdne2935265:0
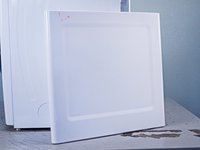
    • Lift the top panel upward to separate it from the chassis.

    • Remove the top panel from the machine.

crwdns2915888:0crwdne2915888:0

To reassemble your device, follow these instructions in reverse order.

Bill Gilbert

crwdns2935283:006/30/22crwdne2935283:0

37,485 crwdns2915208:0crwdne2915208:0

crwdns2935297:0261crwdne2935297:0

crwdns2915084:0crwdne2915084:0

iFixit crwdns2935289:0iFixitcrwdne2935289:0

Staff

crwdns2931471:0121crwdne2931471:0

crwdns2935297:019,839crwdne2935297:0

crwdns2947412:00crwdne2947412:0

crwdns2917038:0crwdne2917038:0

crwdns2936625:0crwdne2936625:0:

crwdns2936751:024crwdne2936751:0 0

crwdns2936753:07crwdne2936753:0 0

crwdns2936753:030crwdne2936753:0 11

crwdns2942667:0crwdne2942667:0 82