crwdns2933423:0crwdne2933423:0

How to Remove the Front Bulkhead of Your Whirlpool Dryer

crwdns2862623:0crwdne2862623:0
crwdns2942641:0crwdne2942641:0

crwdns2942213:0crwdne2942213:0

  1. How to Remove the Front Bulkhead of Your Whirlpool Dryer, Disconnect the main board: crwdns2935265:01crwdnd2935265:01crwdnd2935265:03crwdne2935265:0 How to Remove the Front Bulkhead of Your Whirlpool Dryer, Disconnect the main board: crwdns2935265:01crwdnd2935265:02crwdnd2935265:03crwdne2935265:0 How to Remove the Front Bulkhead of Your Whirlpool Dryer, Disconnect the main board: crwdns2935265:01crwdnd2935265:03crwdnd2935265:03crwdne2935265:0
    • Label, photograph or make a sketch of the connector locations and of the main board bracket position on your machine.

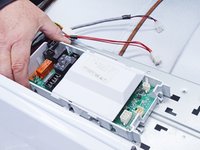
    • Disconnect all of the connectors on the main board front half.

  2. How to Remove the Front Bulkhead of Your Whirlpool Dryer: crwdns2935265:02crwdnd2935265:01crwdnd2935265:03crwdne2935265:0 How to Remove the Front Bulkhead of Your Whirlpool Dryer: crwdns2935265:02crwdnd2935265:02crwdnd2935265:03crwdne2935265:0 How to Remove the Front Bulkhead of Your Whirlpool Dryer: crwdns2935265:02crwdnd2935265:03crwdnd2935265:03crwdne2935265:0
    • Label, photograph or make a sketch of the connector locations and of the main board bracket position on your machine.

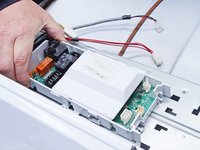
    • Disconnect all the connectors from the rear half of the main board.

  3. How to Remove the Front Bulkhead of Your Whirlpool Dryer, Unfasten the main board from the main board bracket: crwdns2935265:03crwdnd2935265:01crwdnd2935265:01crwdne2935265:0
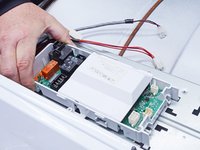
    • Remove the sheet metal screw that retains the main board to the main board bracket.

  4. How to Remove the Front Bulkhead of Your Whirlpool Dryer, Separate the main board from the main board bracket: crwdns2935265:04crwdnd2935265:01crwdnd2935265:03crwdne2935265:0 How to Remove the Front Bulkhead of Your Whirlpool Dryer, Separate the main board from the main board bracket: crwdns2935265:04crwdnd2935265:02crwdnd2935265:03crwdne2935265:0 How to Remove the Front Bulkhead of Your Whirlpool Dryer, Separate the main board from the main board bracket: crwdns2935265:04crwdnd2935265:03crwdnd2935265:03crwdne2935265:0
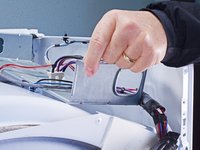
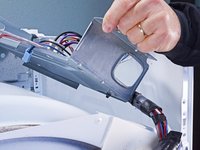
    • Lift the rear corner of the main board nearest to the side walls of the chassis.

    • You want to release the locking tab on the side of the main board.

    • Slide the main board toward the front of the dryer to release the tabs securing it to the main board bracket.

  5. How to Remove the Front Bulkhead of Your Whirlpool Dryer, Remove the main board: crwdns2935265:05crwdnd2935265:01crwdnd2935265:01crwdne2935265:0
    • Remove the main board from the main board bracket.

  6. How to Remove the Front Bulkhead of Your Whirlpool Dryer, Remove the main board bracket: crwdns2935265:06crwdnd2935265:01crwdnd2935265:01crwdne2935265:0
    • Remove the sheet metal screw holding the main board bracket.

  7. How to Remove the Front Bulkhead of Your Whirlpool Dryer, Remove the wiring harness from the main board bracket: crwdns2935265:07crwdnd2935265:01crwdnd2935265:03crwdne2935265:0 How to Remove the Front Bulkhead of Your Whirlpool Dryer, Remove the wiring harness from the main board bracket: crwdns2935265:07crwdnd2935265:02crwdnd2935265:03crwdne2935265:0 How to Remove the Front Bulkhead of Your Whirlpool Dryer, Remove the wiring harness from the main board bracket: crwdns2935265:07crwdnd2935265:03crwdnd2935265:03crwdne2935265:0
    • Lift off the main board bracket from the chassis and turn it so the bottom is exposed.

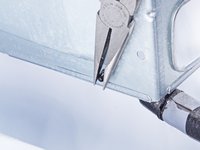
    • Using long nose or slip joint pliers, pinch the locking wings of the harness retainer clamp.

    • Separate the harness from the main board bracket and remove the main board bracket.

  8. How to Remove the Front Bulkhead of Your Whirlpool Dryer, Unfasten the upper front bulkhead: crwdns2935265:08crwdnd2935265:01crwdnd2935265:03crwdne2935265:0 How to Remove the Front Bulkhead of Your Whirlpool Dryer, Unfasten the upper front bulkhead: crwdns2935265:08crwdnd2935265:02crwdnd2935265:03crwdne2935265:0 How to Remove the Front Bulkhead of Your Whirlpool Dryer, Unfasten the upper front bulkhead: crwdns2935265:08crwdnd2935265:03crwdnd2935265:03crwdne2935265:0
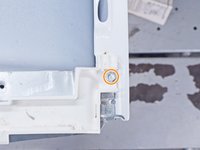
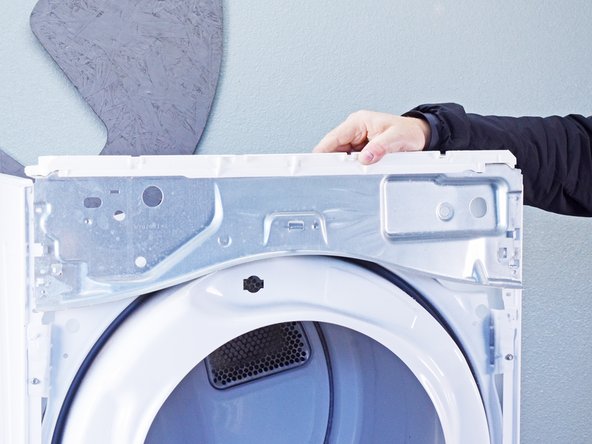
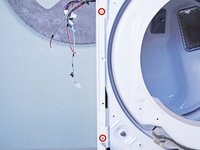
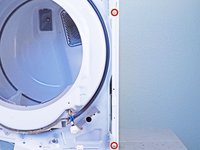
    • Remove the screws securing the upper front bulkhead to the front of the chassis.

    • Remove the sheet metal screws securing the top plastic portion to the upper front bulkhead.

  9. How to Remove the Front Bulkhead of Your Whirlpool Dryer, Remove the upper front bulkhead: crwdns2935265:09crwdnd2935265:01crwdnd2935265:03crwdne2935265:0 How to Remove the Front Bulkhead of Your Whirlpool Dryer, Remove the upper front bulkhead: crwdns2935265:09crwdnd2935265:02crwdnd2935265:03crwdne2935265:0 How to Remove the Front Bulkhead of Your Whirlpool Dryer, Remove the upper front bulkhead: crwdns2935265:09crwdnd2935265:03crwdnd2935265:03crwdne2935265:0
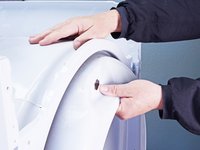
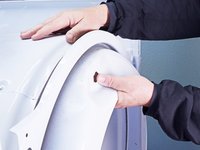
    • Remove the upper front bulkhead and set it aside.

  10. How to Remove the Front Bulkhead of Your Whirlpool Dryer, Release the belt tension: crwdns2935265:010crwdnd2935265:01crwdnd2935265:03crwdne2935265:0 How to Remove the Front Bulkhead of Your Whirlpool Dryer, Release the belt tension: crwdns2935265:010crwdnd2935265:02crwdnd2935265:03crwdne2935265:0 How to Remove the Front Bulkhead of Your Whirlpool Dryer, Release the belt tension: crwdns2935265:010crwdnd2935265:03crwdnd2935265:03crwdne2935265:0
    • Take careful note of the belt path before proceeding.

    • Be careful during this procedure! The idler arm is under spring tension and may pinch you, or it could damage the belt switch if the arm is allowed to snap down.

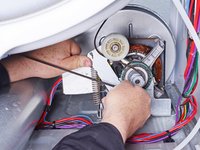
    • Push the idler arm (the metal upside-down "L") up to relieve the tension on the drive belt.

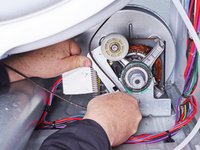
    • Remove the belt from the motor pulley.

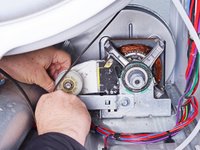
    • Gently lower the idler arm until it rests parallel to the dryer floor.

    • During reassembly, refer to your notes or the belt path link to rethread the drive belt.

  11. How to Remove the Front Bulkhead of Your Whirlpool Dryer, Unfasten the lower front bulkhead: crwdns2935265:011crwdnd2935265:01crwdnd2935265:02crwdne2935265:0 How to Remove the Front Bulkhead of Your Whirlpool Dryer, Unfasten the lower front bulkhead: crwdns2935265:011crwdnd2935265:02crwdnd2935265:02crwdne2935265:0
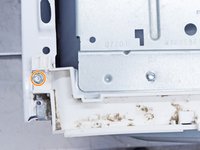
    • Remove the screws securing the lower front bulkhead.

  12. How to Remove the Front Bulkhead of Your Whirlpool Dryer, Remove the lower front bulkhead: crwdns2935265:012crwdnd2935265:01crwdnd2935265:03crwdne2935265:0 How to Remove the Front Bulkhead of Your Whirlpool Dryer, Remove the lower front bulkhead: crwdns2935265:012crwdnd2935265:02crwdnd2935265:03crwdne2935265:0 How to Remove the Front Bulkhead of Your Whirlpool Dryer, Remove the lower front bulkhead: crwdns2935265:012crwdnd2935265:03crwdnd2935265:03crwdne2935265:0
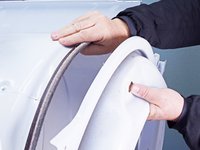
    • While supporting the drum, lift the lower front bulkhead off of the hooks on the chassis.

  13. How to Remove the Front Bulkhead of Your Whirlpool Dryer: crwdns2935265:013crwdnd2935265:01crwdnd2935265:03crwdne2935265:0 How to Remove the Front Bulkhead of Your Whirlpool Dryer: crwdns2935265:013crwdnd2935265:02crwdnd2935265:03crwdne2935265:0 How to Remove the Front Bulkhead of Your Whirlpool Dryer: crwdns2935265:013crwdnd2935265:03crwdnd2935265:03crwdne2935265:0
    • Lower the bulkhead about 2 inches to free the drum rollers tucked under the drum.

    • While supporting the drum, remove the lower front bulkhead.

    • During reassembly, tilt the bulkhead to the right to get the rollers under the lip on the front of the drum. Once the drum is on the rollers, you can move the bulkhead to the upright position.

crwdns2915888:0crwdne2915888:0

To reassemble your device, follow these instructions in reverse order.

Repair didn’t go as planned? Ask our Answers community for help.

Bill Gilbert

crwdns2935283:006/30/22crwdne2935283:0

37,485 crwdns2915208:0crwdne2915208:0

crwdns2935297:0261crwdne2935297:0

crwdns2915084:0crwdne2915084:0

iFixit crwdns2935289:0iFixitcrwdne2935289:0

Staff

crwdns2931471:0121crwdne2931471:0

crwdns2935297:019,806crwdne2935297:0

crwdns2947412:00crwdne2947412:0

crwdns2917038:0crwdne2917038:0

crwdns2936625:0crwdne2936625:0:

crwdns2936751:024crwdne2936751:0 0

crwdns2936753:07crwdne2936753:0 1

crwdns2936753:030crwdne2936753:0 14

crwdns2942667:0crwdne2942667:0 27