crwdns2933423:0crwdne2933423:0
crwdns2947577:0crwdnd2947577:0crwdne2947577:0

How to Reinstall the iFixit Digital Multimeter Outer Cover

    1. How to Reinstall the iFixit Digital Multimeter Outer Cover, Install the outer cover: crwdns2935265:01crwdnd2935265:01crwdnd2935265:02crwdne2935265:0 How to Reinstall the iFixit Digital Multimeter Outer Cover, Install the outer cover: crwdns2935265:01crwdnd2935265:02crwdnd2935265:02crwdne2935265:0
      • Firmly push the top edge of the multimeter into the cover's top cutout.

      • Try to get the top edge well aligned and seated. This will give you enough room to pull the cover's bottom edge in place.

      crwdns2952109:0crwdne2952109:0

      crwdns2917038:0crwdne2917038:0

    2. How to Reinstall the iFixit Digital Multimeter Outer Cover: crwdns2935265:02crwdnd2935265:01crwdnd2935265:03crwdne2935265:0 How to Reinstall the iFixit Digital Multimeter Outer Cover: crwdns2935265:02crwdnd2935265:02crwdnd2935265:03crwdne2935265:0 How to Reinstall the iFixit Digital Multimeter Outer Cover: crwdns2935265:02crwdnd2935265:03crwdnd2935265:03crwdne2935265:0
      • Flip the multimeter over.

      • The cover has a lip that needs to seat into the groove around the multimeter's kickstand.

      • Align and press the cover lip into the groove above the kickstand.

      crwdns2952109:0crwdne2952109:0

      crwdns2917038:0crwdne2917038:0

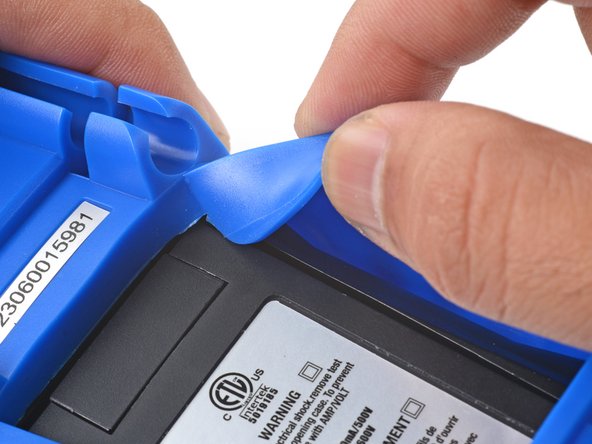
    3. How to Reinstall the iFixit Digital Multimeter Outer Cover: crwdns2935265:03crwdnd2935265:01crwdnd2935265:03crwdne2935265:0 How to Reinstall the iFixit Digital Multimeter Outer Cover: crwdns2935265:03crwdnd2935265:02crwdnd2935265:03crwdne2935265:0 How to Reinstall the iFixit Digital Multimeter Outer Cover: crwdns2935265:03crwdnd2935265:03crwdnd2935265:03crwdne2935265:0
      • Lift and tuck the cover lip into the groove near the top right corner of the kickstand.

      • Repeat the procedure for the top left corner of the kickstand.

      crwdns2952109:0crwdne2952109:0

      crwdns2917038:0crwdne2917038:0

    4. How to Reinstall the iFixit Digital Multimeter Outer Cover: crwdns2935265:04crwdnd2935265:01crwdnd2935265:02crwdne2935265:0 How to Reinstall the iFixit Digital Multimeter Outer Cover: crwdns2935265:04crwdnd2935265:02crwdnd2935265:02crwdne2935265:0
      • Guide and press the cover lip into the grooves along the sides of the kickstand.

      • Pull the cover over the bottom edge of the multimeter and press the bottom lip into the groove under the kickstand.

      • Carefully check to make sure the cover lip sits completely in the groove around the kickstand.

      crwdns2952109:0crwdne2952109:0

      crwdns2917038:0crwdne2917038:0

    5. How to Reinstall the iFixit Digital Multimeter Outer Cover: crwdns2935265:05crwdnd2935265:01crwdnd2935265:03crwdne2935265:0 How to Reinstall the iFixit Digital Multimeter Outer Cover: crwdns2935265:05crwdnd2935265:02crwdnd2935265:03crwdne2935265:0 How to Reinstall the iFixit Digital Multimeter Outer Cover: crwdns2935265:05crwdnd2935265:03crwdnd2935265:03crwdne2935265:0
      • Flip the multimeter over so that the front is facing up.

      • Squeeze the cover along the right edge to pop the cover lip into the groove along the side of the multimeter.

      • Repeat the process along the left edge of the multimeter.

      • Carefully check to make sure the cover is properly seated along the perimeter of the multimeter.

      crwdns2952109:0crwdne2952109:0

      crwdns2917038:0crwdne2917038:0

crwdns2915888:0crwdne2915888:0

For more information on how to use your iFixit multimeter, check out this page.

crwdns2935221:0crwdne2935221:0

Arthur Shi

crwdns2935283:001/03/18crwdne2935283:0

344,559 crwdns2915208:0crwdne2915208:0

crwdns2935297:0915crwdne2935297:0

crwdns2935287:0crwdne2935287:0

iFixit crwdns2935289:0iFixitcrwdne2935289:0

Staff

crwdns2931471:0123crwdne2931471:0

crwdns2935297:041,950crwdne2935297:0

crwdns2947412:00crwdne2947412:0

crwdns2917038:0crwdne2917038:0

crwdns2936625:0crwdne2936625:0:

crwdns2936751:024crwdne2936751:0 0

crwdns2936753:07crwdne2936753:0 6

crwdns2936753:030crwdne2936753:0 24

crwdns2942667:0crwdne2942667:0 209