crwdns2933423:0crwdne2933423:0

How to Clean an Electric Valve for Air Horns

crwdns2942213:0crwdne2942213:0

  1. How to Clean an Electric Valve for Air Horns, Rotate the valve to have easier access: crwdns2935265:01crwdnd2935265:01crwdnd2935265:02crwdne2935265:0 How to Clean an Electric Valve for Air Horns, Rotate the valve to have easier access: crwdns2935265:01crwdnd2935265:02crwdnd2935265:02crwdne2935265:0
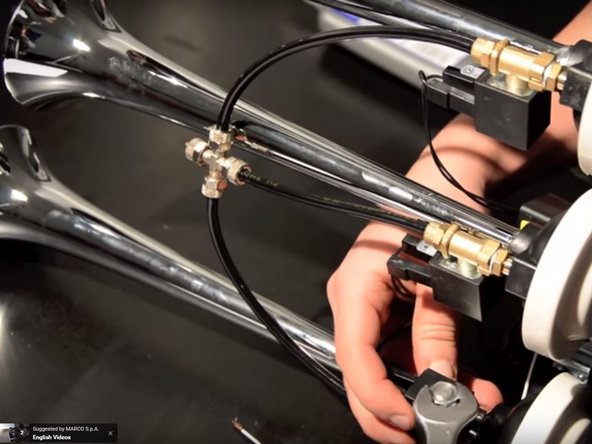
    • Use the socket wrench to rotate the valve.

  2. How to Clean an Electric Valve for Air Horns, Unscrew the fixing nut: crwdns2935265:02crwdnd2935265:01crwdnd2935265:03crwdne2935265:0 How to Clean an Electric Valve for Air Horns, Unscrew the fixing nut: crwdns2935265:02crwdnd2935265:02crwdnd2935265:03crwdne2935265:0 How to Clean an Electric Valve for Air Horns, Unscrew the fixing nut: crwdns2935265:02crwdnd2935265:03crwdnd2935265:03crwdne2935265:0
    • Unscrew the fixing nut using the wrench.

    • Don't lose the pieces: put them in order in a safe place. A good example is a white sheet of paper.

  3. How to Clean an Electric Valve for Air Horns, Unscrew the head of the valve: crwdns2935265:03crwdnd2935265:01crwdnd2935265:03crwdne2935265:0 How to Clean an Electric Valve for Air Horns, Unscrew the head of the valve: crwdns2935265:03crwdnd2935265:02crwdnd2935265:03crwdne2935265:0 How to Clean an Electric Valve for Air Horns, Unscrew the head of the valve: crwdns2935265:03crwdnd2935265:03crwdnd2935265:03crwdne2935265:0
    • Remove the solenoid (the black plastic box).

    • Carefully unscrew the head of the valve: it could be hard to remove due to the threadlocker.

    • Use the Rib Jonit plier and apply a counterclockwise rotation on it.

    • Finish the unscrewing by hand.

    • Don't lose the head: put it, again, in a safe place.

  4. How to Clean an Electric Valve for Air Horns, Remove piston and spring: crwdns2935265:04crwdnd2935265:01crwdnd2935265:02crwdne2935265:0 How to Clean an Electric Valve for Air Horns, Remove piston and spring: crwdns2935265:04crwdnd2935265:02crwdnd2935265:02crwdne2935265:0
    • Gently tilt the whole thing and the spring and piston should exit the valve.

    • Inspect them for cleanliness and put them in a safe place.

  5. How to Clean an Electric Valve for Air Horns, Use compressed air to clean the valve: crwdns2935265:05crwdnd2935265:01crwdnd2935265:02crwdne2935265:0 How to Clean an Electric Valve for Air Horns, Use compressed air to clean the valve: crwdns2935265:05crwdnd2935265:02crwdnd2935265:02crwdne2935265:0
    • Blow in the valve with compressed air to clean it

    • Blow on the piston and other pieces, if dirty, as well.

  6. How to Clean an Electric Valve for Air Horns, Reassemble the valve: crwdns2935265:06crwdnd2935265:01crwdnd2935265:02crwdne2935265:0 How to Clean an Electric Valve for Air Horns, Reassemble the valve: crwdns2935265:06crwdnd2935265:02crwdnd2935265:02crwdne2935265:0
    • Place the piston, first.

    • Then put the spring in the piston's hole.

  7. How to Clean an Electric Valve for Air Horns, Insert the head of the valve: crwdns2935265:07crwdnd2935265:01crwdnd2935265:03crwdne2935265:0 How to Clean an Electric Valve for Air Horns, Insert the head of the valve: crwdns2935265:07crwdnd2935265:02crwdnd2935265:03crwdne2935265:0 How to Clean an Electric Valve for Air Horns, Insert the head of the valve: crwdns2935265:07crwdnd2935265:03crwdnd2935265:03crwdne2935265:0
    • Put some threadlocker on the thread

    • Don't exceed: you may permanently damage the device!

    • Screw the head on the valve.

    • Use the plier to tighten valve's head: there's no need to tighten it too much.

  8. How to Clean an Electric Valve for Air Horns, Finish the job: crwdns2935265:08crwdnd2935265:01crwdnd2935265:03crwdne2935265:0 How to Clean an Electric Valve for Air Horns, Finish the job: crwdns2935265:08crwdnd2935265:02crwdnd2935265:03crwdne2935265:0 How to Clean an Electric Valve for Air Horns, Finish the job: crwdns2935265:08crwdnd2935265:03crwdnd2935265:03crwdne2935265:0
    • Insert the solenoid and put the washer on the top.

    • Finally, screw the nut with the wrench.

    • Set the valve back in place, using the wrench.

crwdns2915888:0crwdne2915888:0

Keep your valves checked, if you want them to last longer!

crwdns2935229:05crwdne2935229:0

Marco Spa

crwdns2935283:012/04/15crwdne2935283:0

1.501 crwdns2915208:0crwdne2915208:0

crwdns2935297:05crwdne2935297:0

crwdns2944067:00crwdne2944067:0

crwdns2917038:0crwdne2917038:0

crwdns2936625:0crwdne2936625:0:

crwdns2936751:024crwdne2936751:0 2

crwdns2936753:07crwdne2936753:0 9

crwdns2936753:030crwdne2936753:0 23

crwdns2942667:0crwdne2942667:0 3,213