crwdns2915892:0crwdne2915892:0
This method was developed as a low-cost alternative for waterproof pressure sensors, which can cost hundreds of dollars. This sensor is under $20, and is easy to assemble. We used the STMicroelectronics LPS33HW pressure sensor mounted on an MKI183V1 board.
crwdns2942213:0crwdne2942213:0
-
-
This is the pressure sensor that we will be using. It is a STEVAL-MKI183V1 board with a LPS33HW sensor. This board can use either SPI or I2C communications. The data sheets can be accessed here.
-
-
-
The factory pins must be removed and replaced with wire.
-
To do so, first cut along the red line in the photo using wire clipper to separate the pin from the board.
-
Next, clip vertically along the blue line to disconnect the pin from the one next to it.
-
-
crwdns2935267:0crwdne2935267:0Desoldering Pump$3.99
-
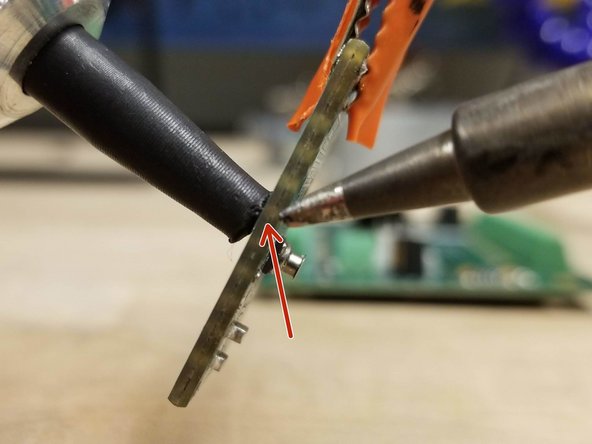
The through holes must be cleared of any leftover solder.
-
Place the hot iron on the side of the through hole with the most solder, and the desoldering pump on the other. Once the solder liquefies, press the trigger of the pump to clear the through hole.
-
-
-
-
Repeat steps 2 and 3 for all of the pins on the board.
-
-
-
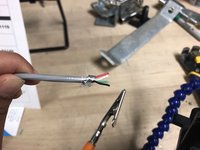
Use wire strippers to strip the coating of the 4-core shielded wire.
-
Place the wire in the wire stripper. To obtain desired length, align with second jaw or with the blue line in the image.
-
Clamp down to remove the wire coating, leaving the 4 wires remaining
-
Pull out the individual wires and repeat the process for each one, exposing the copper
-
-
-
A wire is necessary on the ground, SDA, SDO, SCK, CS, Vd and VdIO pins. These can be identified from the top of the board.
-
Insert the stripped section of the wire into the through hole, and solder into place.
-
Repeat for all seven wires. Electrical tape can cover any exposed shielding if needed.
-
-
-
Apply a layer of liquid electrical tape to the board (a coffee stir stick is a good applicator).
-
After every layer, wait at least ten minutes before applying another one. Very carefully visually inspect to ensure total coverage.
-
-
-
Wire a breadboard as shown in the picture to connect the particle photon to the sensor
-
Important connections: GND is connected to negative rail and GND for sensor. The 3V3 is connected to the positive rail and the Vd, VdIO pins on sensor. A5 is connected to SDA, A4 is connected to SDO, A3 is connected to SCK and A2 is connected to CS.
-
Place in a cup of water and monitor outputs to ensure that a water tight seal was achieved!
-


If you would like to undo your work, simply peel off the liquid electrical tape (this may be easier with a knife or other sharp edge). Then you are free to alter any of the connections.
If you would like to undo your work, simply peel off the liquid electrical tape (this may be easier with a knife or other sharp edge). Then you are free to alter any of the connections.
crwdns2935221:0crwdne2935221:0
crwdns2935227:0crwdne2935227:0